From your first tenant to autopay — find answers fast or talk to a real person.
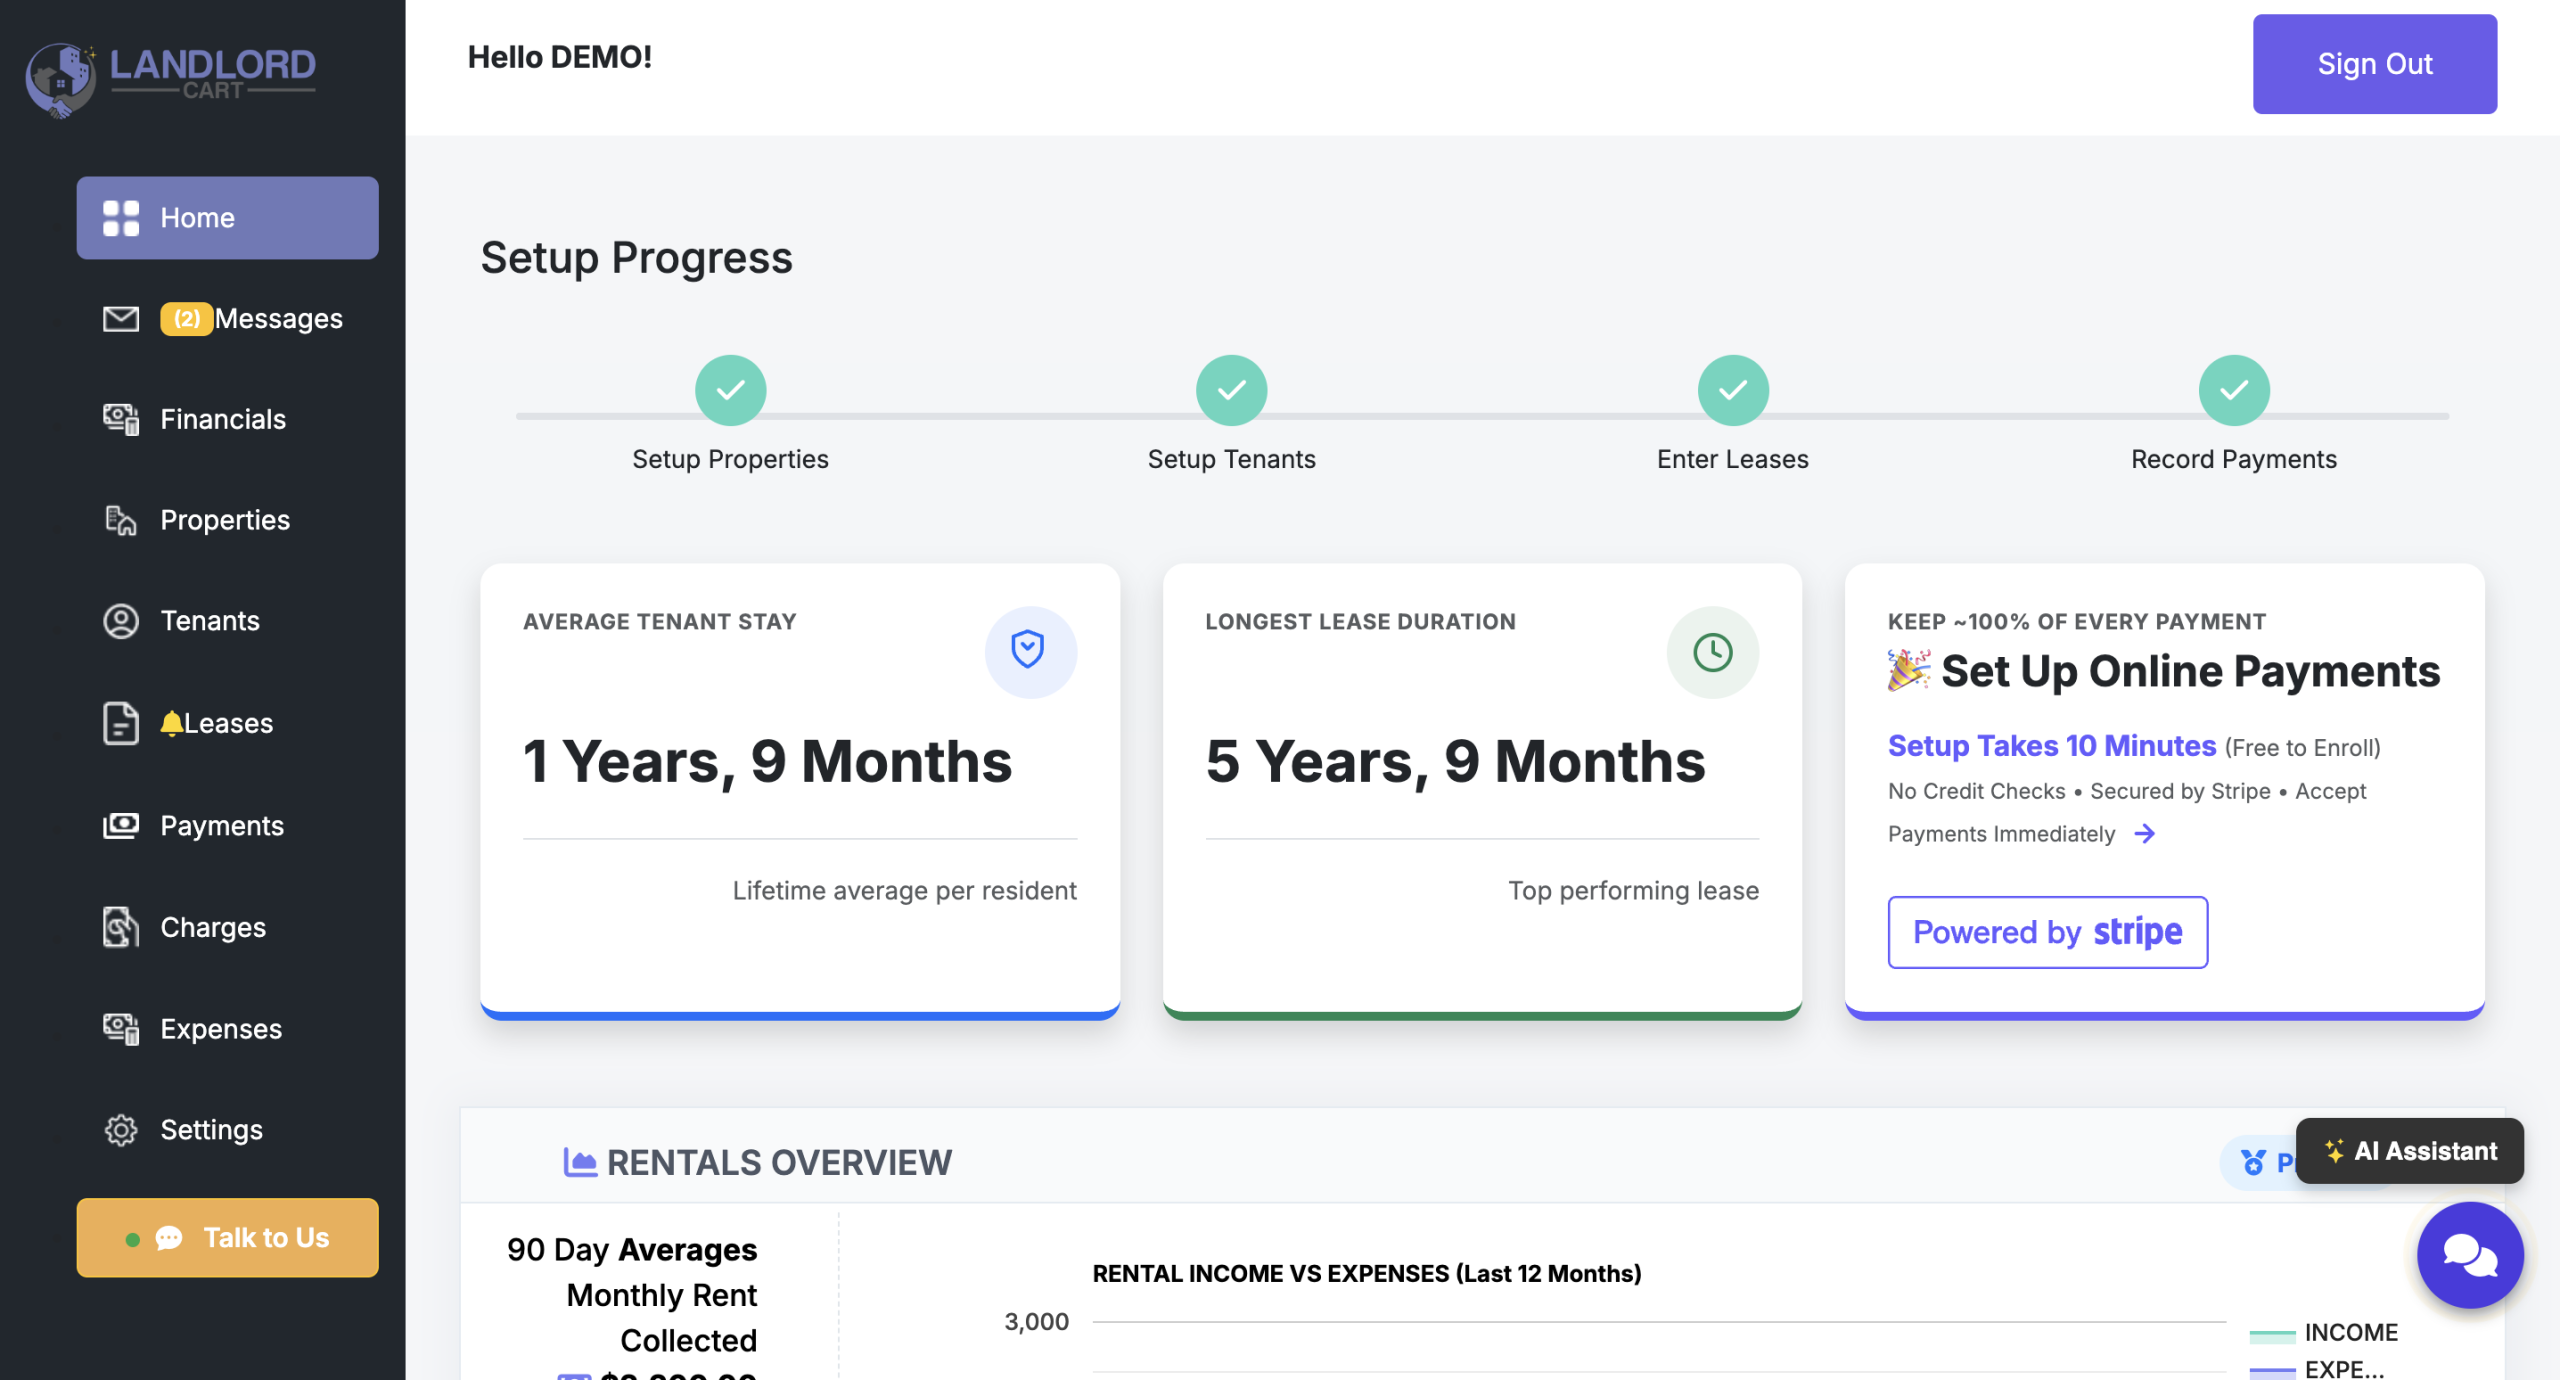
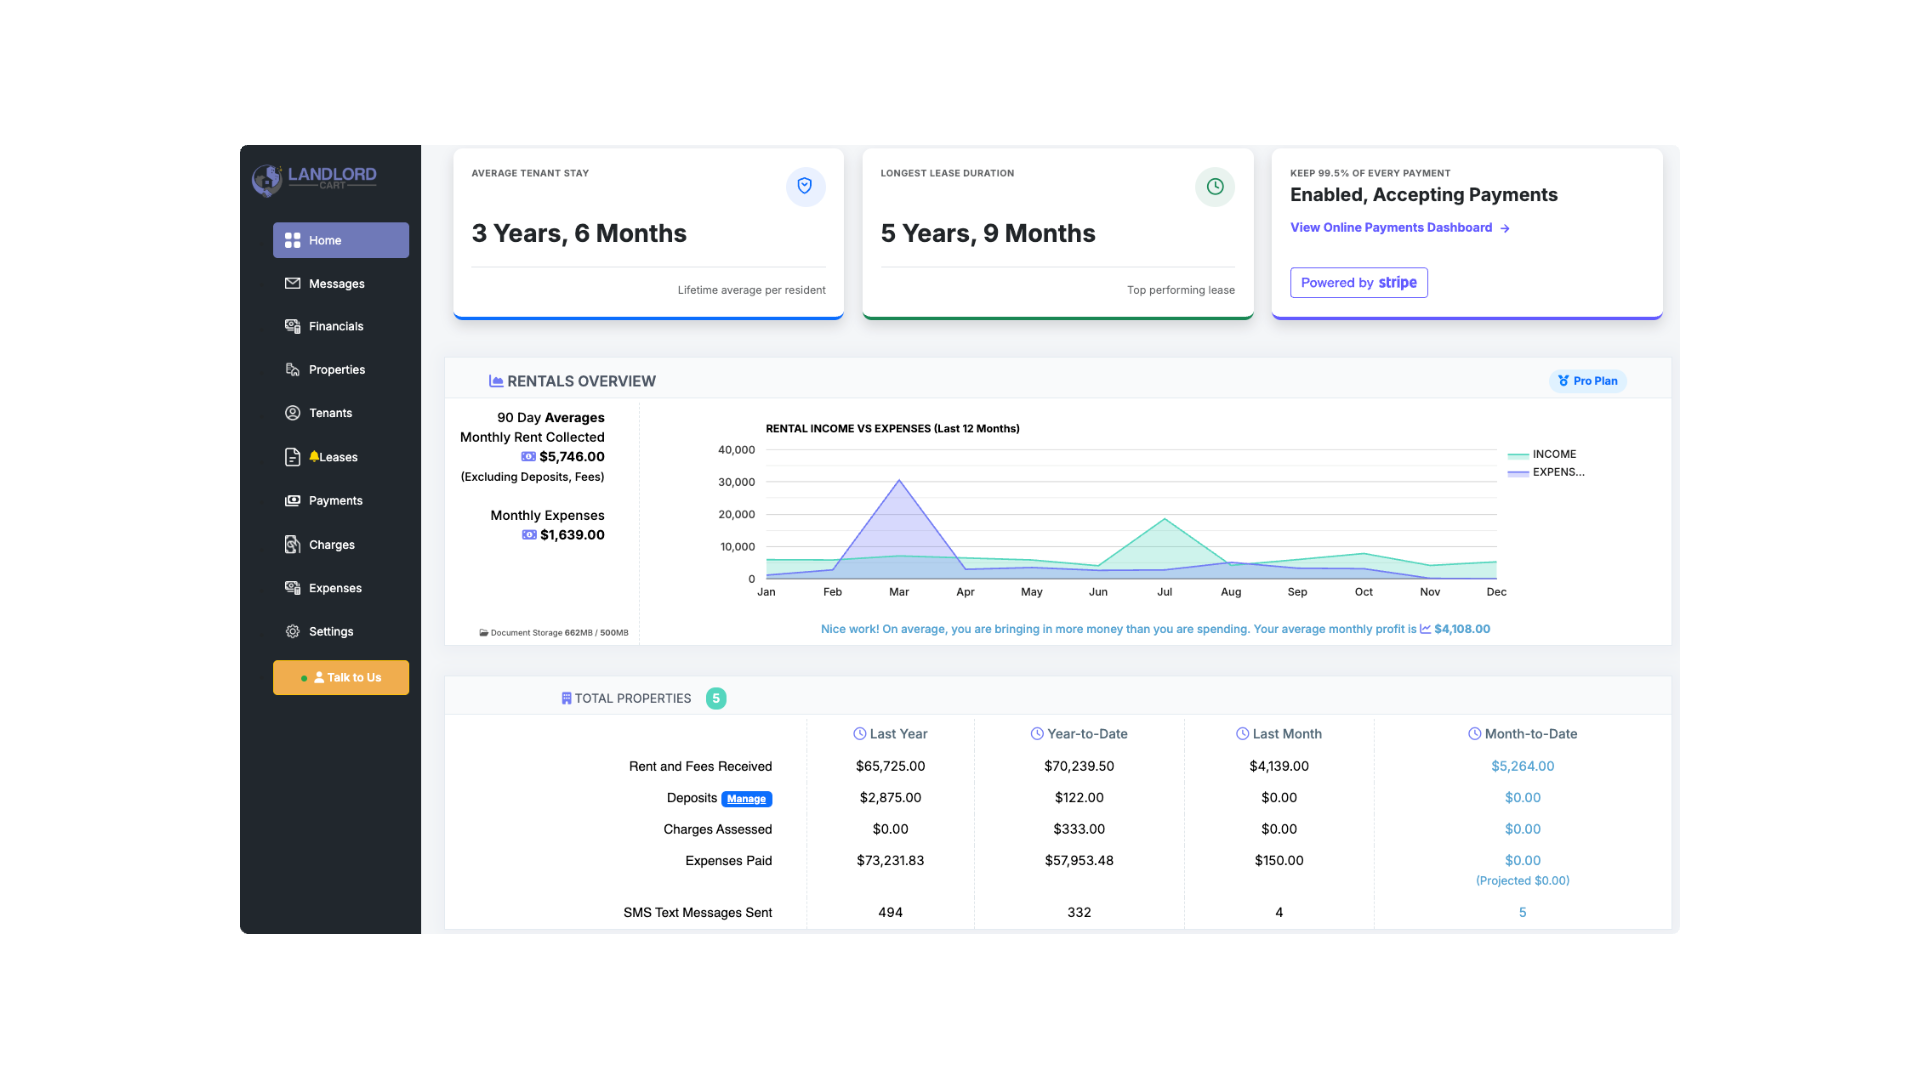
Landlord Cart is designed to be easy to use. When you log in at selfservice.properties, you land on your Dashboard — a summary of your portfolio’s financials, open maintenance tickets, and upcoming lease activity.
Everything you need is in the left-hand menu, organized in the order you’ll typically use it:
Desktop vs. Mobile
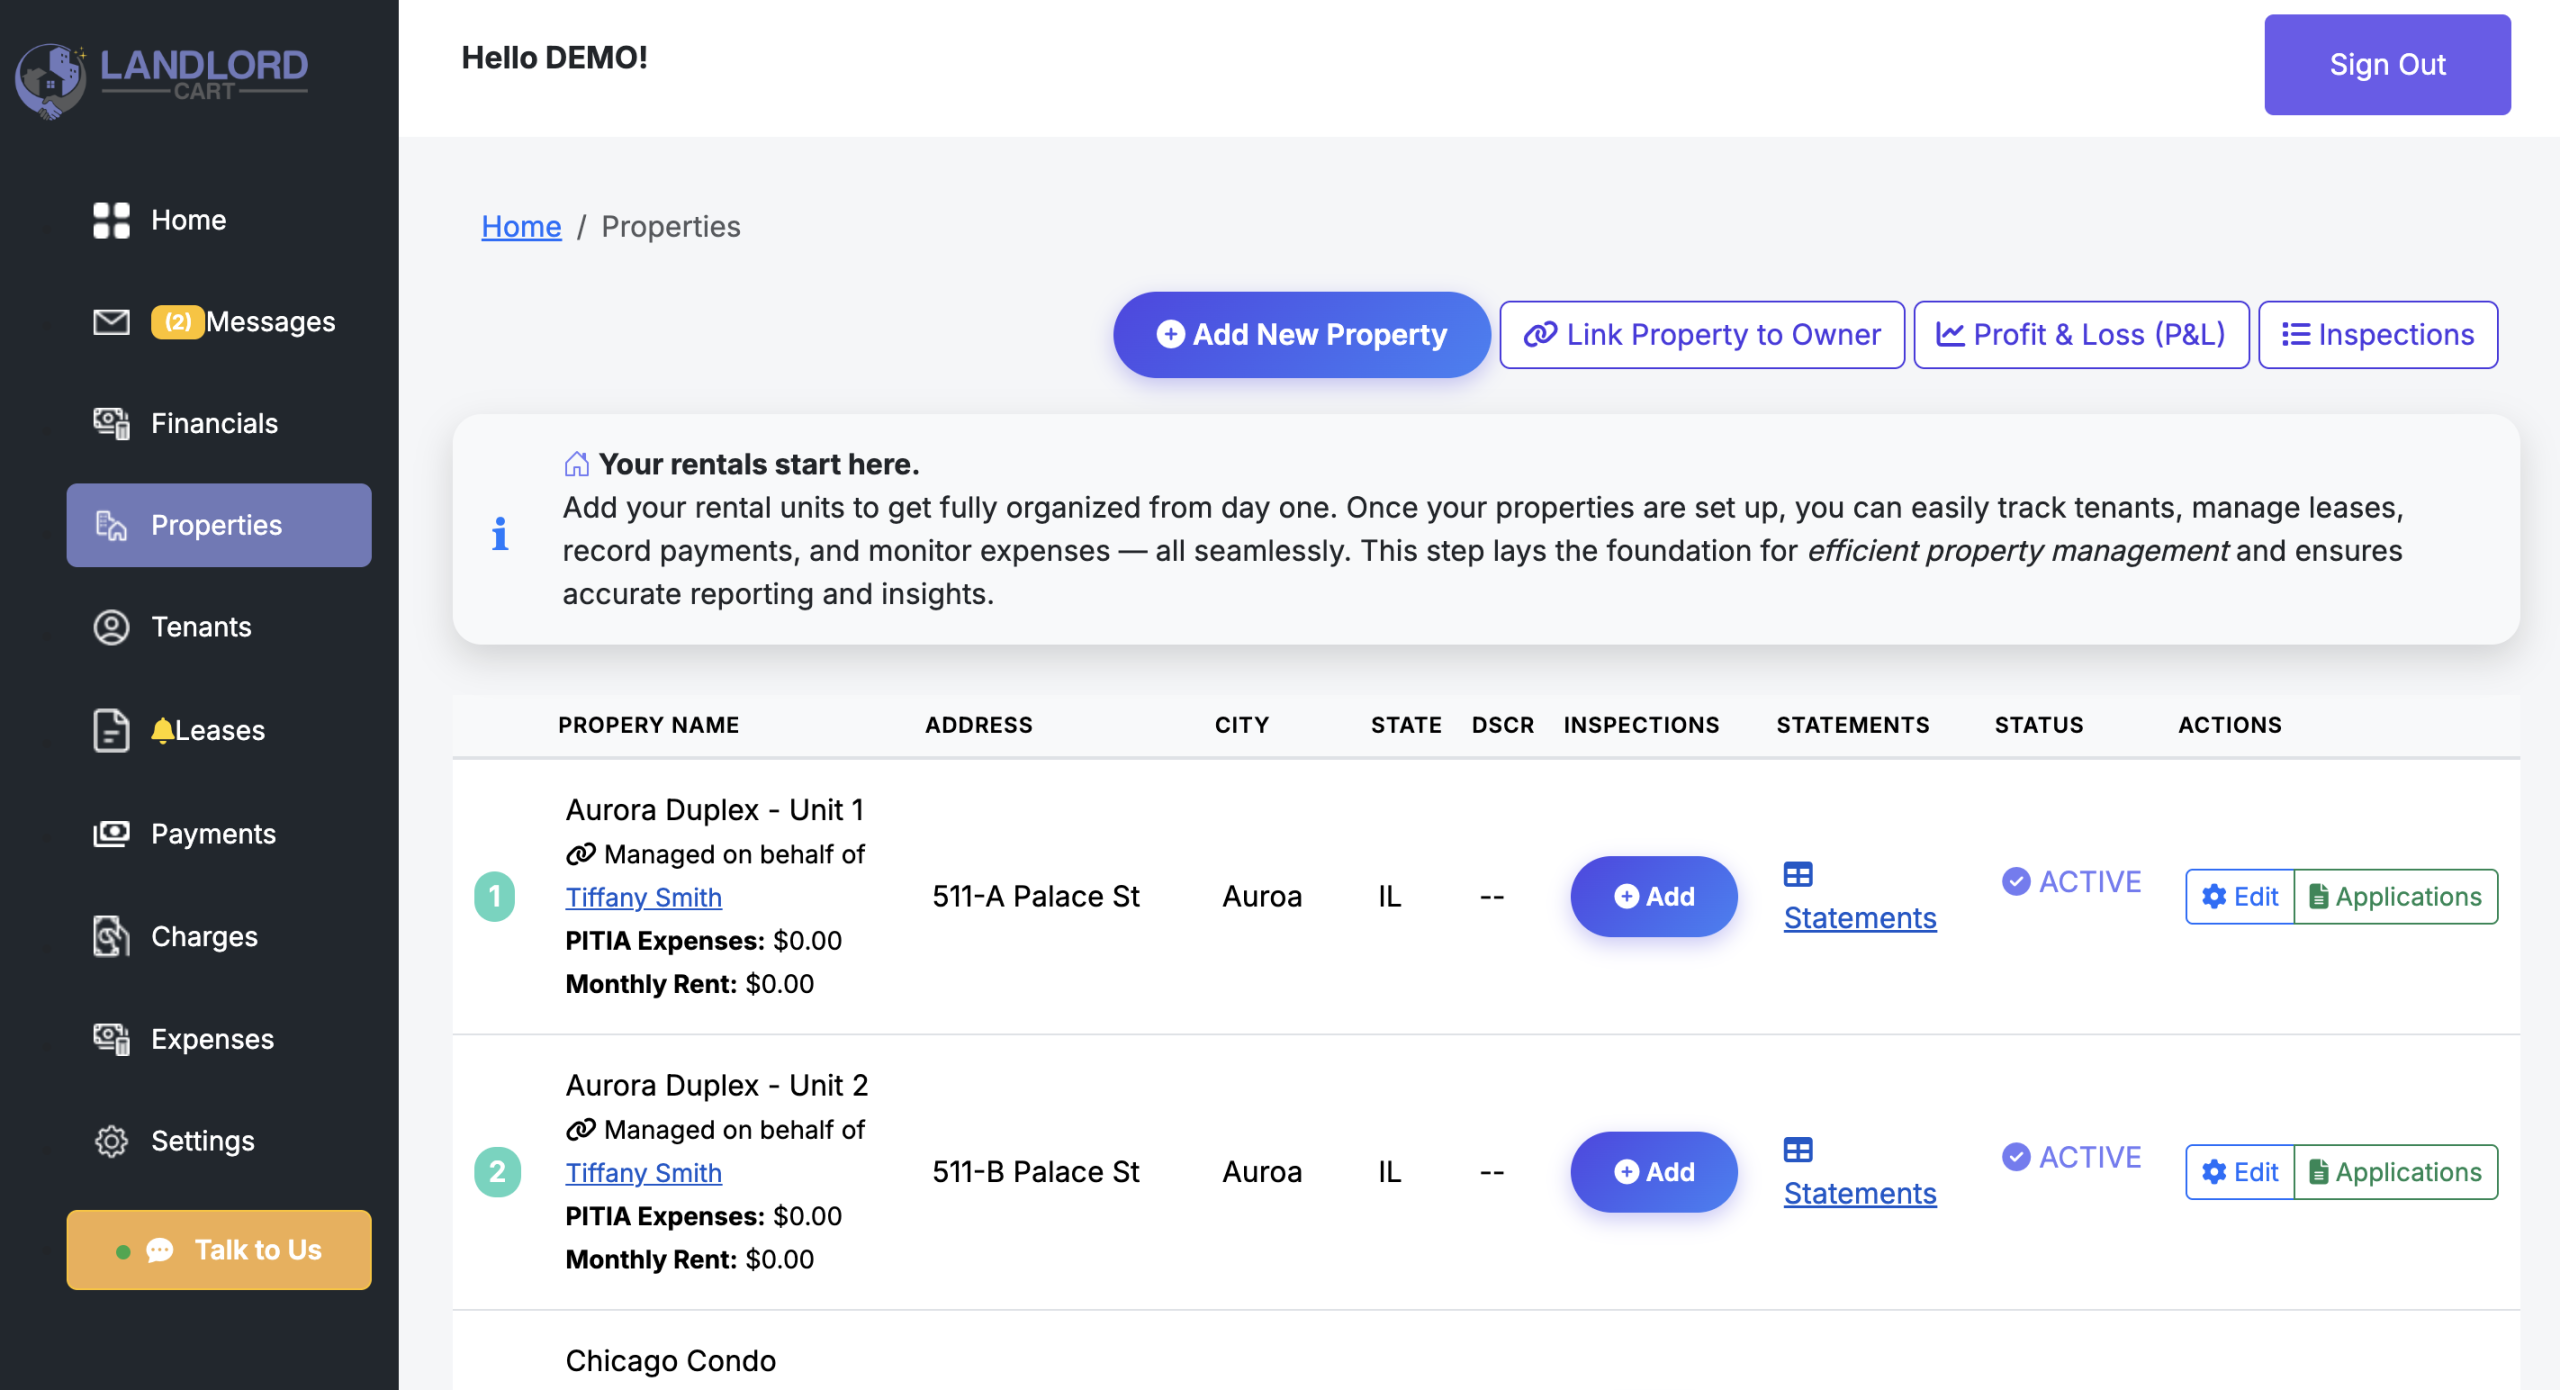
The Properties section is the foundation of your management workflow. In Landlord Cart, data flows in a specific order to ensure accuracy across your records:
Account > Properties > Tenant > Lease > Payments > Expenses
You must create a Property before you can add a Tenant. You must have a Tenant before you can create a Lease. This order is enforced so all financial records stay accurately linked to the correct property.
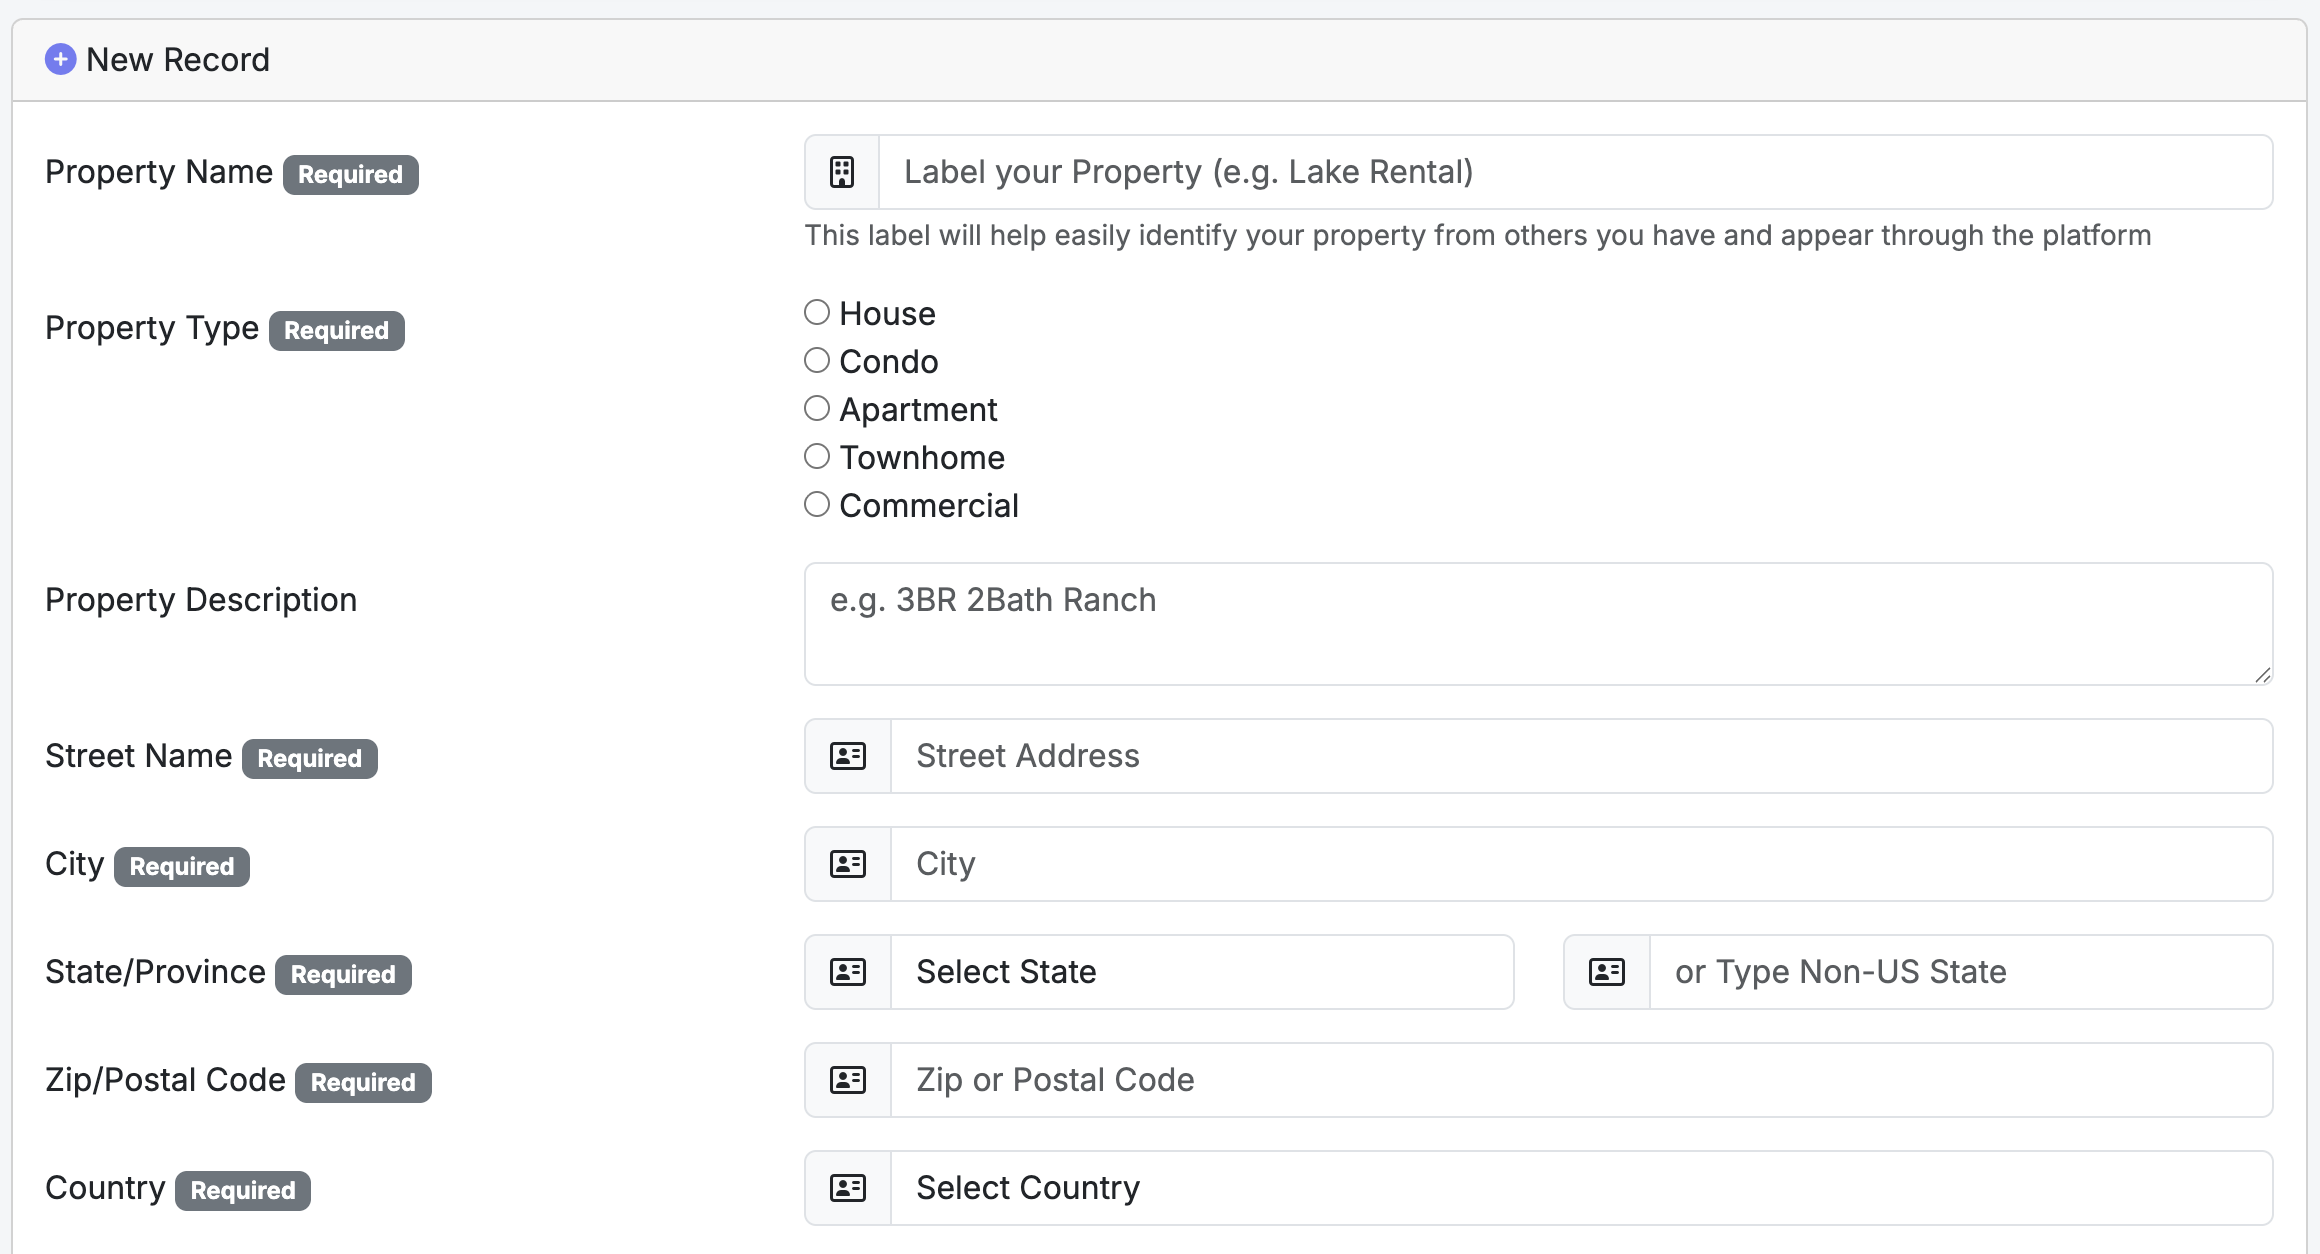
Key Property Details:
Plan Unit Limits:
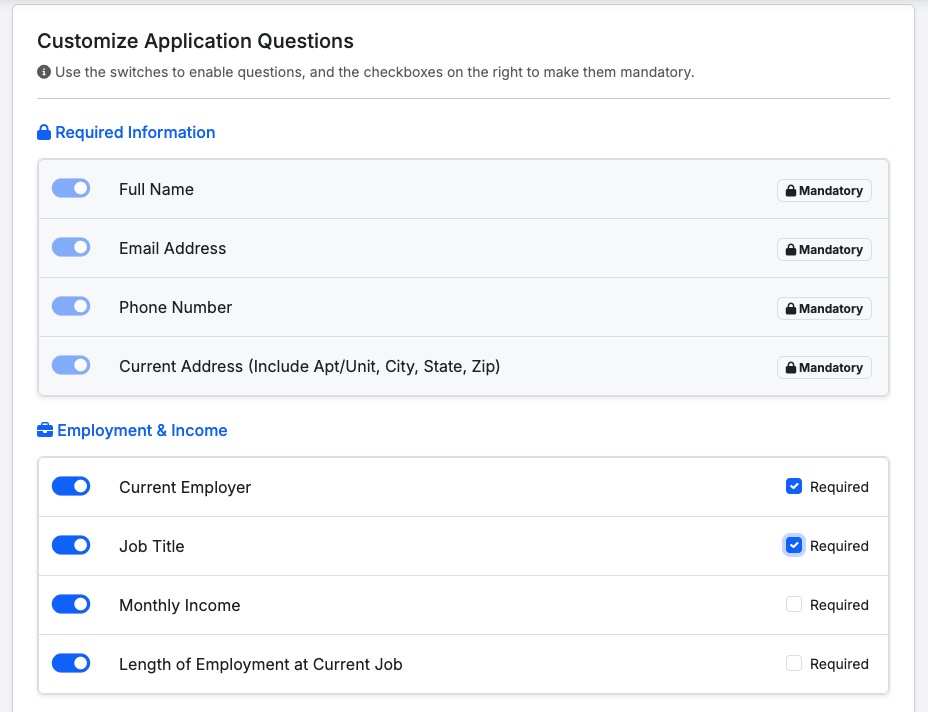
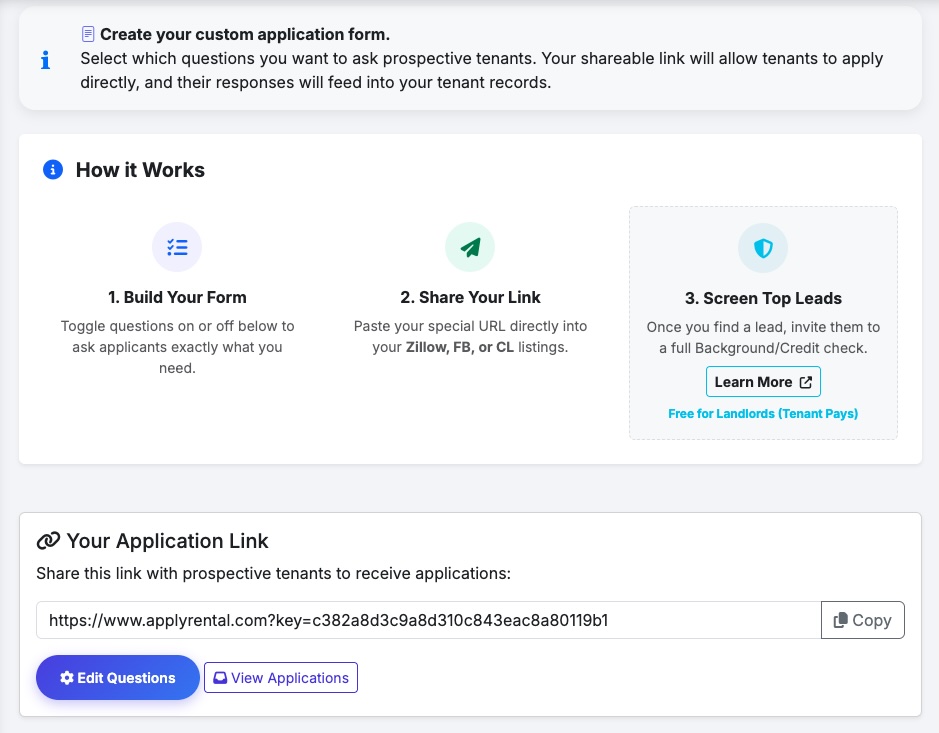
Tenant Applications:
Owner Management:
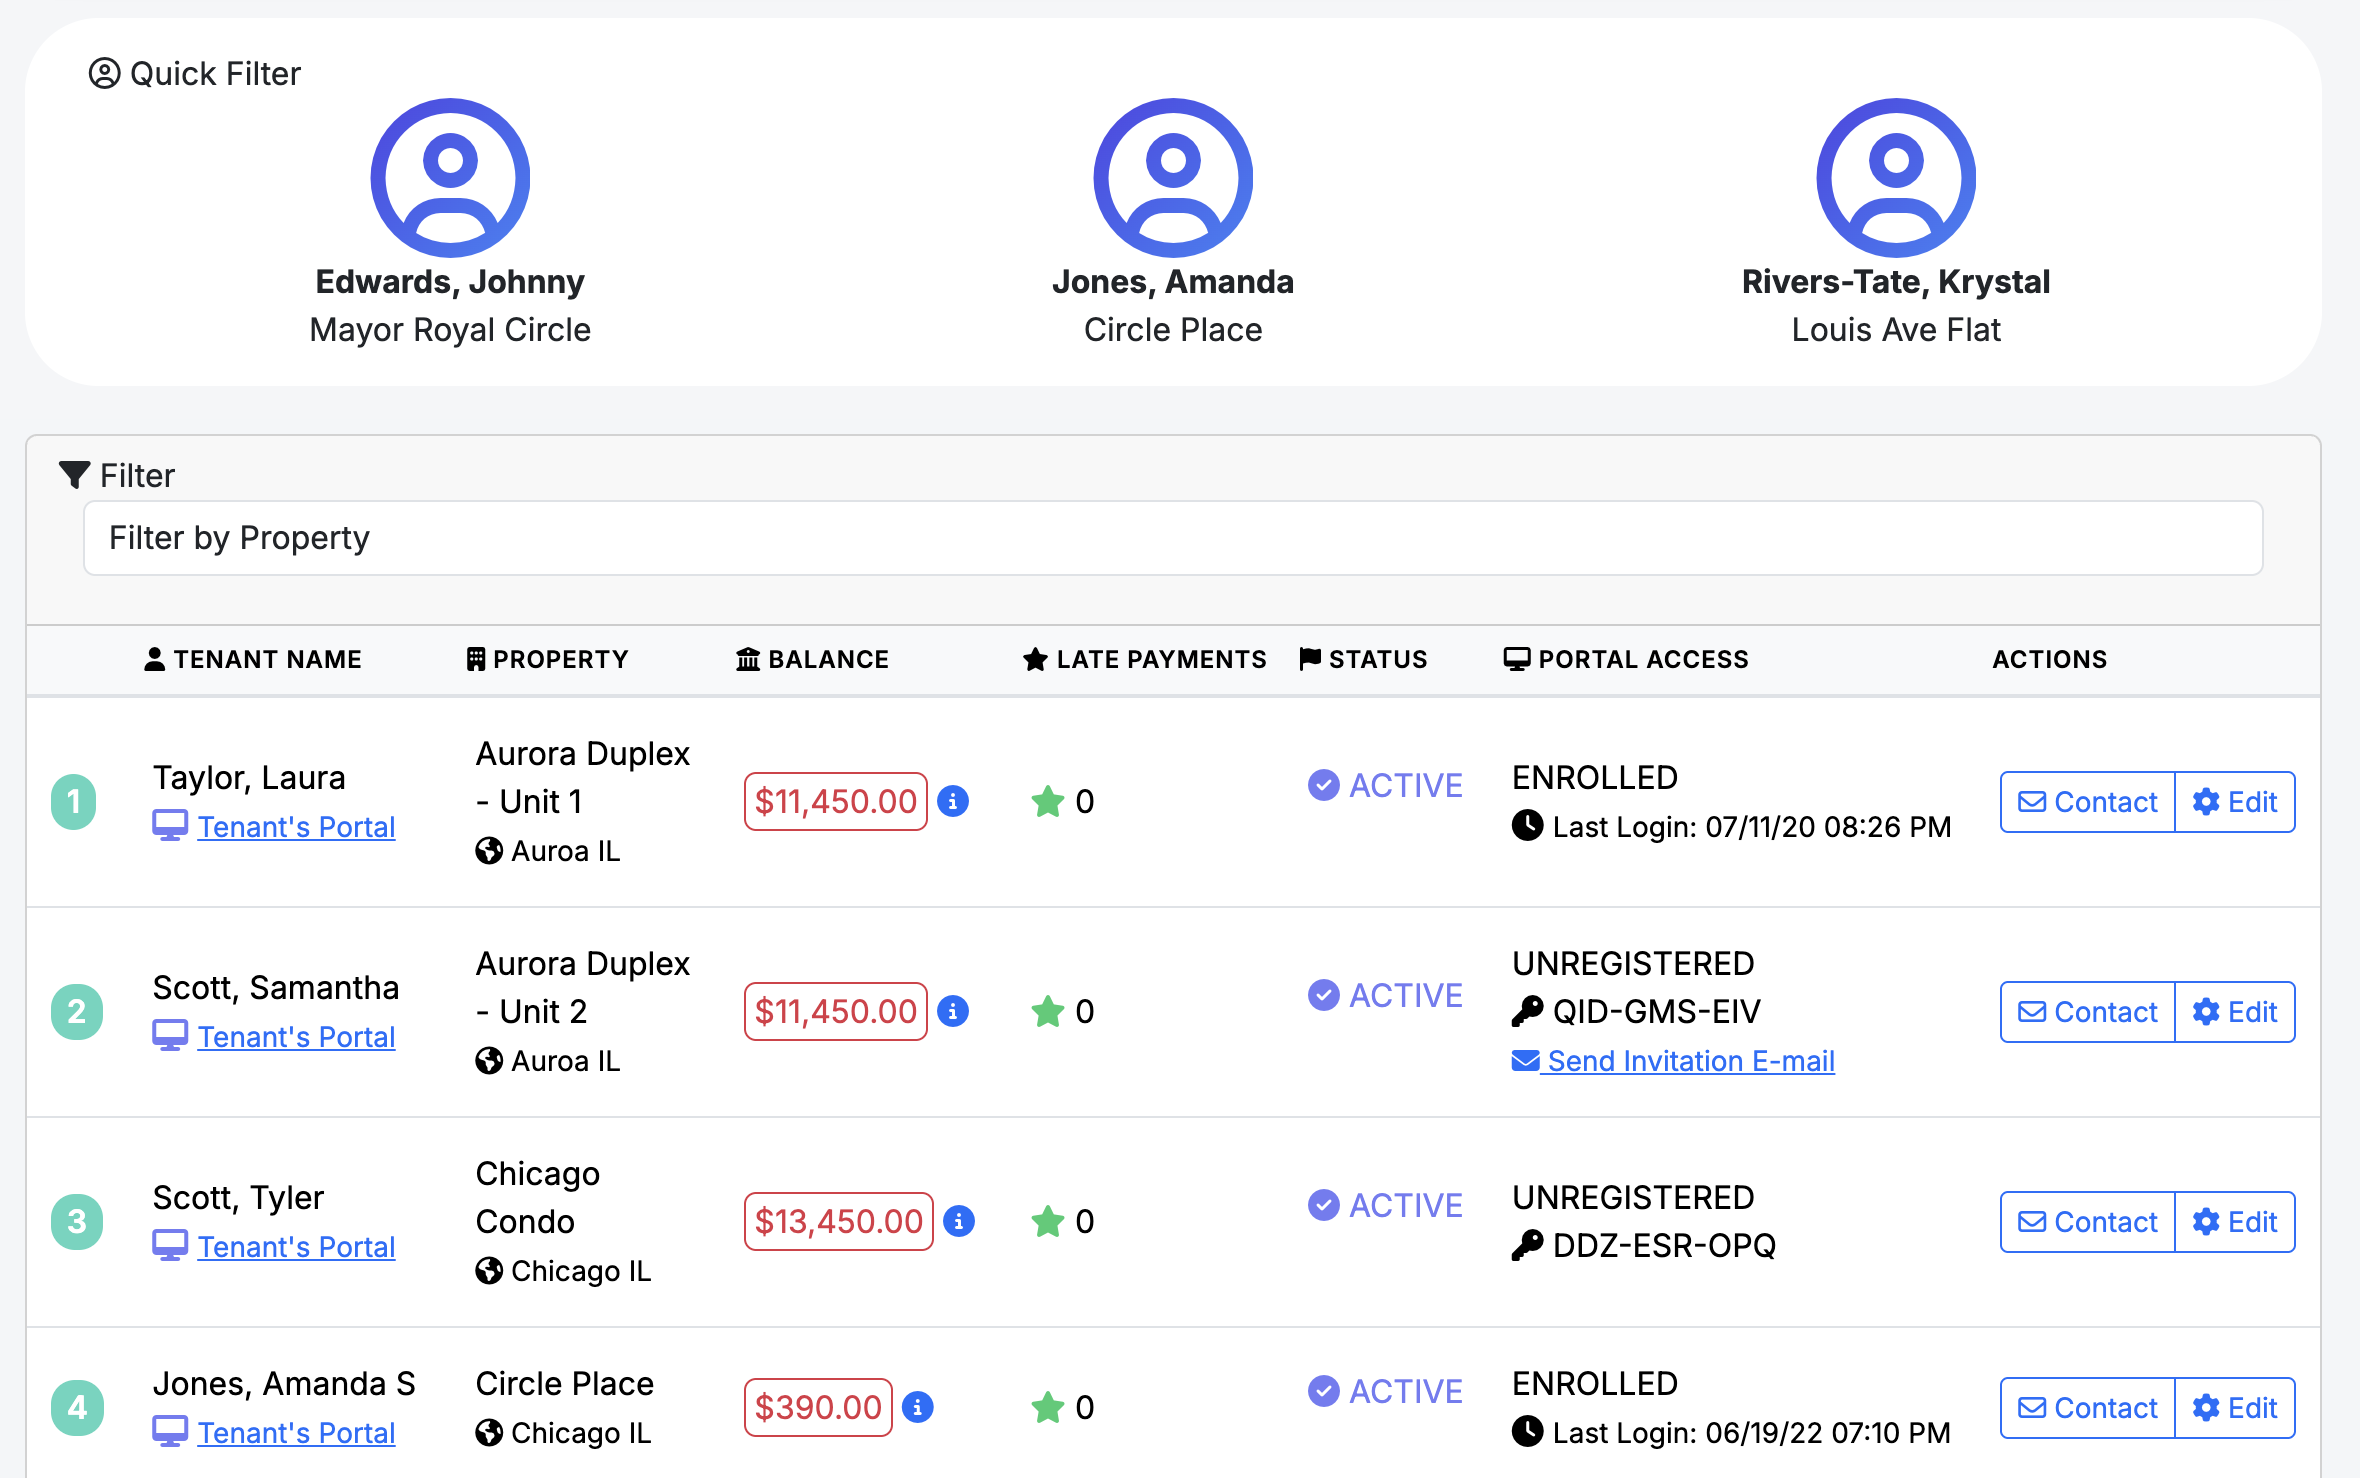
The Tenants section provides a comprehensive overview of your resident relationships and their portal activity.
Admin Oversight:
Tenant Monitoring & Financials:
Tenant Onboarding:
Critical Information Requirements:
Efficiency Tools:
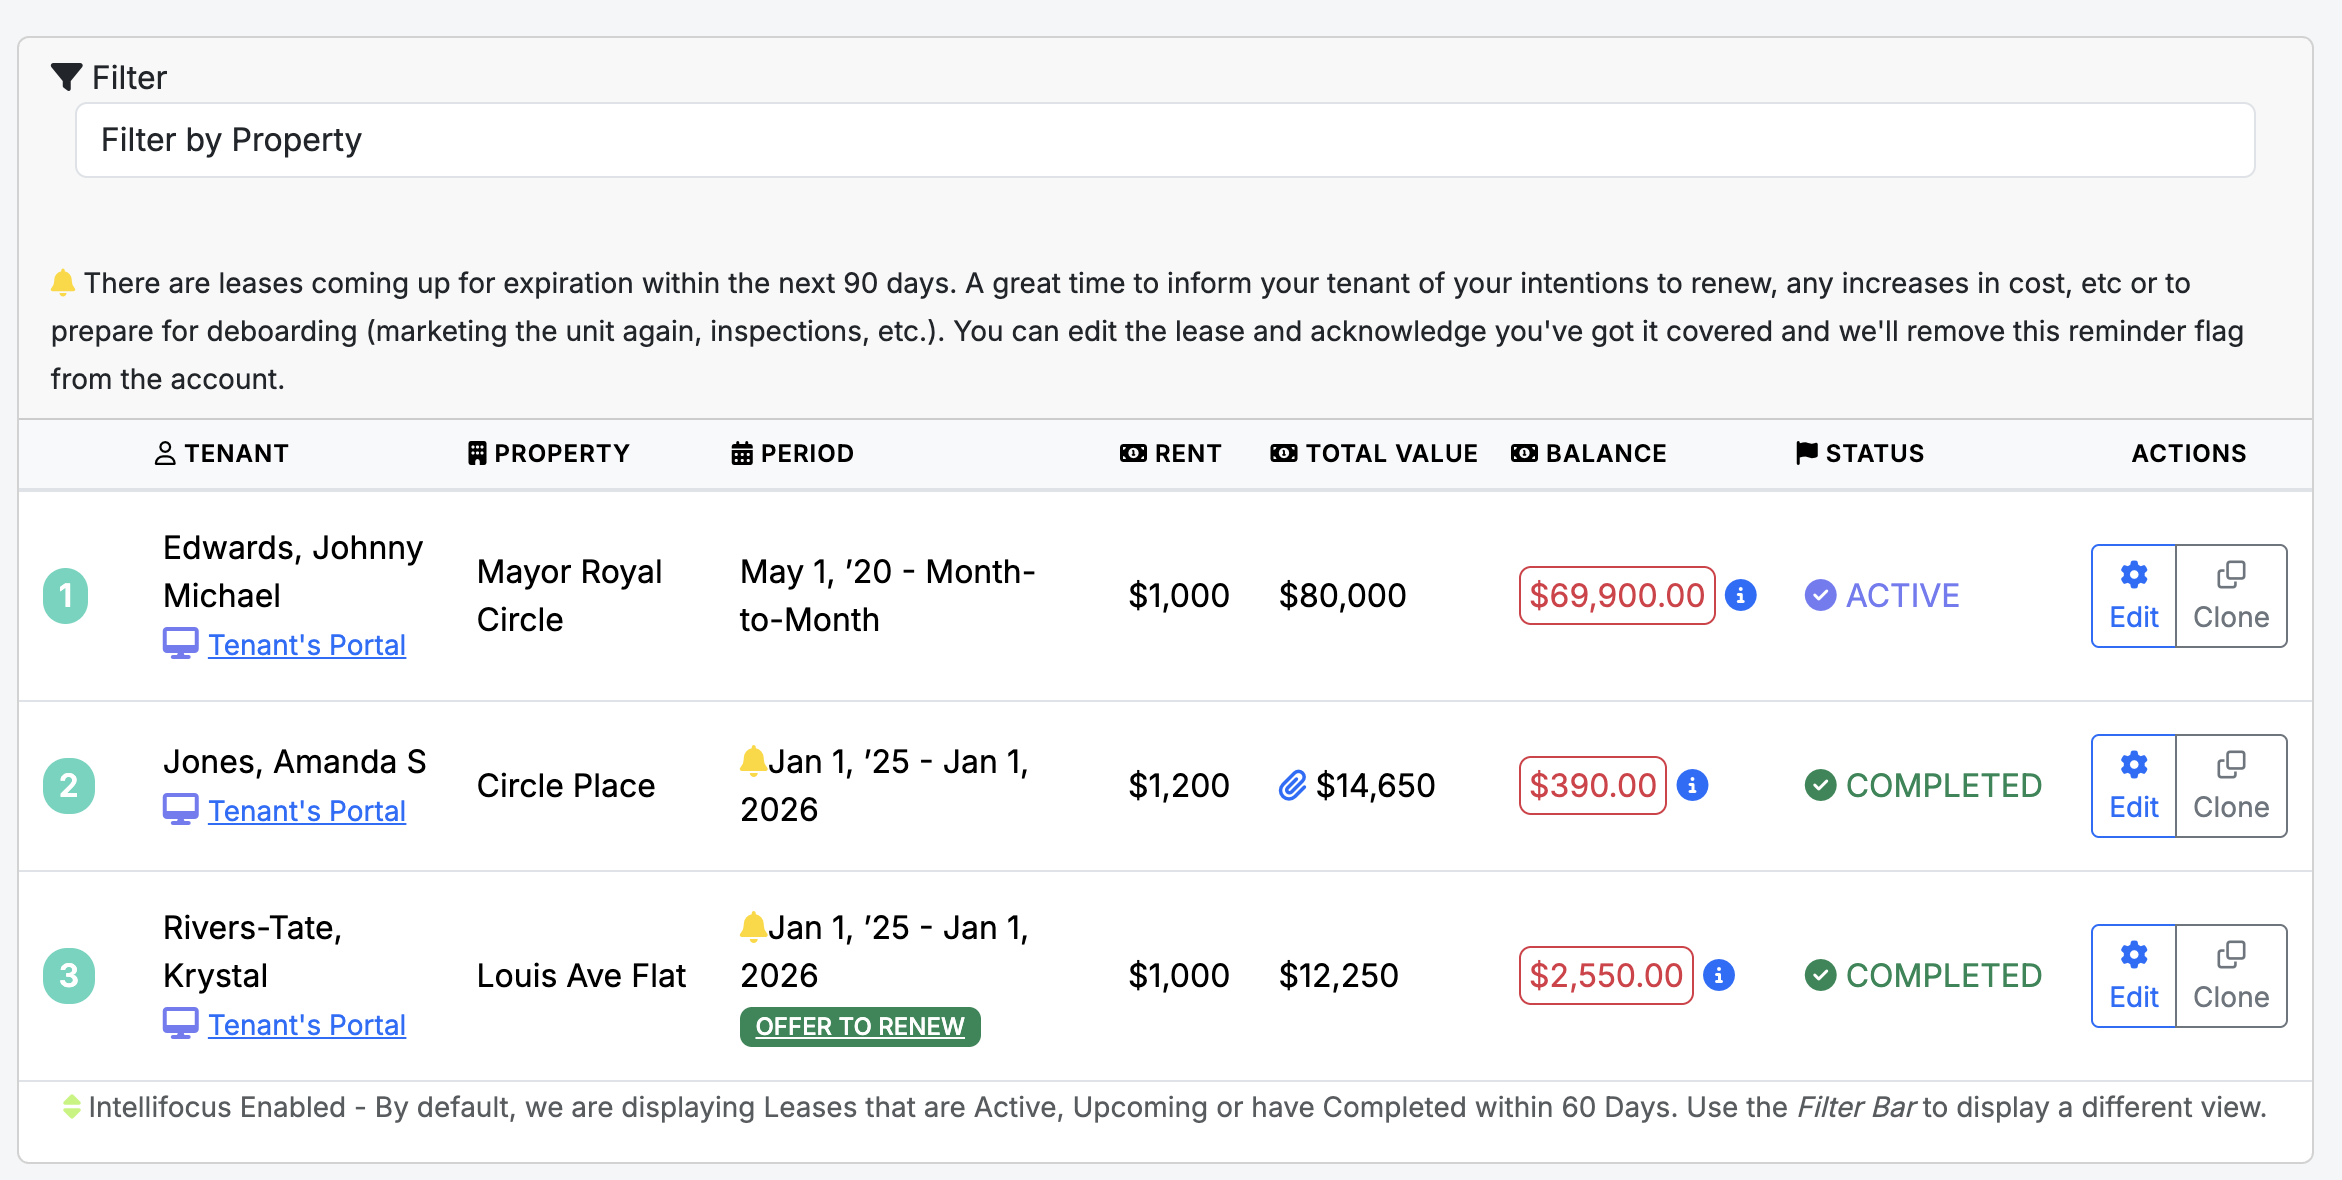
The Leases screen is the financial engine of the system. All automated calculations — including total amounts owed and late fee applications — are derived directly from the data entered here.
Lease Configuration & Financials:
Lease Lifecycle & Renewals:
Document Management & Compliance:
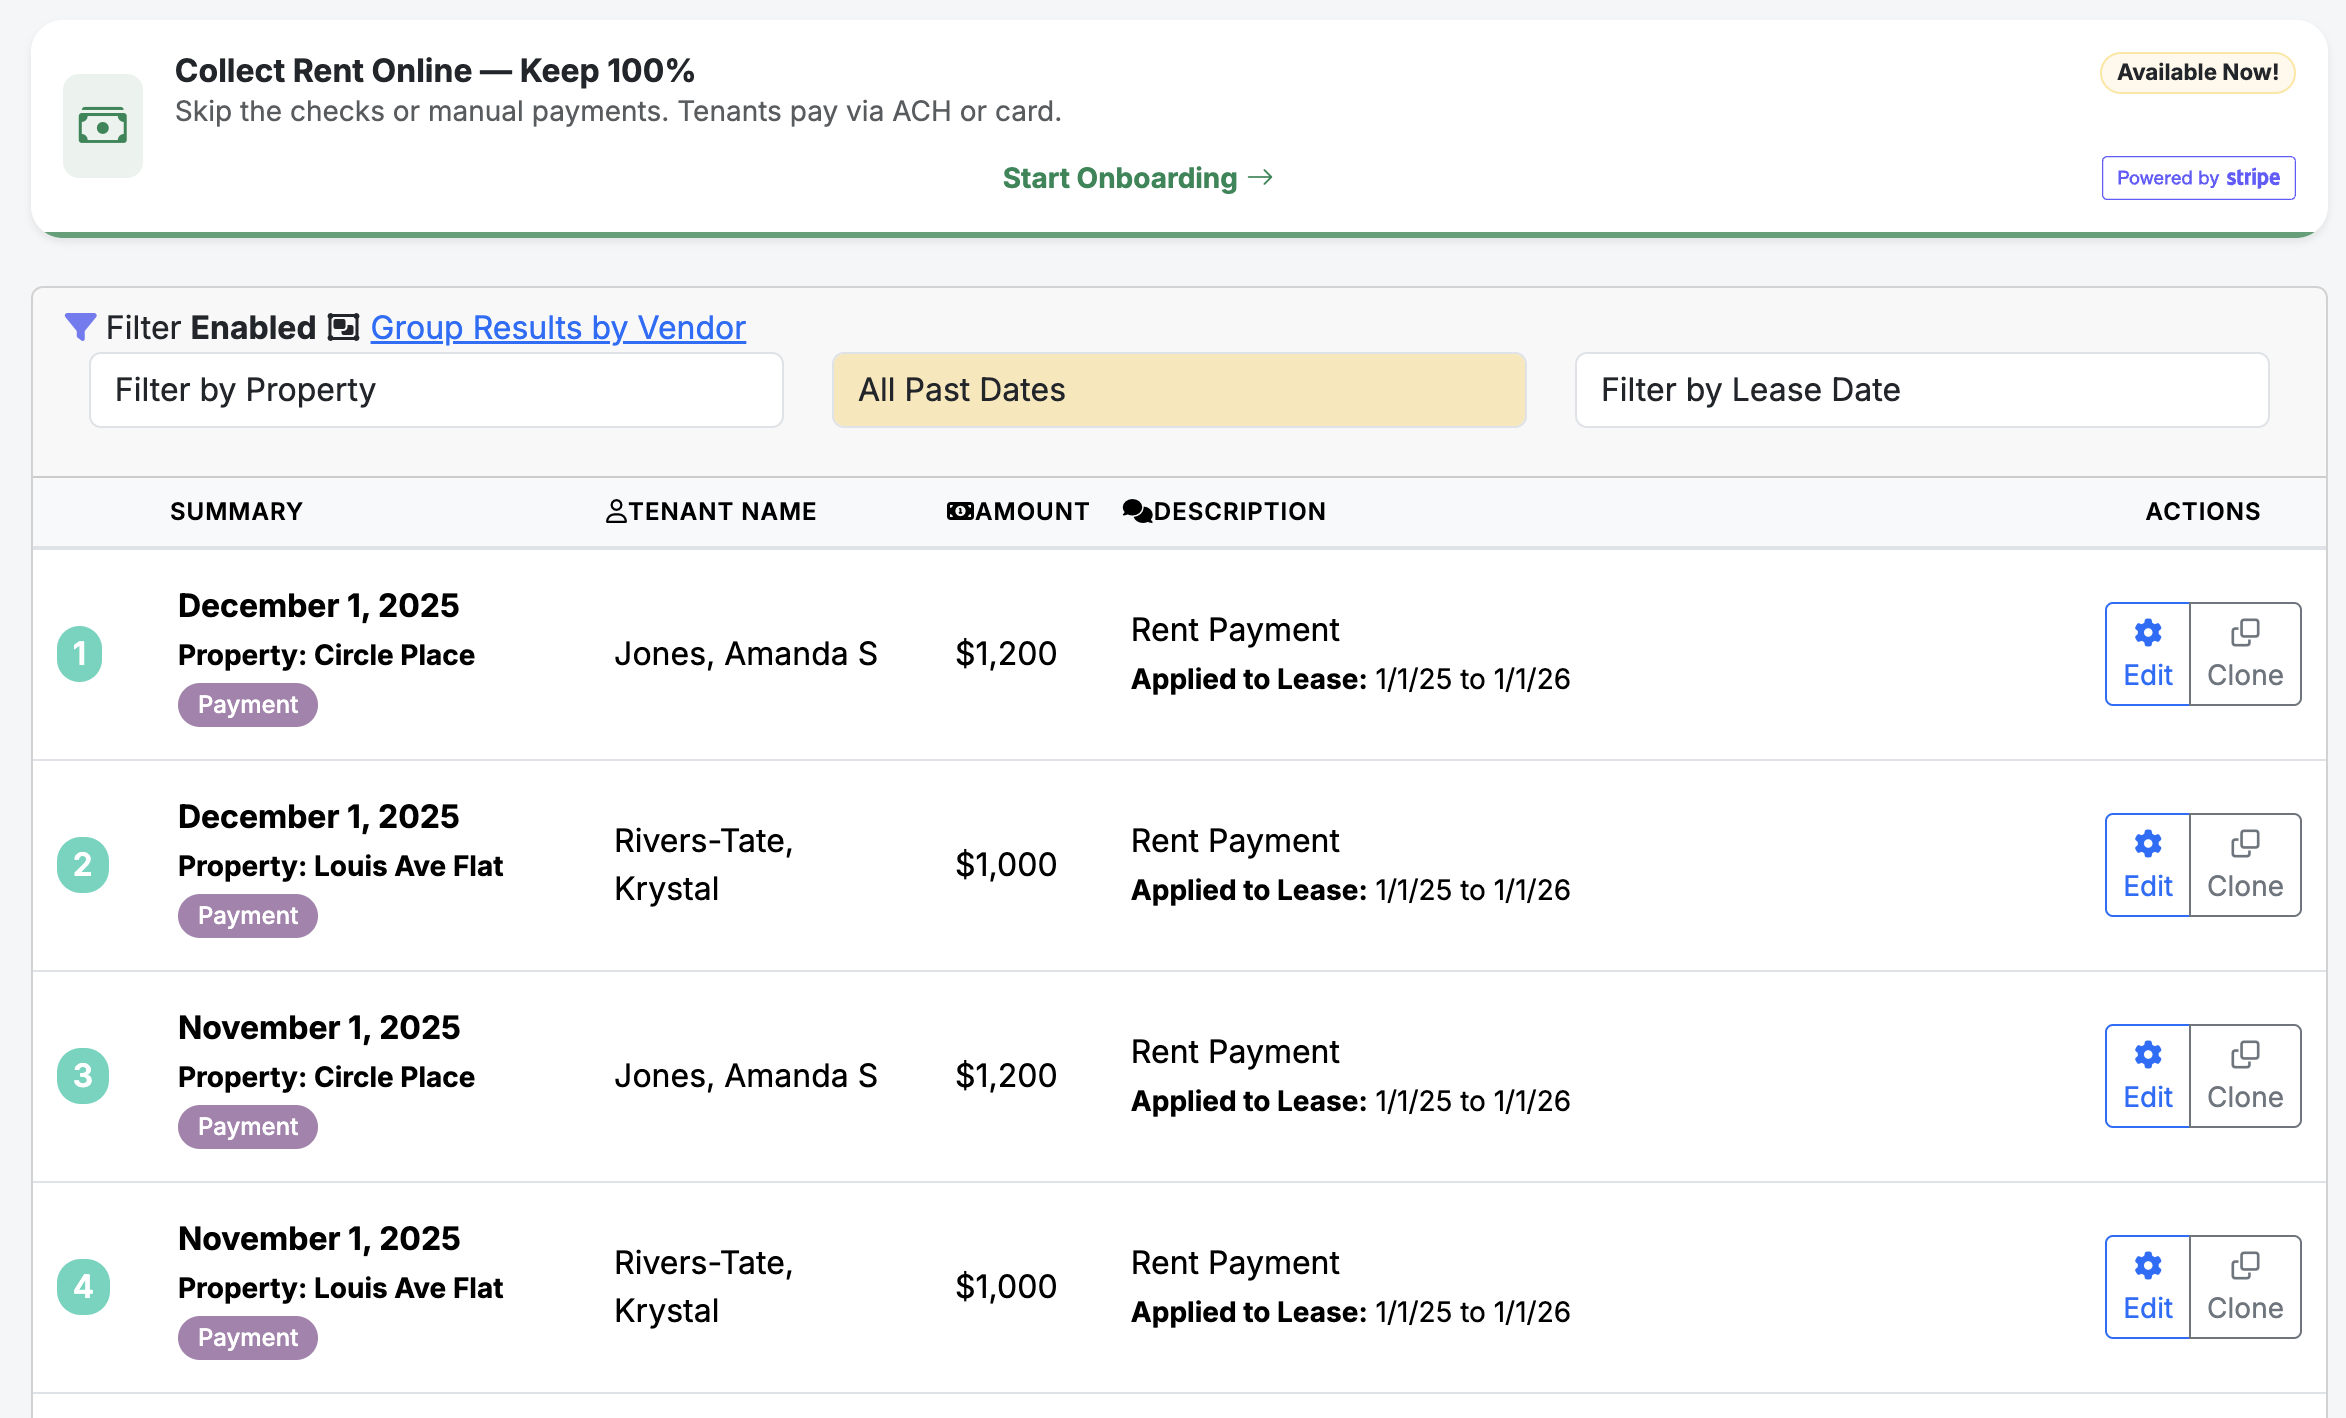
The Payments screen is the primary tool for tracking income and is optimized for mobile use to allow for real-time data entry while you are on the go.
Automated Stripe Integration:
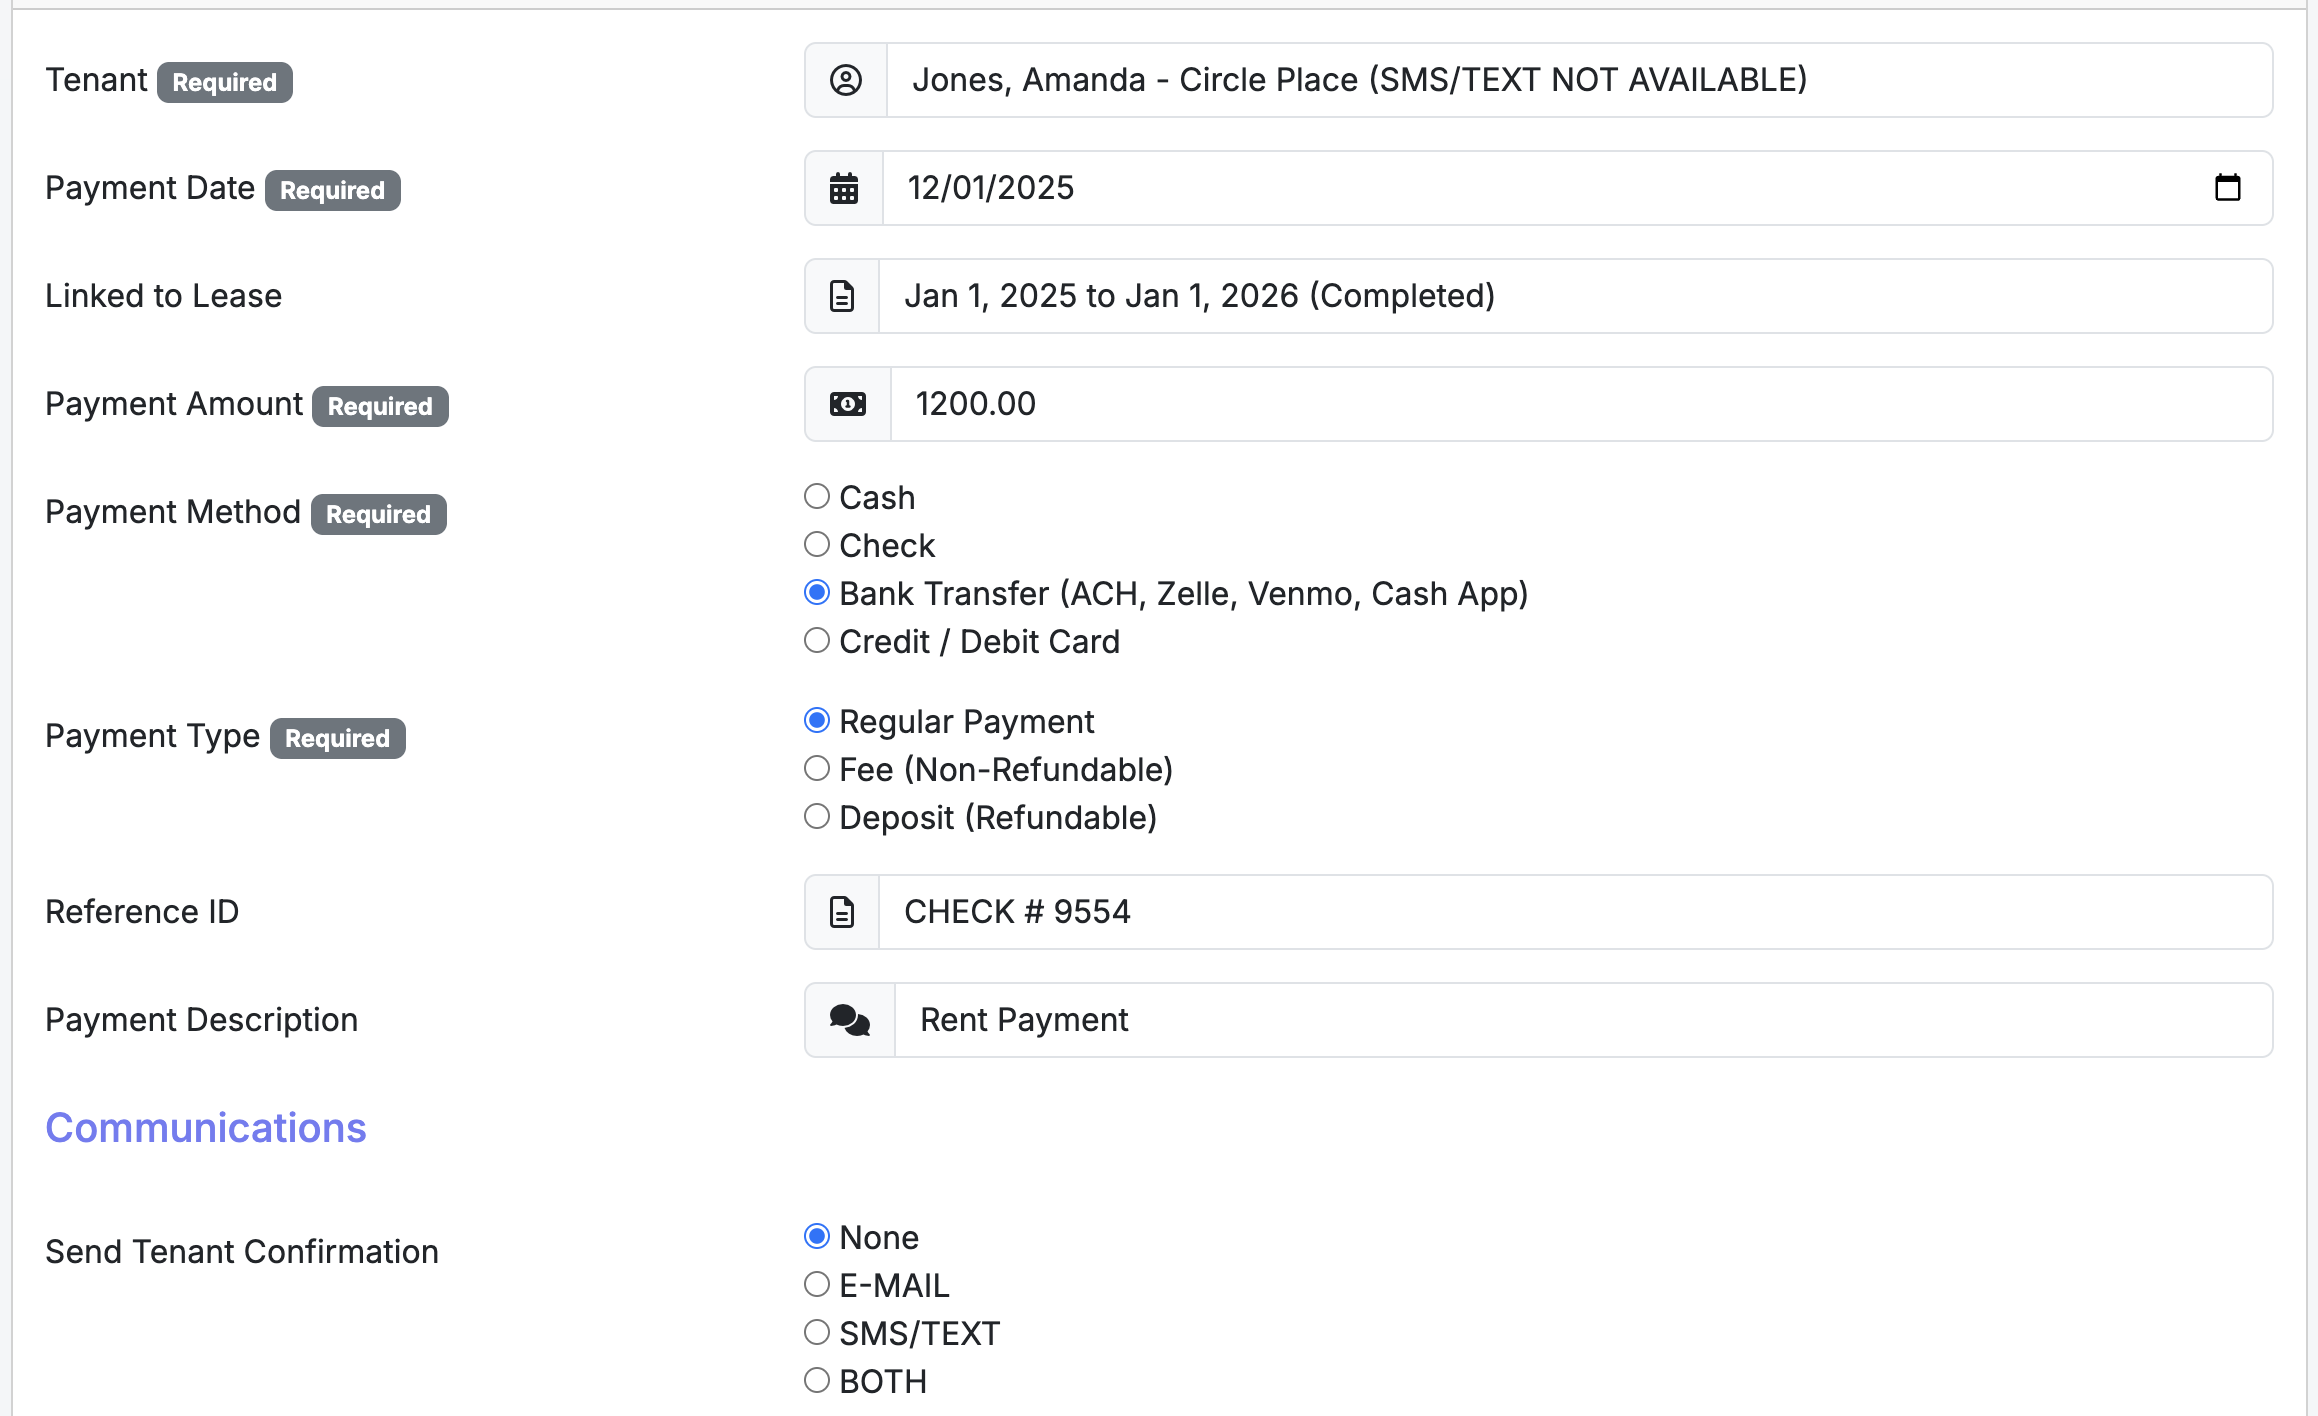
Recording Manual Payments:
Security Deposits:
Notes & Privacy:
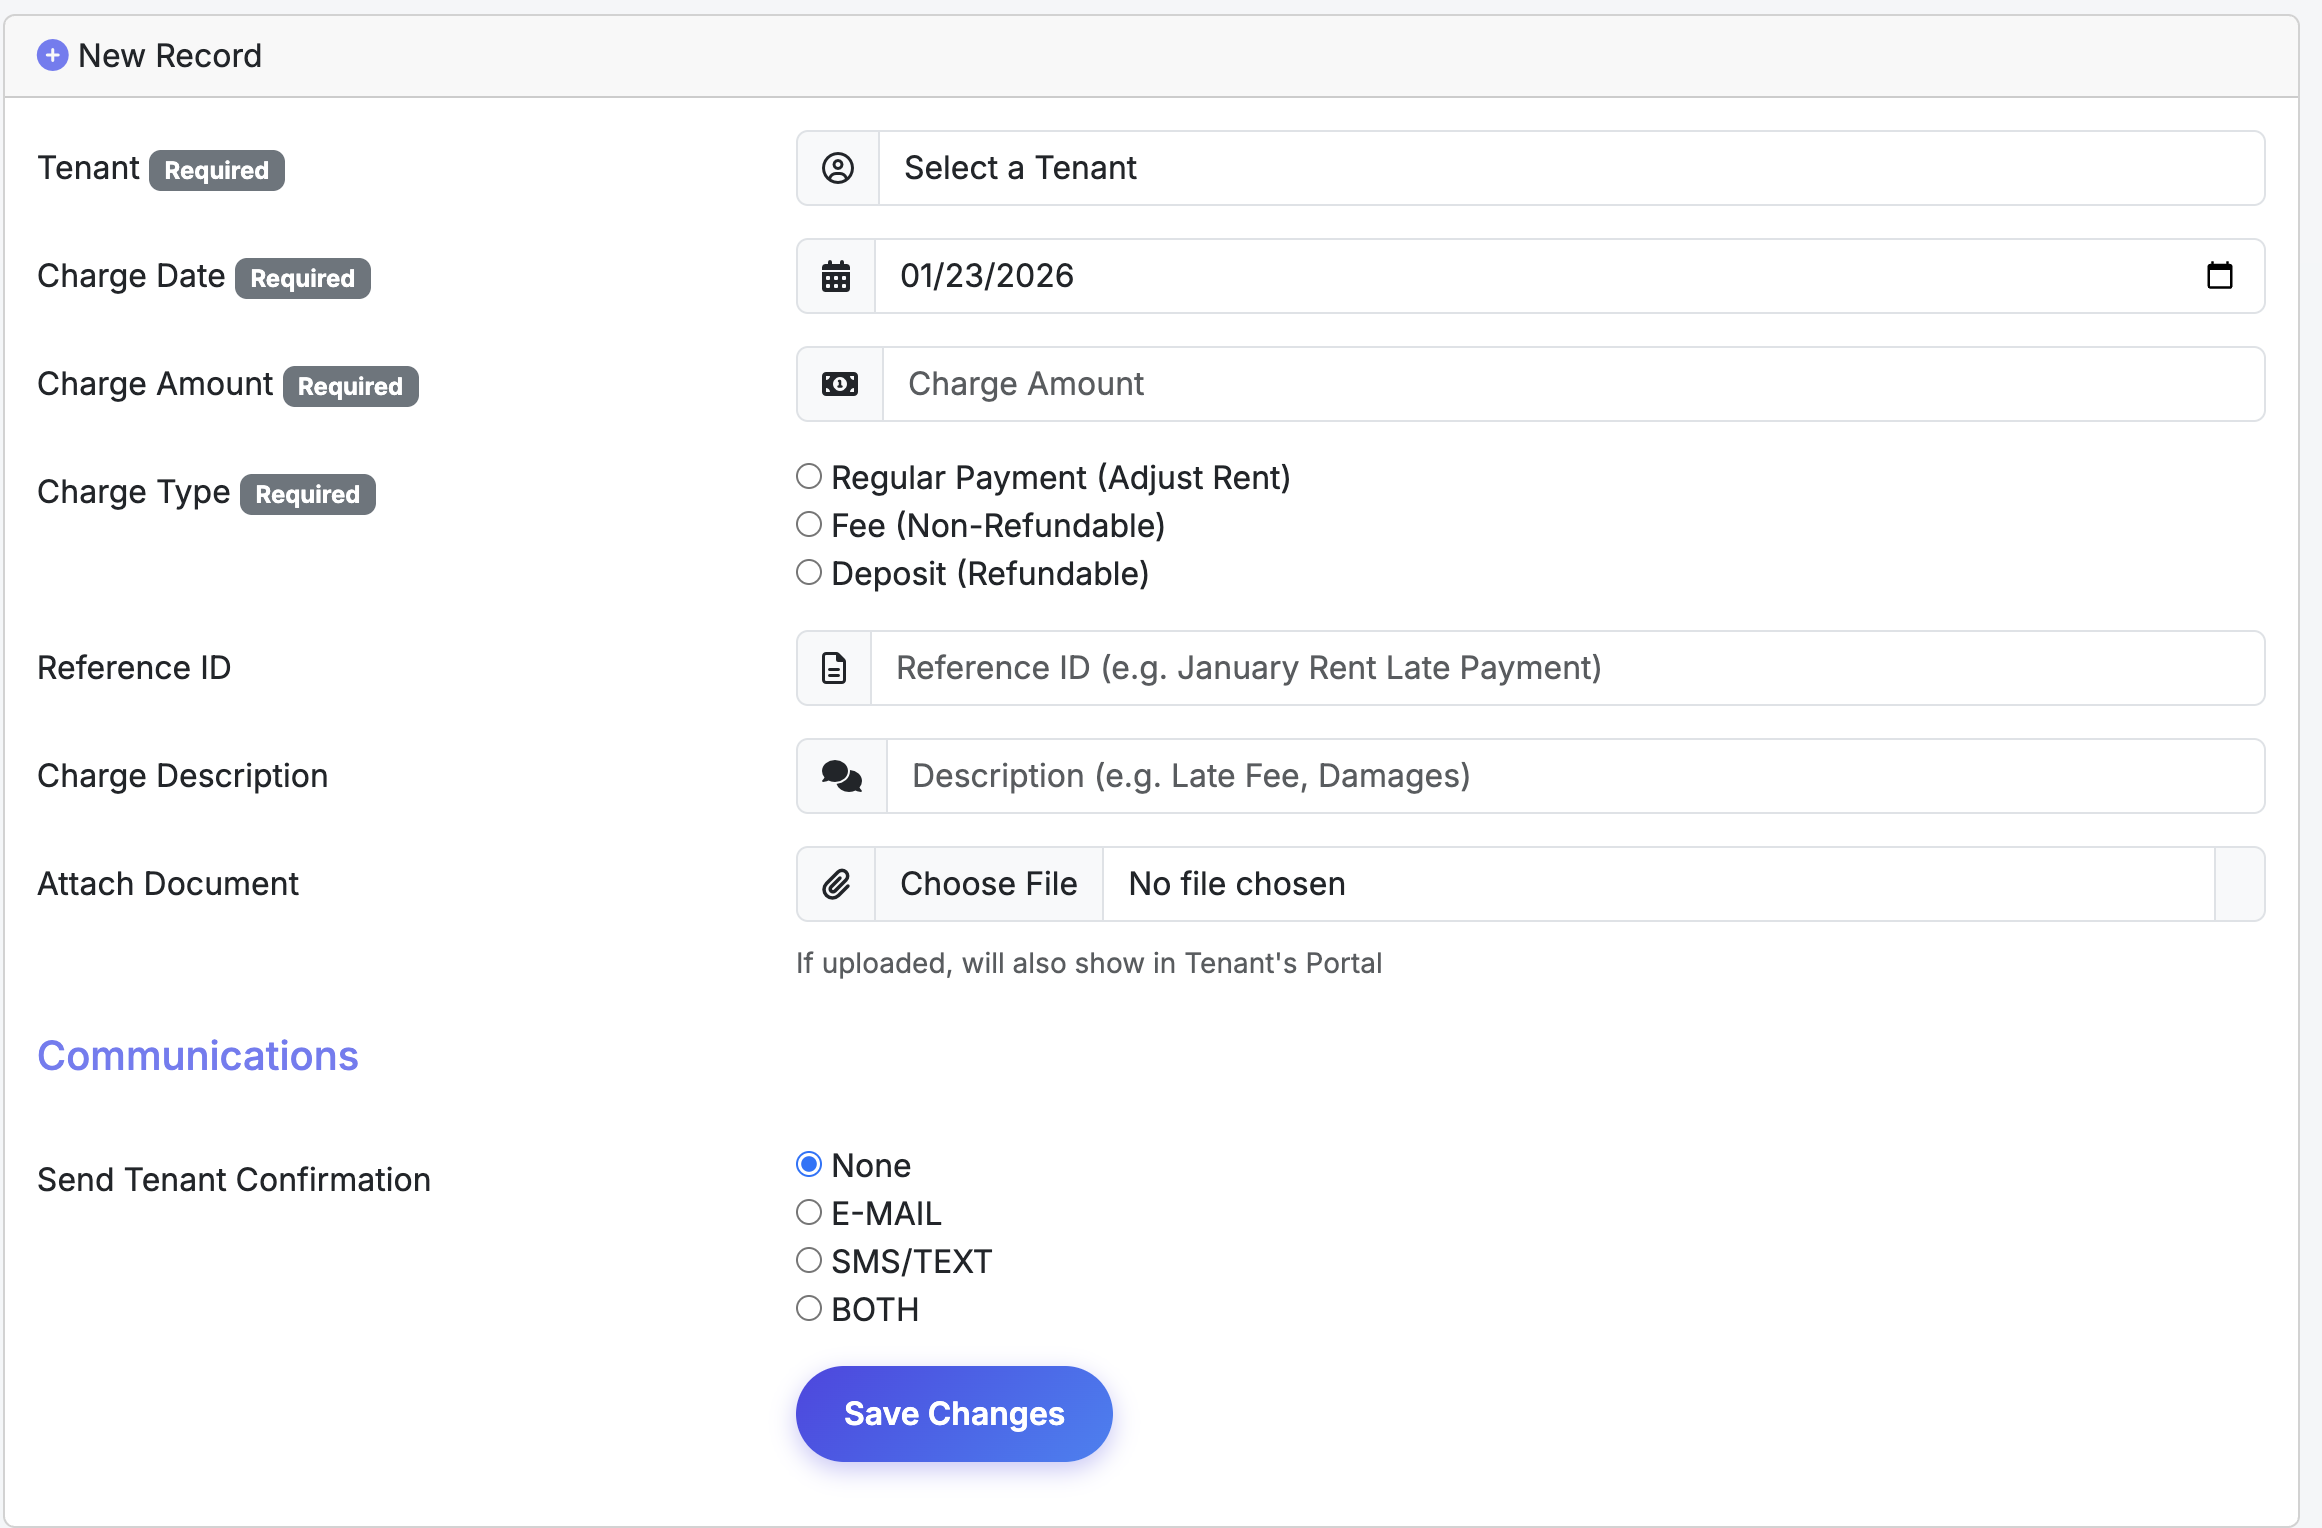
Important: Do not enter monthly rent on this screen. Rent is calculated automatically from your Lease settings. The Charges screen is strictly for one-time fees, penalties, and balance adjustments.
Exceptions and Extra Fees:
Tenant Transparency:
Common Use Case:
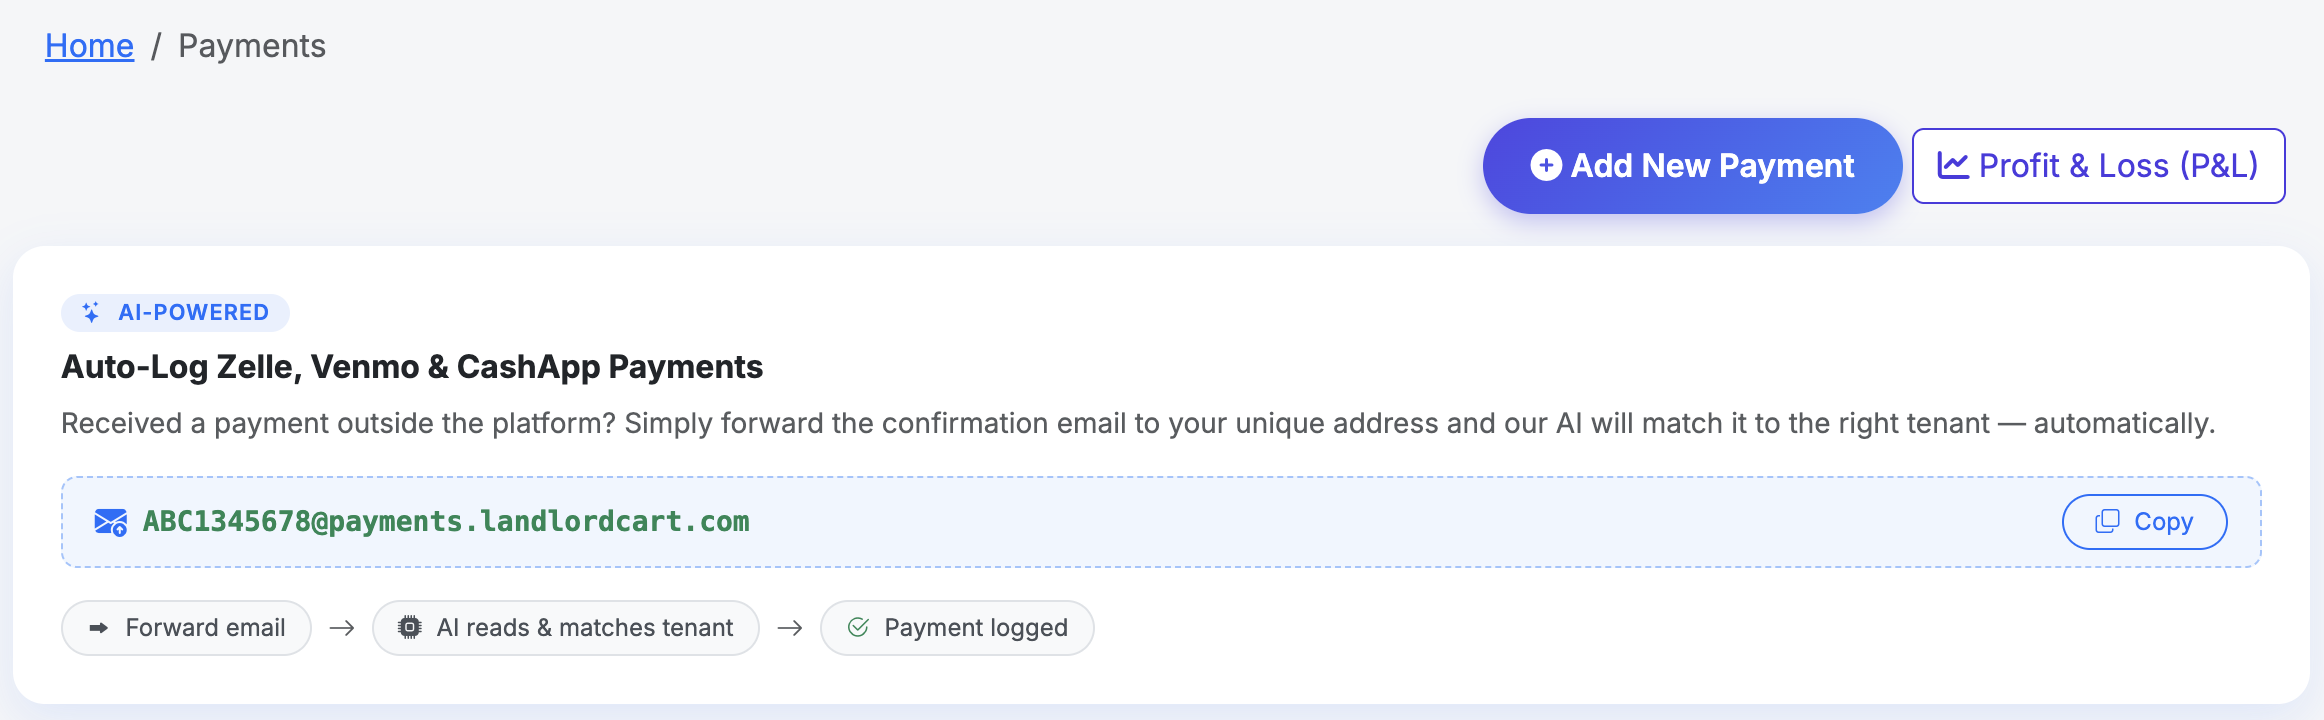
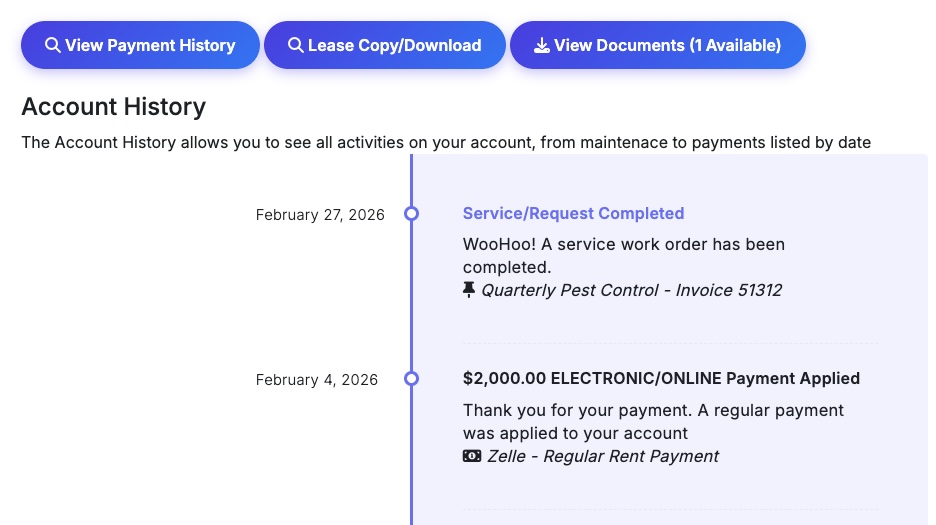
Landlord Cart uses AI to automatically detect, match, and log rent payments you receive via Zelle, Venmo, CashApp, or PayPal — no manual entry required. Simply forward the payment confirmation email you received and our system handles everything else.
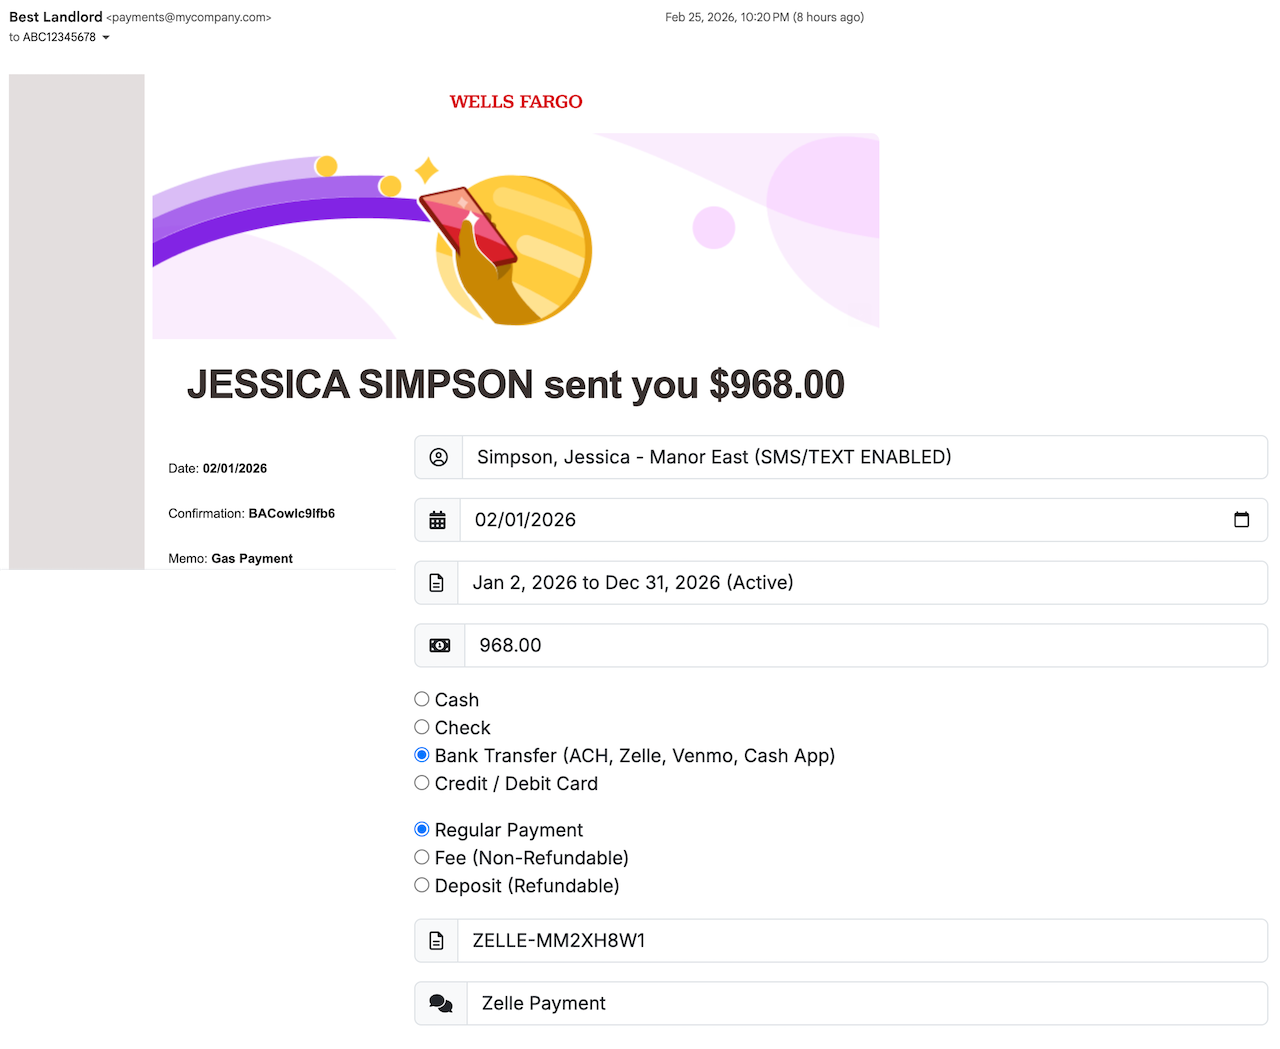
When a tenant sends you a payment through Zelle, Venmo, CashApp, or PayPal, you will receive a confirmation email from that service. Forward that email to your unique Landlord Cart payment address. Our AI will read the email, extract the payment details, match it to the correct tenant, and automatically log it to your Payments screen — then send a confirmation to both you and your tenant.
Every Landlord Cart account has a unique, private email address assigned for this purpose. To find yours:
We recommend saving this address to your phone contacts under a name like “Rent Logger” so you can forward payment confirmations quickly without searching for the address.
Once you forward the email, our AI analyzes the content and attempts to match the payment using the following priority order:
When a payment is successfully matched, the system will:
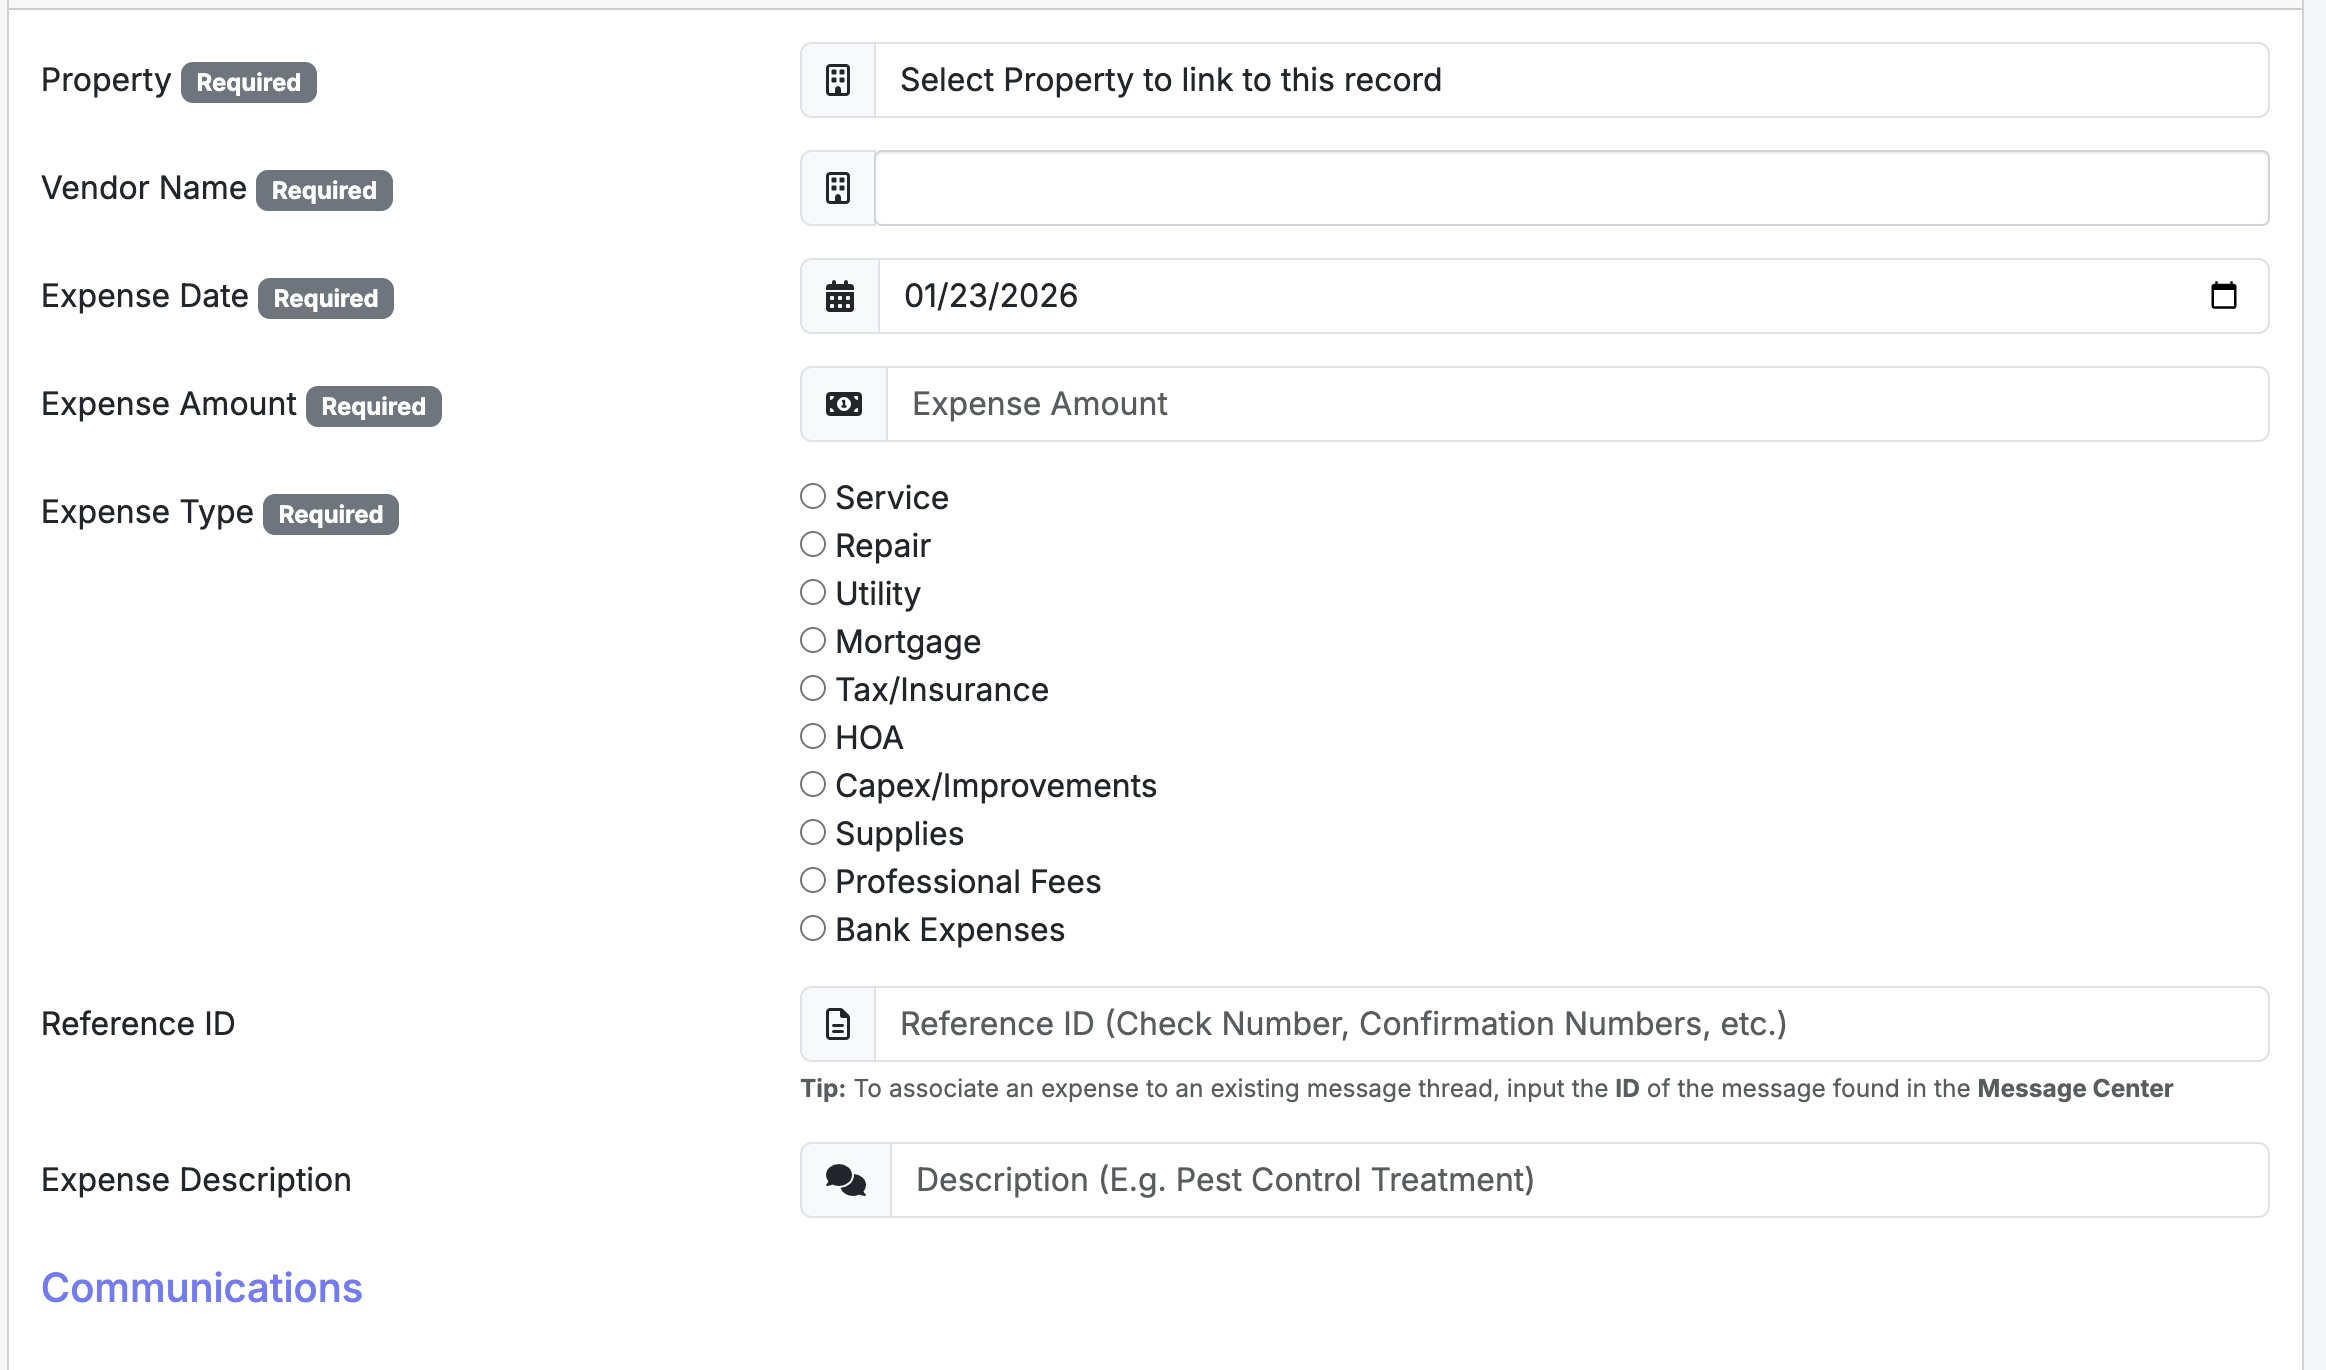
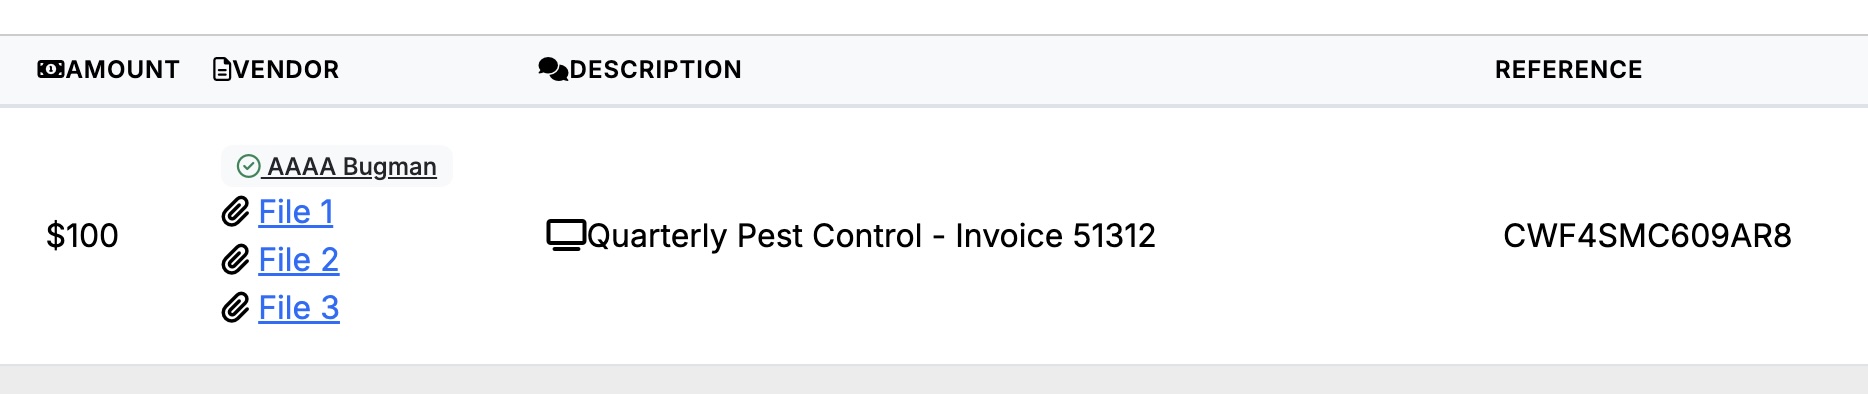
The Expenses screen is used to document all outflows related to your properties. Proper recording here keeps your portfolio organized and simplifies end-of-year tax preparation.
IRS Compliance (US Customers): Landlord Cart is designed to help you stay IRS compliant by recording payments and expenses in the calendar year they occur. All tenant payments — except security deposits — are recorded as revenue. Entries in this section are recorded as deductible expenses.
Recording an Expense:
Tenant Communications:
The Importance of Vendors:
If you have a mortgage on a rental property, Landlord Cart allows you to incorporate your IRS 1098 mortgage interest statement directly into your Profit and Loss report for a more complete and accurate financial picture.
The report pulls mortgage-related data from two sources and combines them for a complete picture:
The Settings section is where you manage your account security, professional branding, and automated tenant features. Keeping this information current ensures your communications and financial processing run smoothly.
Company and Account Information:
Branding:
Online Payments & Processing Fees:
AI Virtual Agent:
Additional Administrator Access:
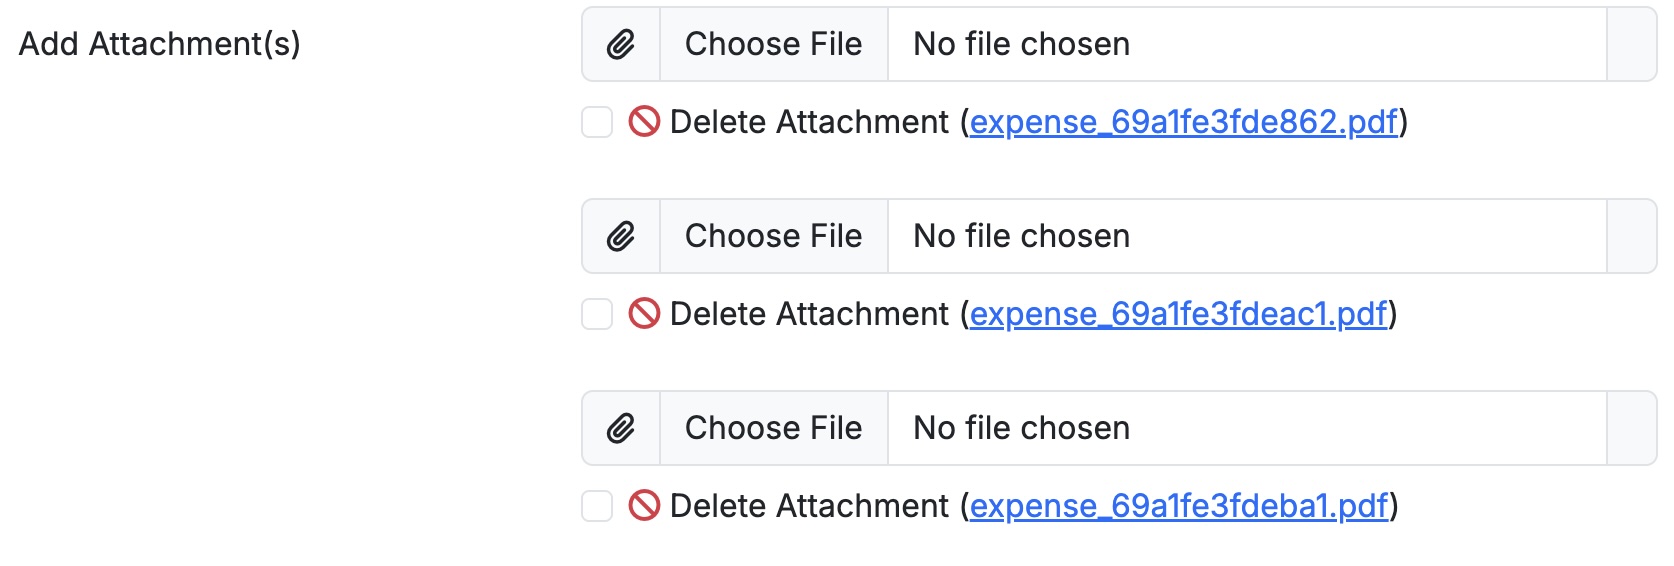
Attachments let you associate supporting files directly with records throughout the platform. Supported file types include PDF, Word, plain text, and common image formats (JPG, PNG, etc.).
Each message entry supports one attachment at a time, but you can post as many messages as needed to share multiple files. When composing a message, you have the option to mark it as Private:
Open the record, click the attachment field to browse and select your file, then save the record. To replace an existing attachment, clear the current file, upload the new one, and save.
⚠ Warning: Removing an attachment is permanent and cannot be undone. Download a local copy before deleting if you may need it later.
Landlord Cart gives you flexible tools to view and filter your data quickly across the platform, as well as dedicated financial reports to track income, expenses, and budget performance across your portfolio.
Most screens throughout the software include a built-in quick filter bar. Use it to narrow down your data without running a formal report. Filters vary by screen but generally allow you to search by:
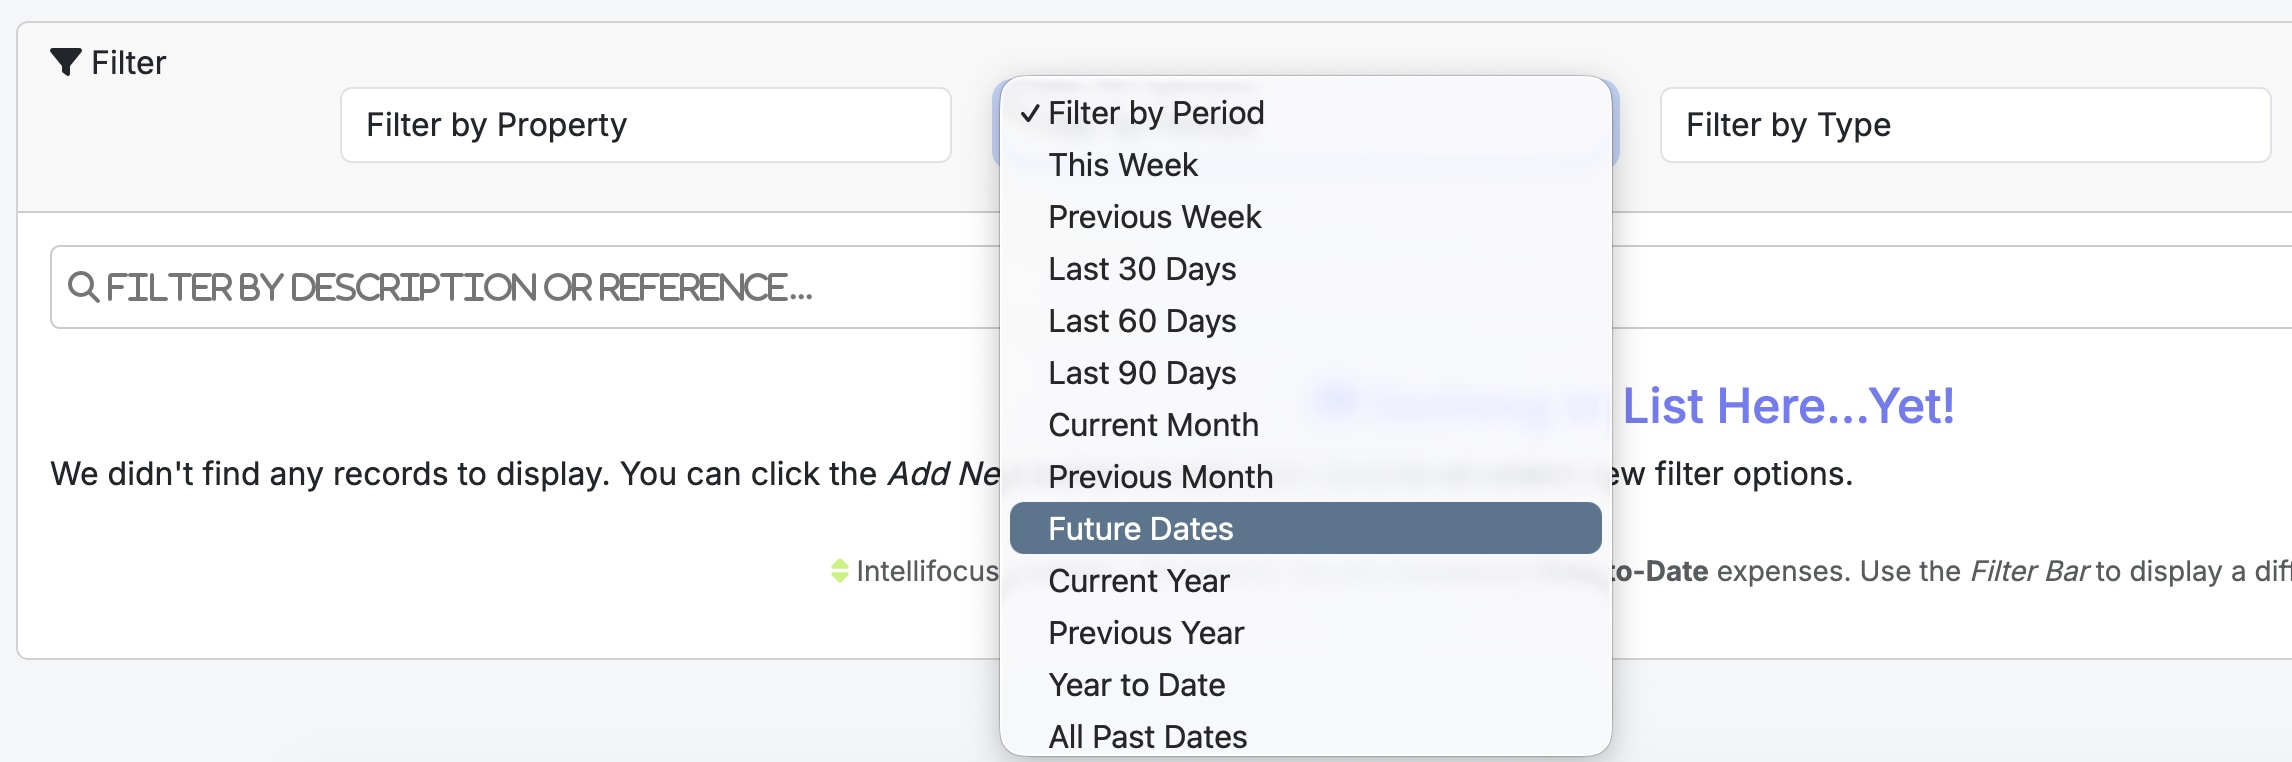
When you first open the Expenses screen, Landlord Cart automatically applies Intellifocus — a smart default that displays only Year-to-Date expenses. This keeps your view clean and relevant even as your data grows over time.
You can always use the Filter Bar to change what’s displayed. For example, if you’ve added an expense with a future due date (such as an upcoming tax payment), it won’t appear in the default Year-to-Date view.
To view future-dated expenses:
💡 Tip: Any expenses dated in the future — including taxes or other planned costs — will appear once you switch to the Future Periods filter.
To access your financial reports, click Financials in the left-hand navigation menu. Two reports are available:
If a property has multiple occupants such as roommates or co-tenants, Landlord Cart supports adding each person as their own individual tenant record under the same property. This is the recommended approach and gives you far greater control over payments, deposits, and communications.
Keeping roommates as individual records gives you clean separation across every area of the platform:
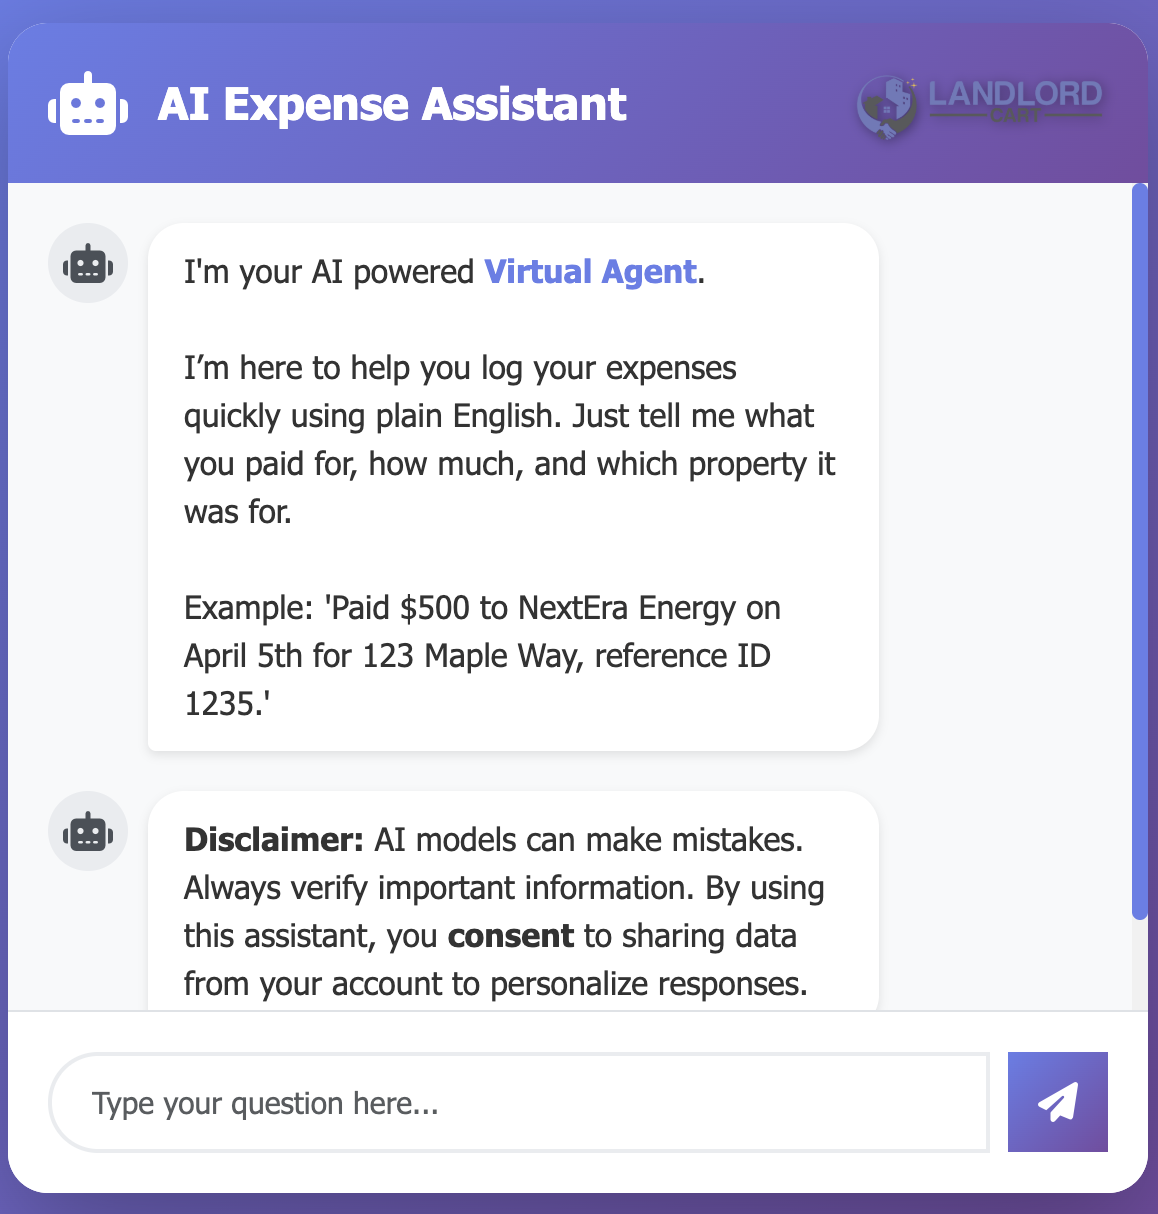
Landlord Cart utilizes advanced AI to streamline communication and financial data entry for both you and your tenants. These features save time by handling routine inquiries and automating record-keeping.
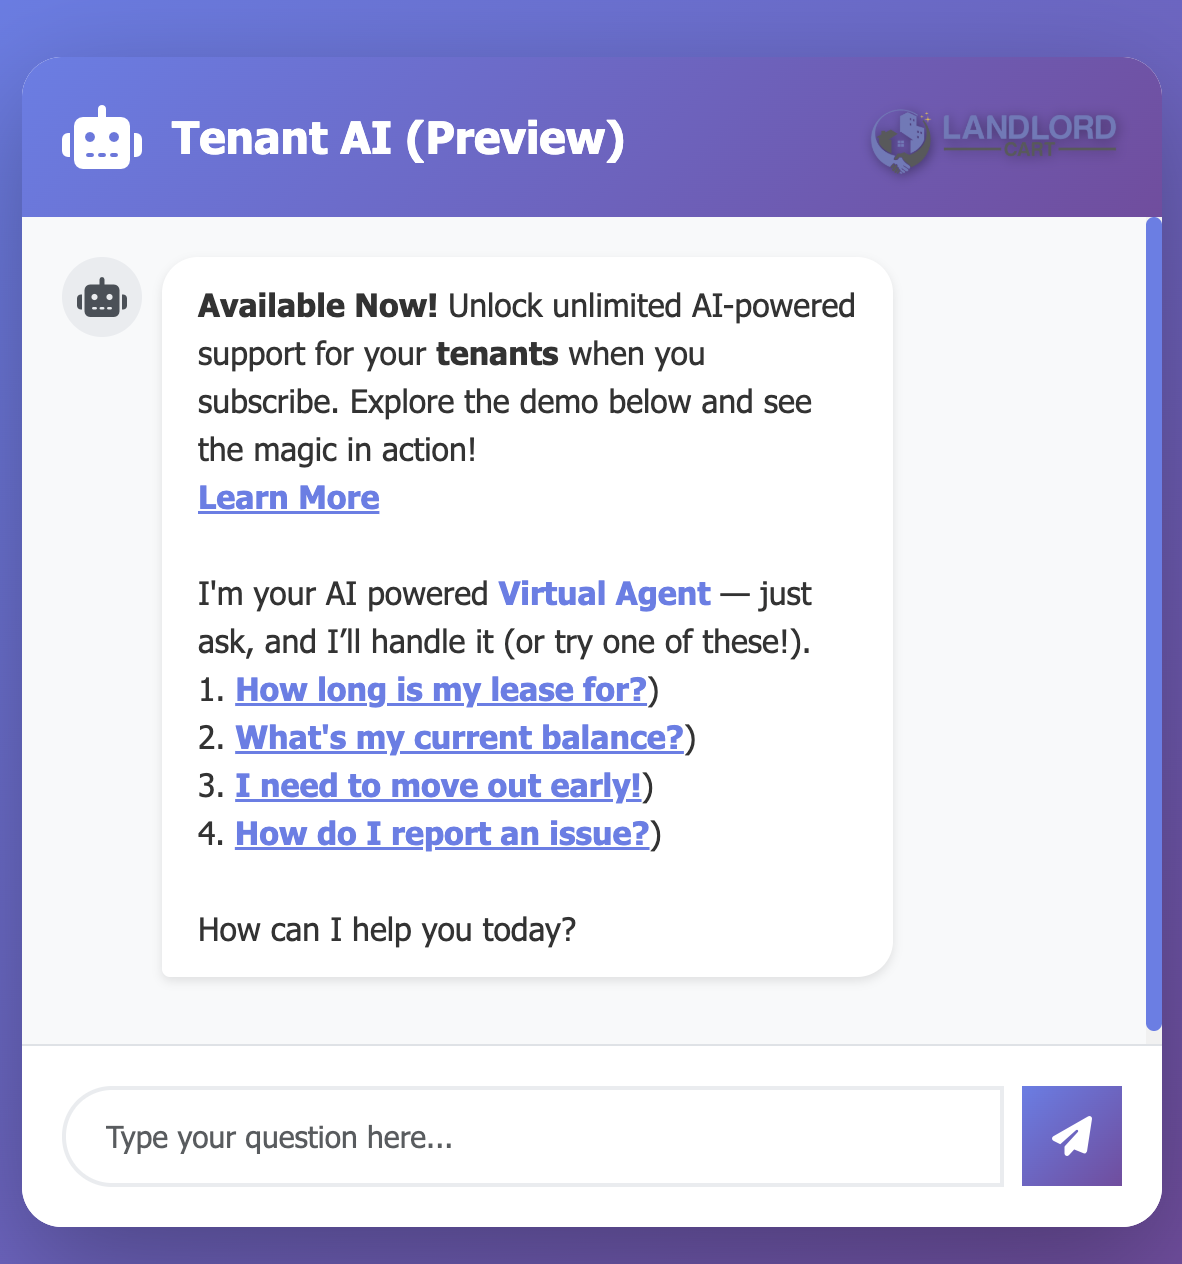
Tenant AI Virtual Agent (Starter & Professional Plans):
When enabled in your Settings, tenants have access to a 24/7 Virtual Agent within their portal. This agent provides immediate answers to common questions without requiring your manual response, such as:
AI Message Revisions (All Plans):
Both landlords and tenants can use AI-powered message assistance. This tool suggests professional rewrites for communications sent through the Message Center, ensuring all correspondence remains clear and professional.
AI Expense Entry (Professional Plan):
Instead of filling out every expense form field manually, describe the transaction in plain English and the AI will populate the fields for you.
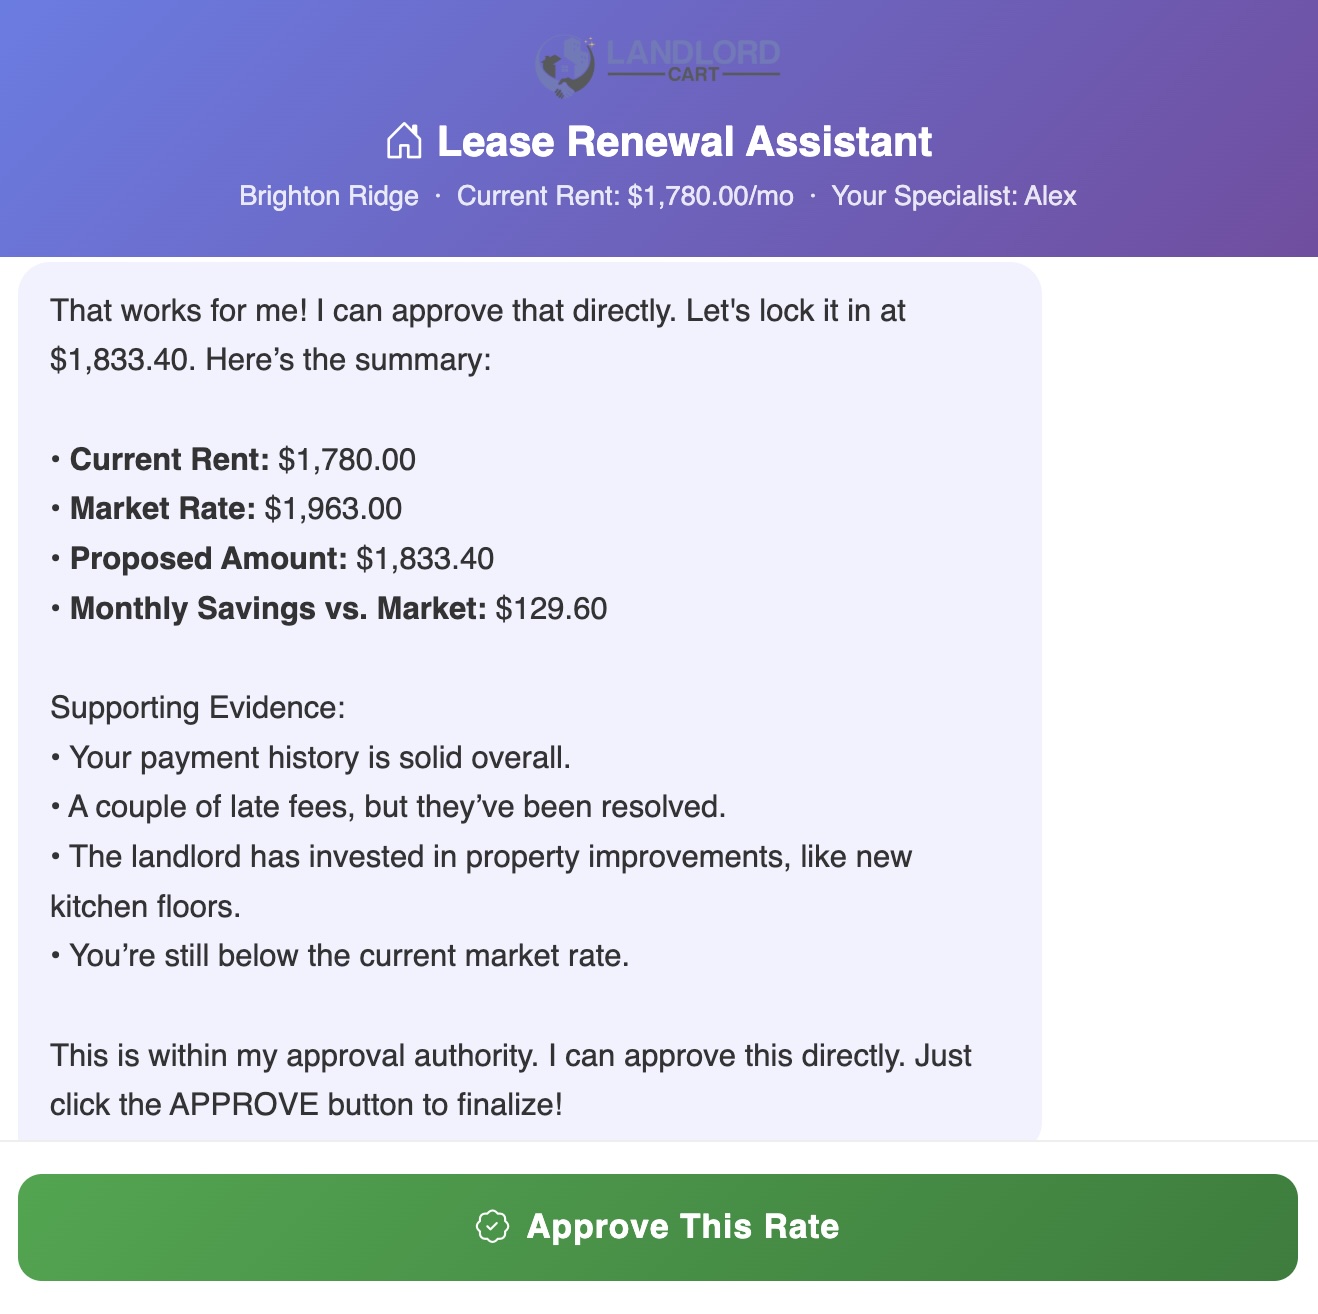
The AI Renewal Assistant is an exclusive feature for paid Landlord Cart customers that handles lease renewal negotiations automatically. Tenants chat with an AI specialist named Alex who guides them through a structured, data-driven conversation — using their real payment history, property expenses, and current market rates — while staying within the financial limits you set. Deals at or above your floor get approved on the spot. Anything below it comes to you for review.
From the tenant’s perspective, Alex works for them — helping them understand their position and get the best rate they can. This framing is intentional: tenants who feel heard are more likely to renew and less likely to walk. Alex follows a natural conversation that builds trust at every step.
Alex never jumps straight to your floor. If a tenant pushes back, he works down gradually — splitting the difference in rounds — before landing at your minimum and holding firm.
| Counter Round | What Alex Does |
|---|---|
| Round 1 | Splits the difference between the starting offer and the tenant’s ask. |
| Round 2 | Inches closer toward your floor. |
| Round 3+ | Lands at your minimum and holds there regardless of what the tenant says. |
| After 3–4 failed attempts | Alex offers the tenant two choices: submit their number to you for discretionary review, or end the session and let you generate the renewal on your own terms. |
After two or more failed counters, Alex will also naturally reference local rental market trends — mentioning that rents in the area have been rising and that the proposed rate is already well below that. This fires once per session, not on every counter.
A note on floor visibility: Alex is designed to keep your minimum private. However, after several rounds of back-and-forth where the tenant keeps pushing below what Alex can approve, Alex may reference the floor directly — for example, “The best I can approve is $X.” This is intentional: at that stage in the conversation, holding the line clearly is more effective than continuing to deflect. Keep this in mind when setting your minimum — it is a number the tenant may ultimately see if negotiations go deep.
Beyond Alex’s instructions, the system has independent safeguards built in at the code level to give you confidence that your floor is never breached — even in edge cases. The system will never process a renewal at or below the tenant’s current rent, will never approve a rate below your minimum, and will never submit anything without the tenant explicitly clicking the button. If something unexpected occurs mid-conversation, the system corrects itself silently and the conversation continues.
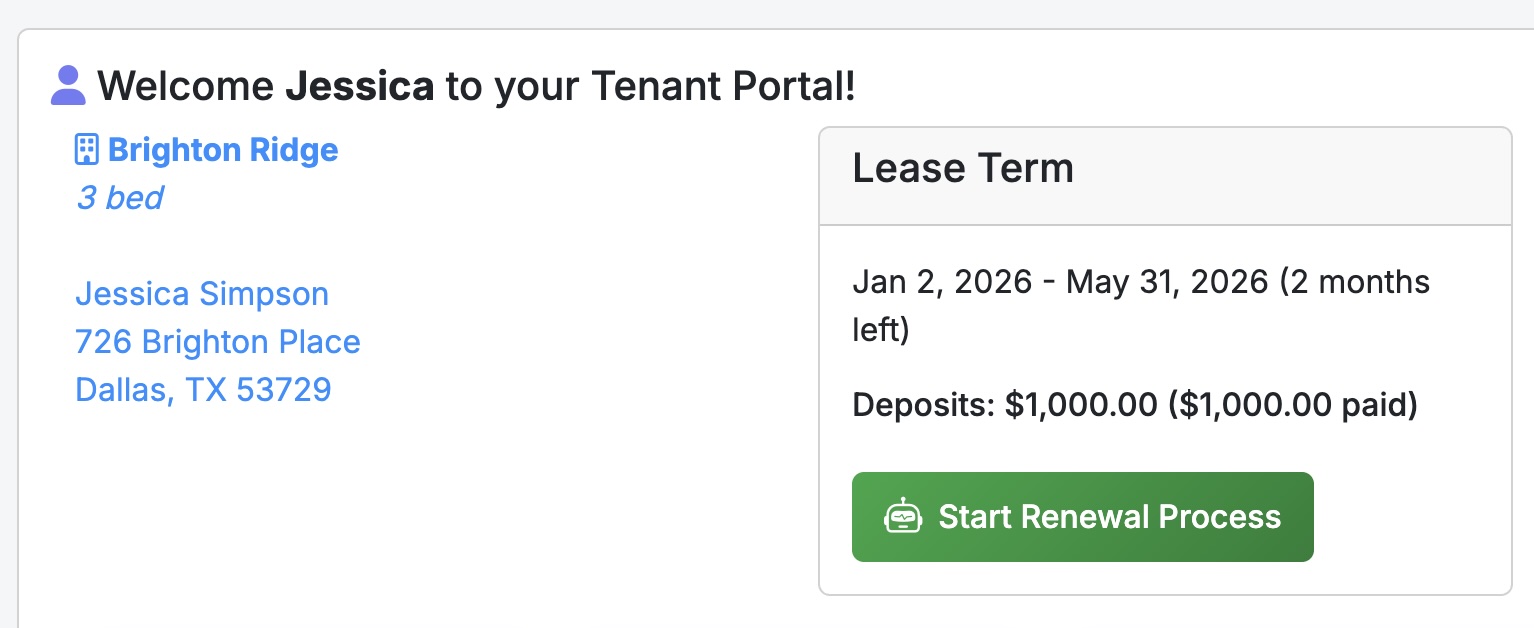
The AI Renewal Assistant activates automatically for any tenant whose property has both values configured. To turn it on:
| Field | What to Enter | Visible to Tenant? |
|---|---|---|
| Market Rate | The current going rate for comparable units in your area. Alex shows this to the tenant as the market benchmark, framing their renewal offer as a savings against it. | Yes |
| Floor Price (Minimum) | Your absolute floor — the lowest monthly rate you will accept for this renewal. Alex will never agree to anything below this, and the system enforces it independently as a backup. As noted above, this number may surface during extended negotiations. | Possibly — if negotiations go several rounds |
restart in the chat.To disable the feature for any property, simply clear both fields and save. Any tenant on that property will see a “not available yet” page on their next visit.
The chat only becomes available to the tenant when their lease end date is within 90 days. Outside that window the activation block is ignored automatically — you don’t need to manage timing yourself.
When the tenant agrees to a rate, Alex presents a summary and one of two action buttons:
| Button | When It Appears | What Happens |
|---|---|---|
| APPROVE (solid green) | Agreed rate is at or above your minimum | Alex approves on your behalf immediately. No action needed from you. |
| SUBMIT (teal-green) | Agreed rate is below your minimum but the tenant still wants to send it | The proposal is forwarded to you for review. You decide whether to accept, counter, or decline. |
If the tenant closes the chat without clicking either button, nothing is sent and no record is created. Once you generate your own renewal offer through the standard process, the negotiation window closes and Alex is no longer available for that tenant.
Every completed session generates the following automatically:
The AI Tax Advisor is an exclusive feature for paid Landlord Cart customers that analyzes your full portfolio’s financial data for the year and tells you — in plain English — how to use the IRS tax code to pay as little as possible. It reads your actual income, expenses, and capital improvements and produces a CPA-style strategy report in seconds.
The report is structured in six sections, each focused on a different tax strategy:
The report closes with a What to Bring Your CPA checklist — a prioritized list of elections, documentation, and questions to bring to your tax professional before filing.
Below is an example of what the report looks like for a three-property portfolio.
Your portfolio generated $81,121 in gross rental income across three properties in 2024. Total operating expenses were $82,282, putting you in a net operating loss position of approximately $1,161 before depreciation strategies are applied. This is actually a favorable starting point — you are already showing a paper loss, and the strategies below can deepen it further to maximize your tax benefit.
Siding Upgrade — $16,761: This is capitalized as an improvement and should remain so. The scope of work (full exterior siding replacement) constitutes a restoration of a major building component under IRS Reg. 1.263(a)-3, not a repair. Reclassification is not defensible here.
HVAC Replacement — $9,297: Even though the system failed, replacing the entire unit is a capitalization event — not a repair — under IRS rules. The correct strategy here is Partial Asset Disposition (see above), not reclassification.
After applying all strategies above, your projected paper loss is approximately $12,400–$18,000 depending on depreciation elections made.
Active Participation (most likely path): If your AGI is under $100,000, you can deduct up to $25,000 of this loss directly against W-2 income. This benefit phases out between $100,000 and $150,000 AGI and disappears entirely above $150,000. To qualify for Active Participation you do not need to be a full-time landlord — you simply need to be meaningfully involved in management decisions: approving tenants, setting rent, authorizing repairs. Keep a brief log of these activities.
Real Estate Professional Status (REPS) — if your AGI exceeds $150K: REPS removes the passive loss limitation entirely, allowing you to offset unlimited W-2 income with real estate losses. To qualify you must meet two tests: (1) spend more than 750 hours per year in real property trades or businesses, and (2) spend more time in real estate than in any other profession. If you hold a full-time W-2 job outside of real estate, REPS is very difficult to defend and increases audit risk. Document every hour with a contemporaneous log — calendar entries, invoices, email timestamps. Consult your CPA before claiming this status.
If neither applies: Your paper loss carries forward indefinitely and offsets real estate income in future years, or triggers when you sell a property.
This analysis is AI-generated for informational purposes only and does not constitute tax advice. Consult a licensed CPA or tax professional before filing.
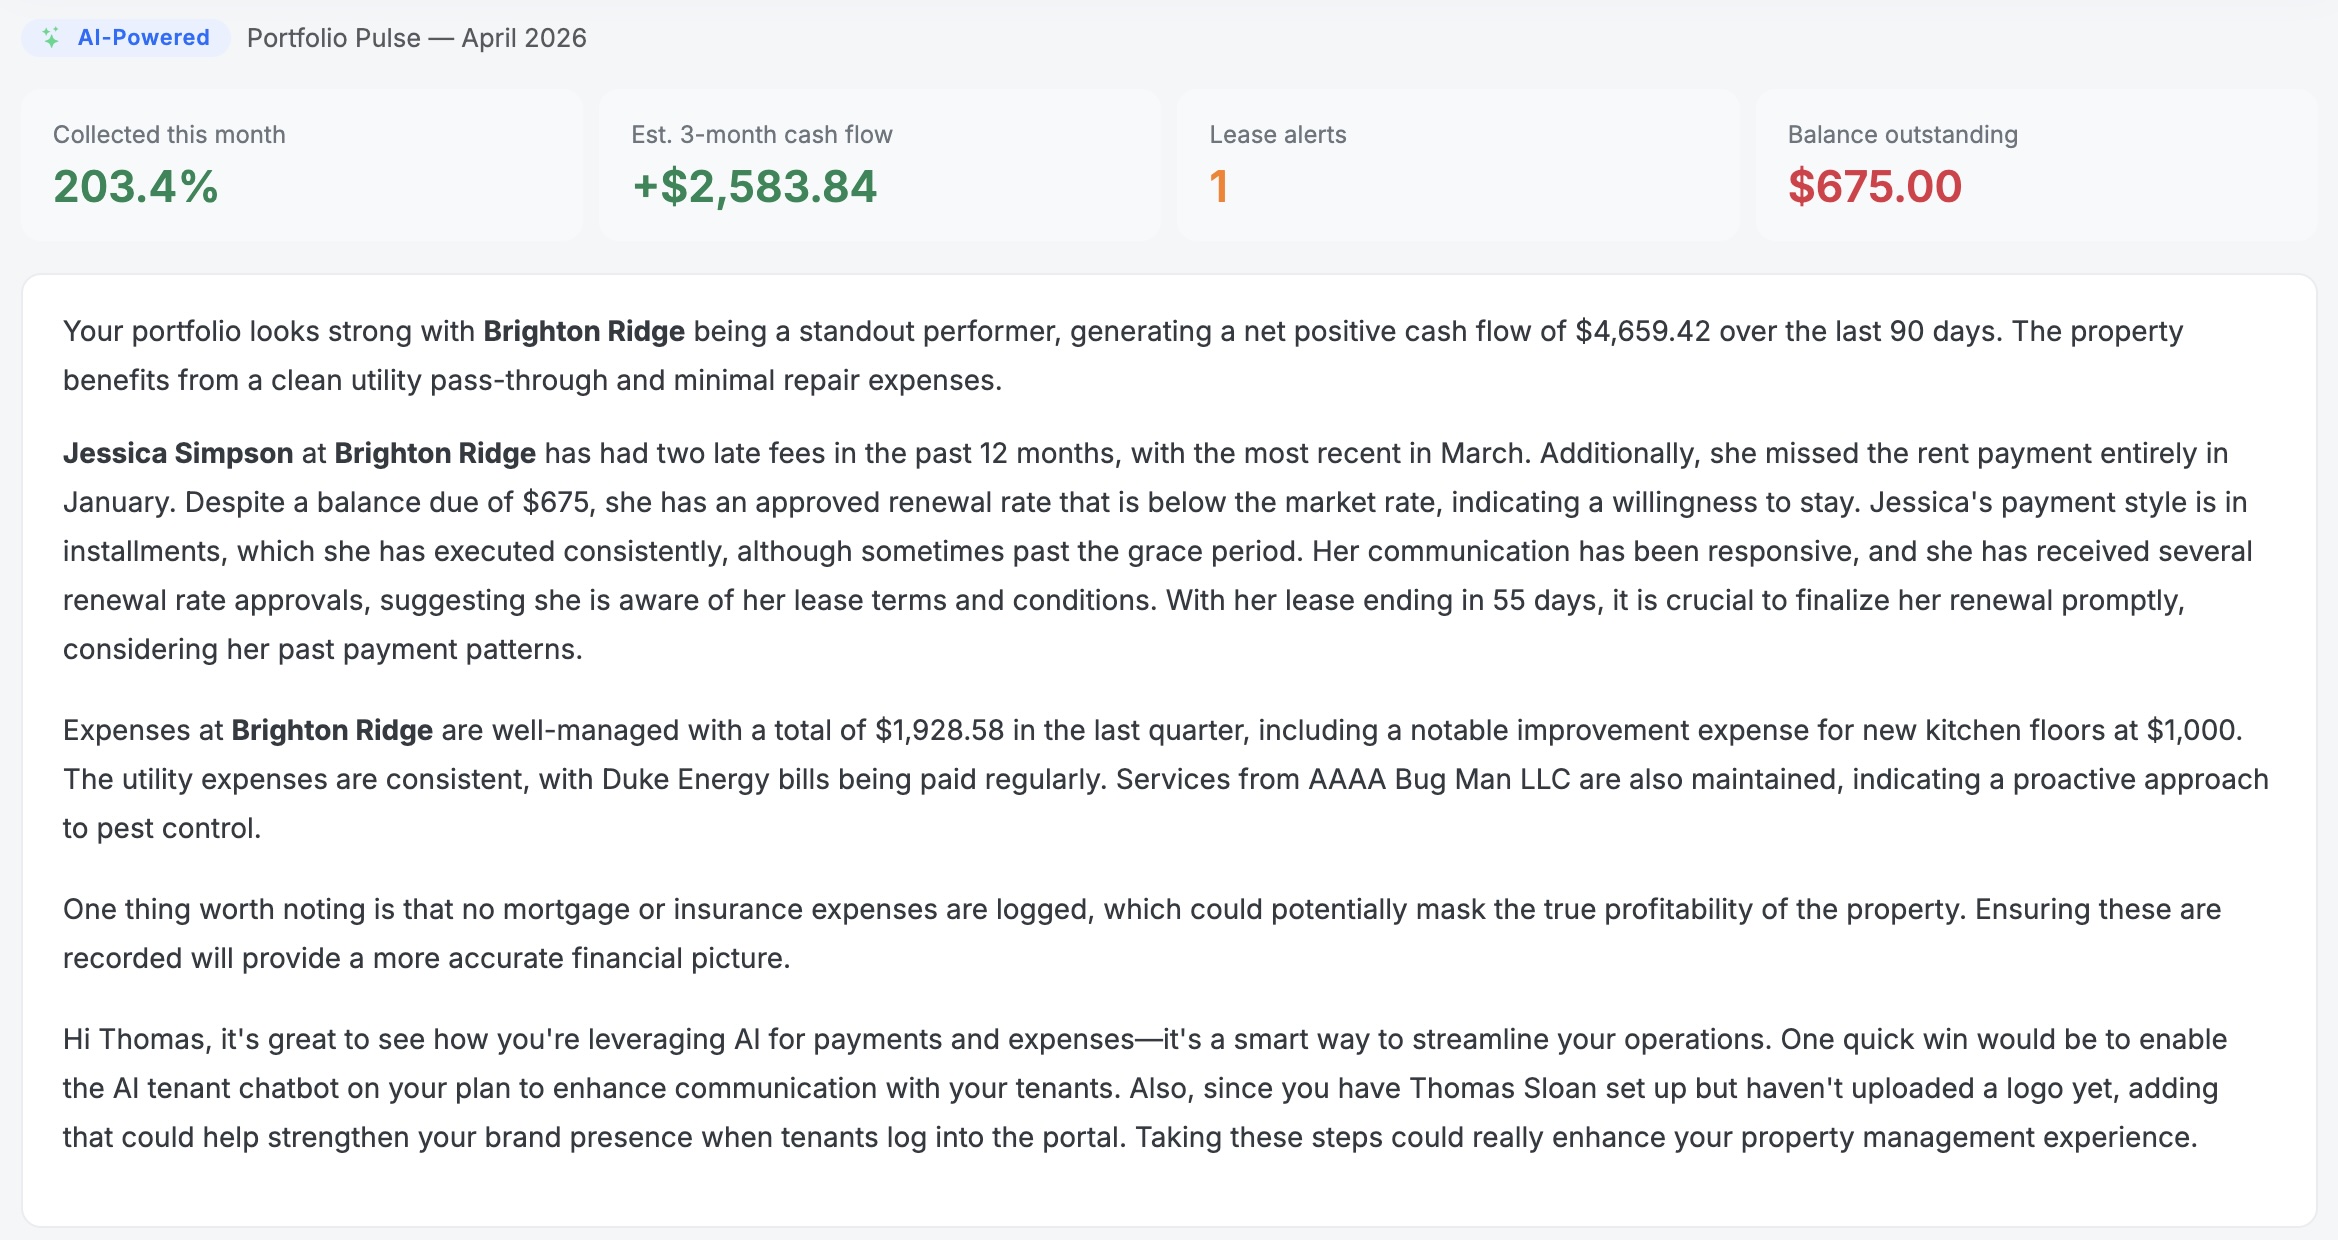
Portfolio Pulse is an on-demand AI briefing built directly into your Landlord Cart dashboard. When you click Generate Snapshot, the system reviews your entire rental portfolio — tenants, leases, payments, expenses, and charges — and returns a structured, plain-English analysis written as if a sharp property manager just finished reviewing your books.
The briefing uses your real property names, real tenant names, and real numbers. It is not a generic summary — it is a first-person narrative about your specific portfolio at this moment in time.
We recommend generating your snapshot once a month to stay on top of lease expirations, payment trends, and cash flow changes across your portfolio.
You receive a full snapshot generated from your real tenant, lease, payment, and expense data. Every metric, every tenant name, and every dollar amount reflects your actual portfolio. The more data you have logged in Landlord Cart, the richer and more detailed your briefing will be.
You will see a snapshot based on your real account data. If you are just getting started, your briefing may have fewer insights simply because there is less activity in your account yet. As you add properties, tenants, leases, and payments, your snapshot will become more detailed and actionable over time.
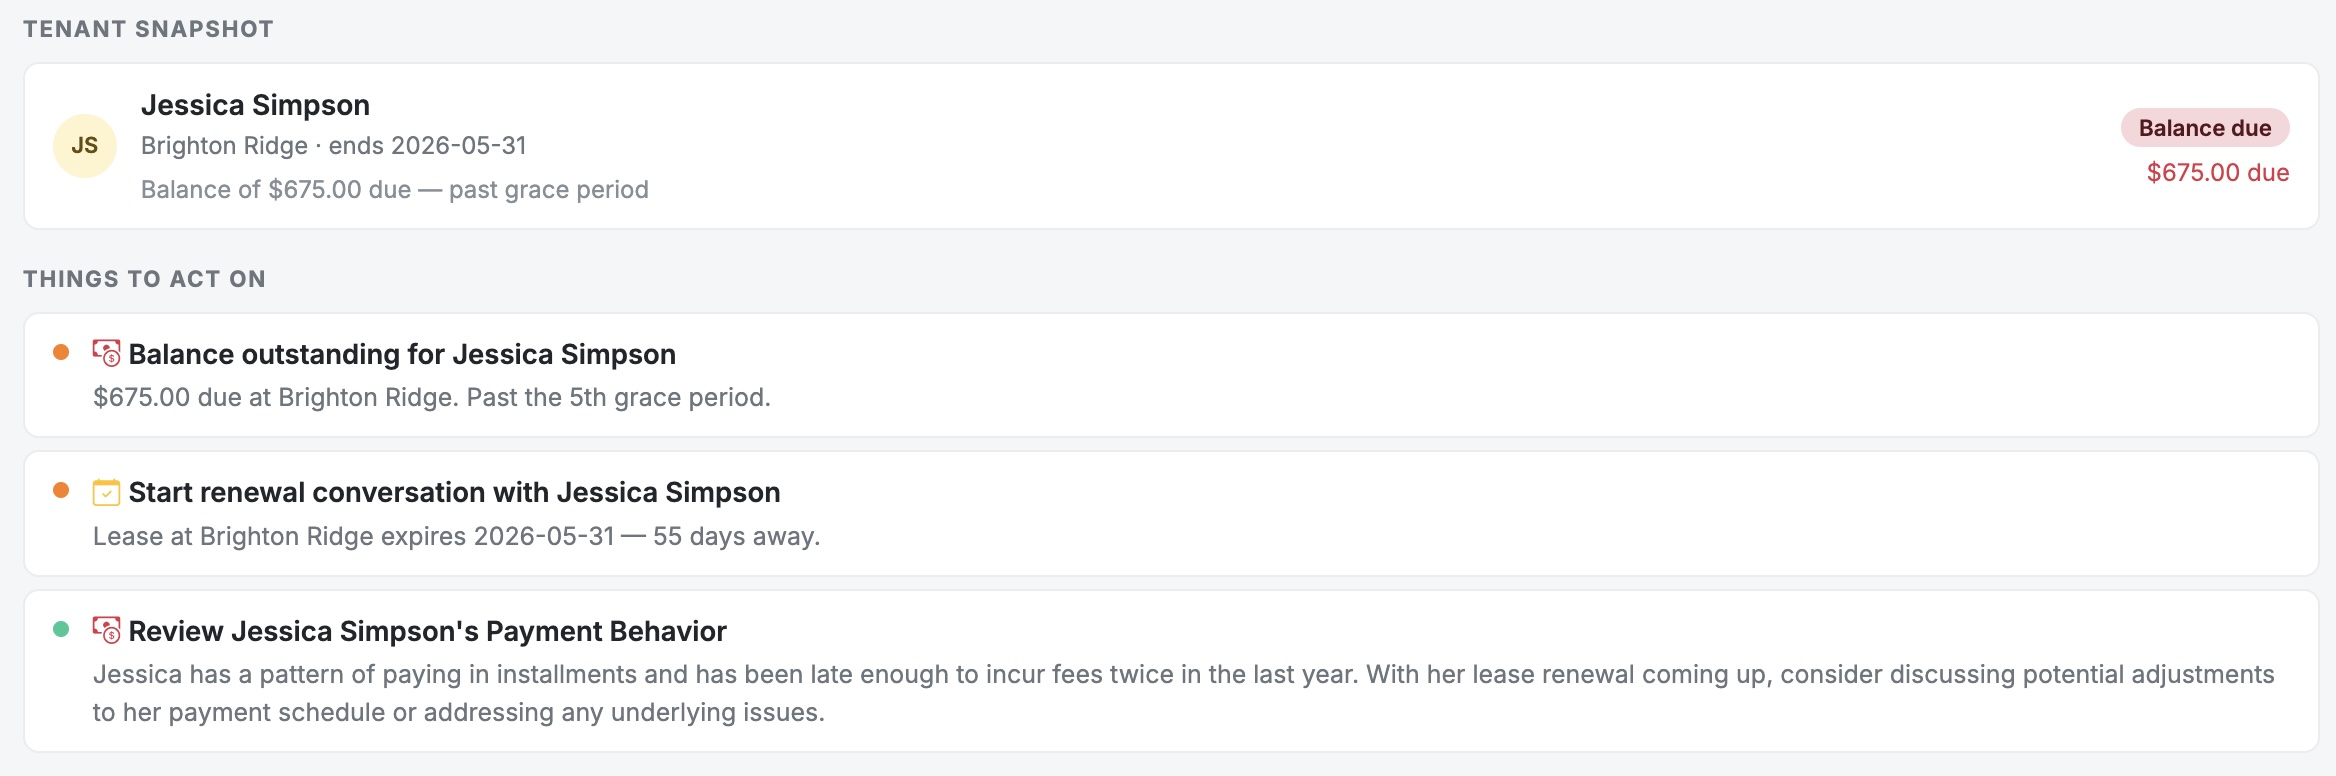
After a snapshot is generated, the dashboard displays your results in five sections:
Four quick-read metric cards appear at the top of your briefing: your rent collection rate for the current month as a percentage, your estimated three-month net cash flow, the number of leases expiring within 90 days, and the number of vacant units. These numbers are always pulled directly from your Landlord Cart records.
A two-to-three paragraph first-person analysis of your portfolio written by AI using your actual tenant names, property names, and dollar amounts. This is the core of Portfolio Pulse — a briefing that reads like it came from a property manager who just reviewed your books.
A row-by-row breakdown of every active tenant showing their current balance, payment reliability rating, lease expiration date, renewal urgency level, and whether they pay digitally or manually. All balances and reliability ratings are sourced directly from your Landlord Cart payment records.
Up to six prioritized action items ordered from high to low urgency. Each item includes a specific title, supporting detail with dollar amounts or dates, and the tenant or property name it applies to. Categories include payment issues, lease renewals, expense concerns, and account setup steps.
Up to two suggestions based on activity detected in your account — such as features you have not yet turned on or areas where Landlord Cart could be saving you time. These are tailored to your specific account, not generic tips.
Portfolio Pulse reviews six areas of your account and weaves the findings into a single cohesive briefing.
Each tenant’s payment reliability, outstanding balance, and payment method are reviewed. The briefing identifies tenants who are consistently paid in full, tenants carrying a partial balance, and tenants who have paid short multiple months in a row. Payment method is noted — digital payments like ACH or card versus manual methods like cash or check.
Leases expiring within 30 days are flagged as critical. Leases expiring in 31 to 60 days are flagged as urgent. Leases expiring in 61 to 90 days are listed as a watch item. Month-to-month tenants are identified and noted. Where a renewal conversation is recommended, the briefing will mention the tenant by name and include the exact number of days remaining on their lease.
Three months of payment and expense activity are reviewed to estimate your net cash flow, calculate your collection rate, and identify expense trends across your properties. The briefing will flag the property with the highest repair costs, call out any expense spikes that may signal a maintenance issue, and note if expenses at a specific property are consuming a high percentage of that property’s rent revenue. If no expenses have been logged in three months, the briefing will flag it — missing expense records can affect your tax deductions.
Properties with no active lease are flagged by name. If you have any vacant units, the briefing will note them and may suggest resources for getting them re-leased, including Landlord Cart’s free AI lease generator.
Portfolio Pulse recognizes when you are using Landlord Cart’s payment automation or expense automation features. If you are using both, the briefing will acknowledge it. If you are using one but not the other, it will let you know the other option exists. If it detects payment keywords in your records that suggest you might benefit from automation, it will mention it.
The briefing checks whether key features like online rent collection through Stripe or the AI tenant chatbot are active on your account. If a feature that could benefit you is not yet turned on, it will be noted with context on what you would gain by enabling it.
Each snapshot is stored in your browser for 24 hours. You can generate a new snapshot once every 24 hours.
We recommend generating your snapshot at least once a month to catch lease expirations, payment concerns, and cash flow changes before they become problems.
All tenant balances, payment totals, and reliability ratings are calculated by Landlord Cart’s platform before the AI ever sees them. The AI reads and interprets a structured summary of your account — it does not have access to raw financial records, and it never independently recalculates figures. Every dollar amount and every metric in your briefing comes from your Landlord Cart records, not from an AI estimate.
Once every 24 hours. If your current snapshot is less than 24 hours old, the Refresh button will not be available yet. Your previous snapshot will remain visible in the meantime.
No. Portfolio Pulse only reads payment and expense records that have been logged inside Landlord Cart. It does not connect to any bank, payment processor, or external financial account.
Balances reflect what has been recorded in Landlord Cart. If a payment has not been logged — either manually or through automation — it will not appear as received or outstanding. Keeping your payment records up to date ensures your snapshot is accurate.
Not at all. If your account is newer or has less activity, your briefing will naturally have fewer insights to report. As you add properties, tenants, leases, and payments over time, your snapshot will grow more detailed and personalized with each generation.
For most DIY landlords, tenant turnover happens infrequently — hopefully every couple of years or more. When it’s time to find a new tenant, you don’t need expensive listing services to get started.
Start with free platforms that give you strong exposure to local renters:
Need help writing a listing? We have a comprehensive guide: How to Advertise Your Rentals for Free
While you handle initial marketing and showings, Landlord Cart helps you with:
Ready to get started? Let’s walk through how to manage your applicants and screen potential tenants.
Since applicants are tied to specific properties, you manage everything directly through the Properties screen.
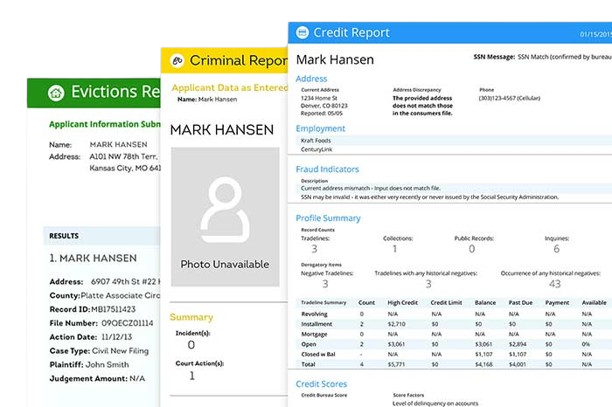
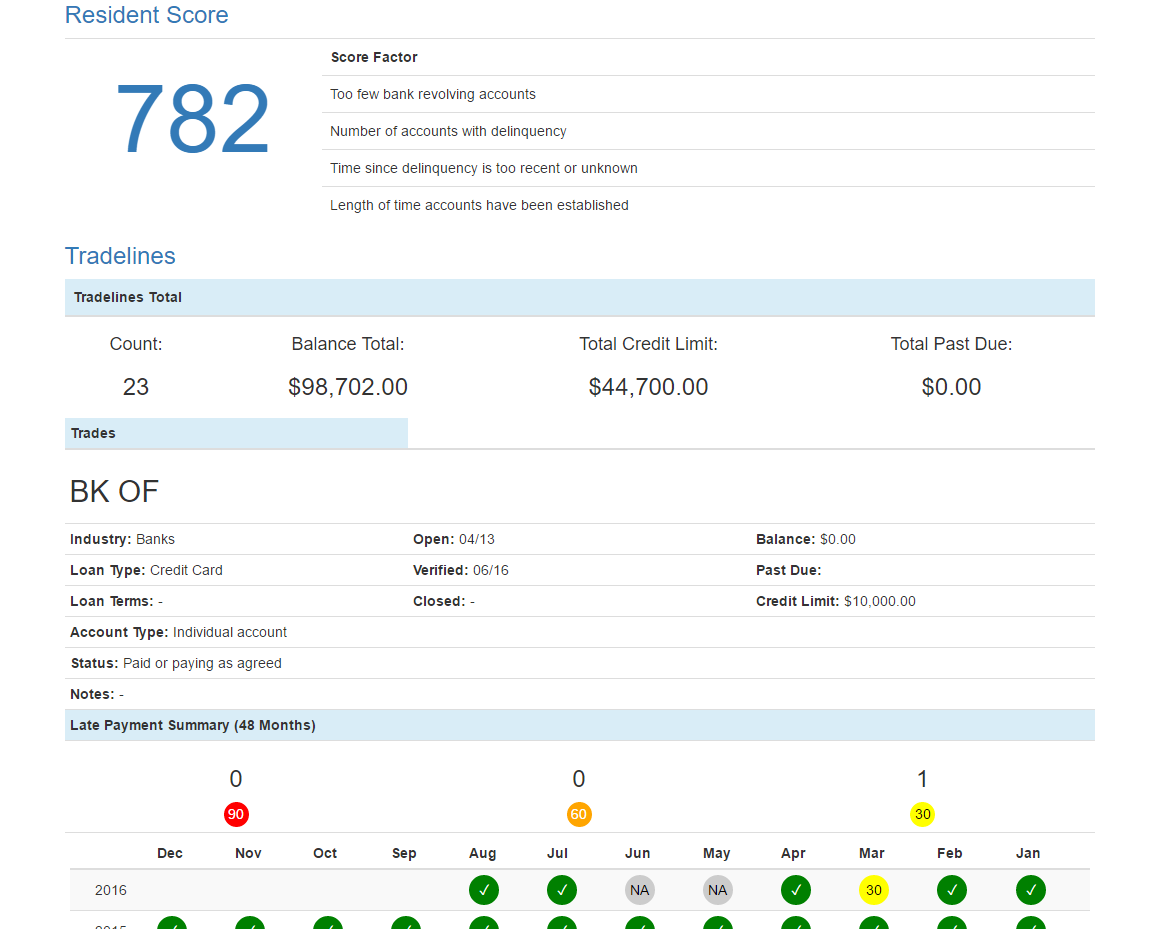
Once you’ve received applications and narrowed down your prospects, it’s time to conduct thorough tenant screening. We’ve partnered with TransUnion to provide comprehensive credit and background checks.
Start Screening with TransUnion
Don’t ask every applicant to pay for screening. First review all applications and narrow down to your top 2–3 candidates based on their application information, employment, and references.
Let applicants know upfront that shortlisted candidates will be asked to complete a background check at their own expense (typically $30–40). This ensures serious applicants only.
Always complete screening before making a rental offer or signing a lease.
Apply the same screening criteria to all applicants. Establish written standards for income, credit score, and rental history before reviewing any applications — this protects you from fair housing liability.
Look beyond just the credit score. Review:
Once you’ve selected your tenant, use our free AI Lease Generator to create a legally compliant lease. From there, manage the entire rental lifecycle within Landlord Cart.
Introducing your tenants to a professional management portal isn’t just a benefit for you — it’s a major upgrade for them. A portal reduces friction, increases transparency, and gives them direct control over their residency experience.
The portal is 100% browser-based — no app download required. Tenants access it at selfservice.properties from any phone, tablet, or desktop. If a tenant forgets their password, they can click “Forgot Password” on the login screen to reset it via email — you cannot reset it on their behalf.
Key Benefits for Tenants:
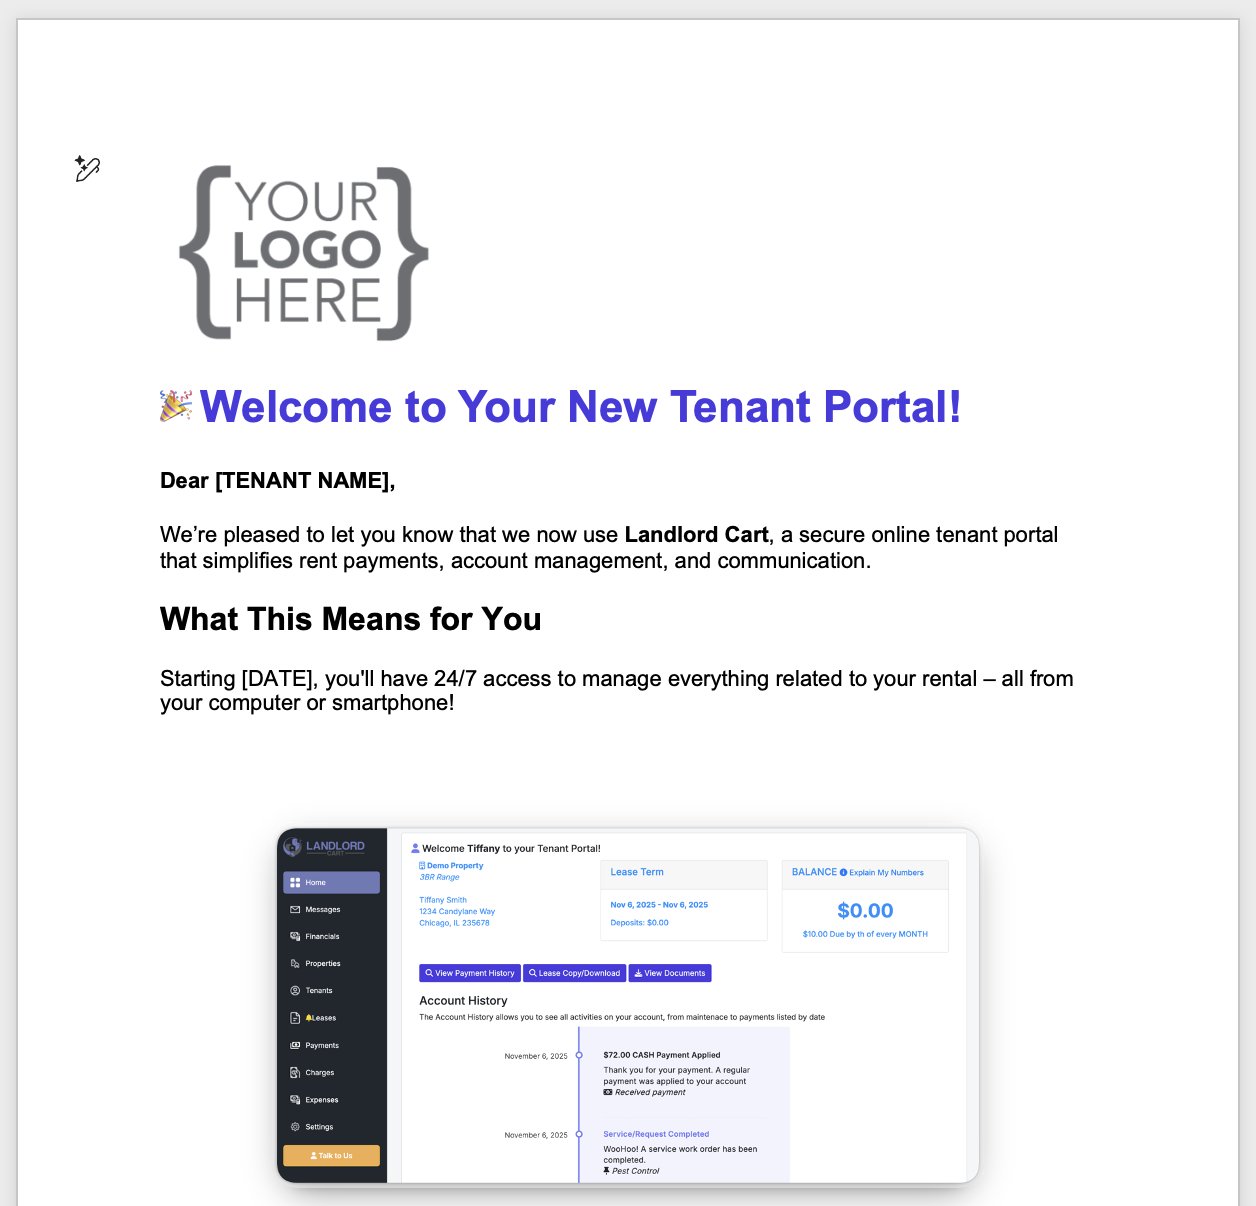
The Welcome Template: To make this transition easy, we provide a pre-written Tenant Introduction Letter. You can download the Word Doc template from the Tenant Management section. It is fully editable so you can customize it with your property details and logo.
The Self-Service Domain: To keep your management professional and separate from our software marketing, all users — Landlords, Owners, and Tenants — manage their business at selfservice.properties. This white-labeled experience makes your operation feel like a dedicated management firm.

To ensure high adoption and clear expectations, we recommend adding a specific “Communication Clause” to all your future lease agreements. This establishes the portal as the official legal channel for your business relationship — and creates a timestamped, documented record that protects you if a dispute ever goes to court.
Recommended Lease Language: Copy and paste the following into your lease under a “Communications” or “General Administration” section:
COMMUNICATION: Tenant(s) agrees to direct and accept all non-emergency communication regarding repair, maintenance, payment, or general administration of this agreement through a secure web portal and/or SMS text messaging from Landlord and/or their assignees such as a property manager.
By setting this standard early, you ensure that all history, payments, and repair requests are stored in one central database.
For existing tenants who don’t have this clause in their current lease, you can add it as a signed lease addendum at renewal time.
Once you have created the Tenant record and verified that their lease dates and balances are accurate, it is time to give them access.
The Invitation Process:
Onboarding Pro-Tip: Before sending the invite, upload a digital copy of their current Lease Agreement to their record. When a tenant logs in for the first time and sees their documents and accurate balance already there, it builds immediate professional trust.
To receive rent payments directly to your bank account, you must connect a secure Stripe account. To begin, go to your Landlord Portal and click Collect Rent Online. Stripe is our industry-leading payment processor. By law, Stripe must verify your identity to prevent fraud and comply with federal financial regulations.
What you will need for setup:
Why is my SSN/EIN required? The IRS requires processors to collect tax identification for anyone receiving $600+ per year to generate 1099-K tax forms. Your sensitive data is never stored on Landlord Cart servers — it is handled exclusively by Stripe using bank-level 256-bit encryption.
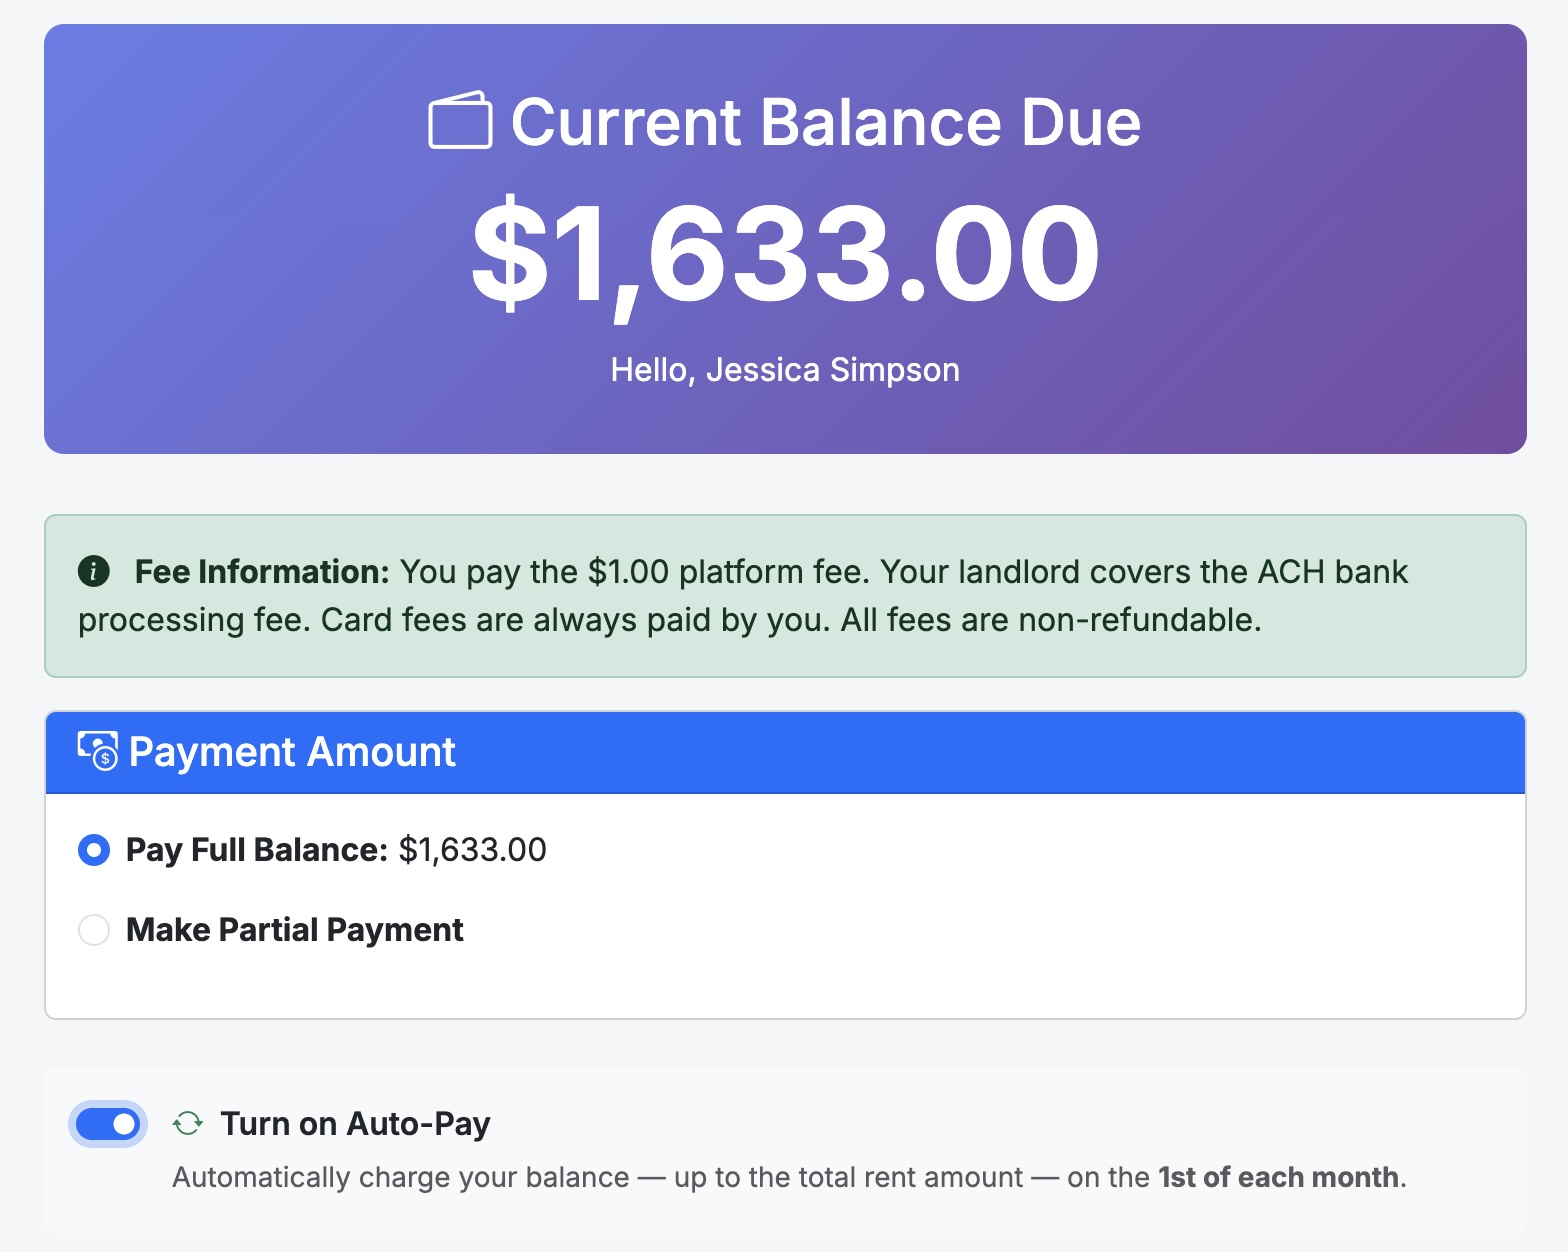
Tenants can make secure online payments at any time directly from their portal without needing to contact you. The process is straightforward and gives tenants full control over how and how much they pay.
From the Tenant Portal, the current balance is displayed prominently at the top of the screen. To make a payment:
Processing times and fees explain how rent moves from your tenant’s bank account to yours, what costs apply, and who is responsible for paying them based on your subscription plan.
| Plan | ACH Platform Fee | Card Platform Fee | Who Can Choose Who Pays? |
|---|---|---|---|
| Free Forever | $2 | 1% | Tenant only (cannot change) |
| Starter | $1 | $9.99 | Yes |
| Professional | $0 | $7.99 | Yes |
Note: Platform fees are in addition to the bank processing fees listed above.
Fee responsibility can be updated anytime under Settings → Payment Preferences (Starter and Professional plans only).
For more details on processing, payouts, and FAQs, please see our full guide:
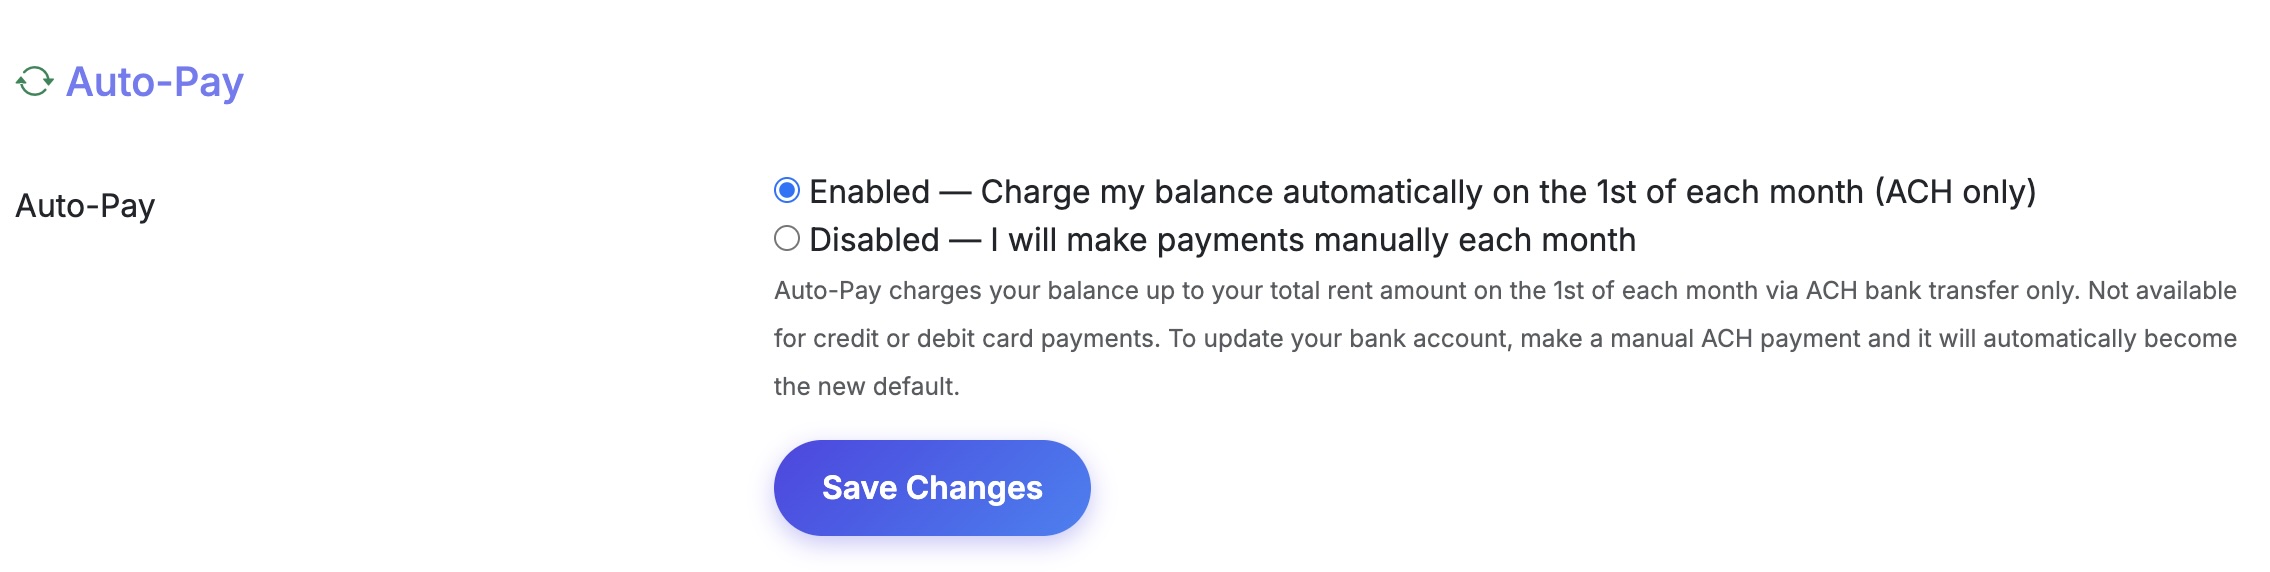
Auto-Pay allows your tenant to authorize an automatic ACH bank transfer on the 1st of each month. Their balance — up to their total rent amount — will be charged automatically. If the 1st falls on a weekend or bank holiday, processing may be delayed by 1 business day.
Tenants can turn on Auto-Pay during any ACH payment by checking the Turn on Auto-Pay checkbox on the payment screen. They can also enable or disable it at any time under Account Settings → Auto-Pay.
When a tenant makes a manual ACH payment using a new bank account, that account automatically becomes the new default for all future Auto-Pay charges.
View a tenant’s Auto-Pay status under Tenants → Edit Tenant → Auto-Pay. This field is read-only — only the tenant can change it.
If an Auto-Pay charge fails — for example due to insufficient funds or a closed account — both you and the tenant will receive a payment failed email notification. The tenant will need to log in and make a manual payment to resolve the balance.
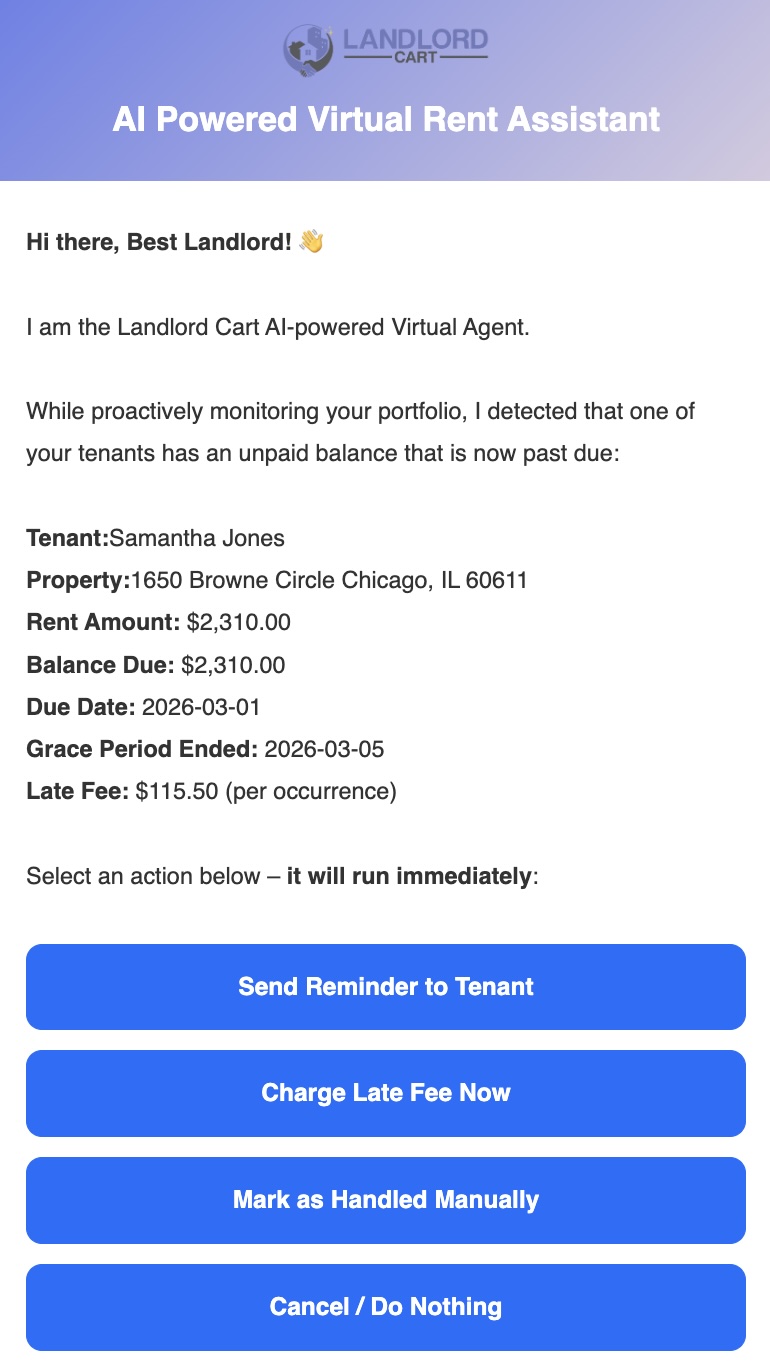
Because many landlords collect rent through offline methods like Zelle, Venmo, or CashApp, Landlord Cart does not automatically charge late fees. Instead, the system uses AI-powered alerts to notify you when rent has not been logged by the due date, putting you in control of every late fee decision.
Late fee settings are configured individually on each lease record:
We take your financial security seriously. Neither Landlord Cart nor Stripe will ever sell or share your information for marketing purposes.
Handling Disputes: While rare, if a tenant disputes a payment with their bank, Stripe will notify you immediately via email. Dispute resolution typically takes 60–90 days. During that time the disputed amount is held. If you win the dispute, the funds are released; if you lose, the amount plus a Stripe dispute fee is deducted.
Updating Your Information: If your bank account changes, update it at any time via Settings → Payment Account. Stripe will verify the new account through micro-deposits or instant verification via your online banking login.
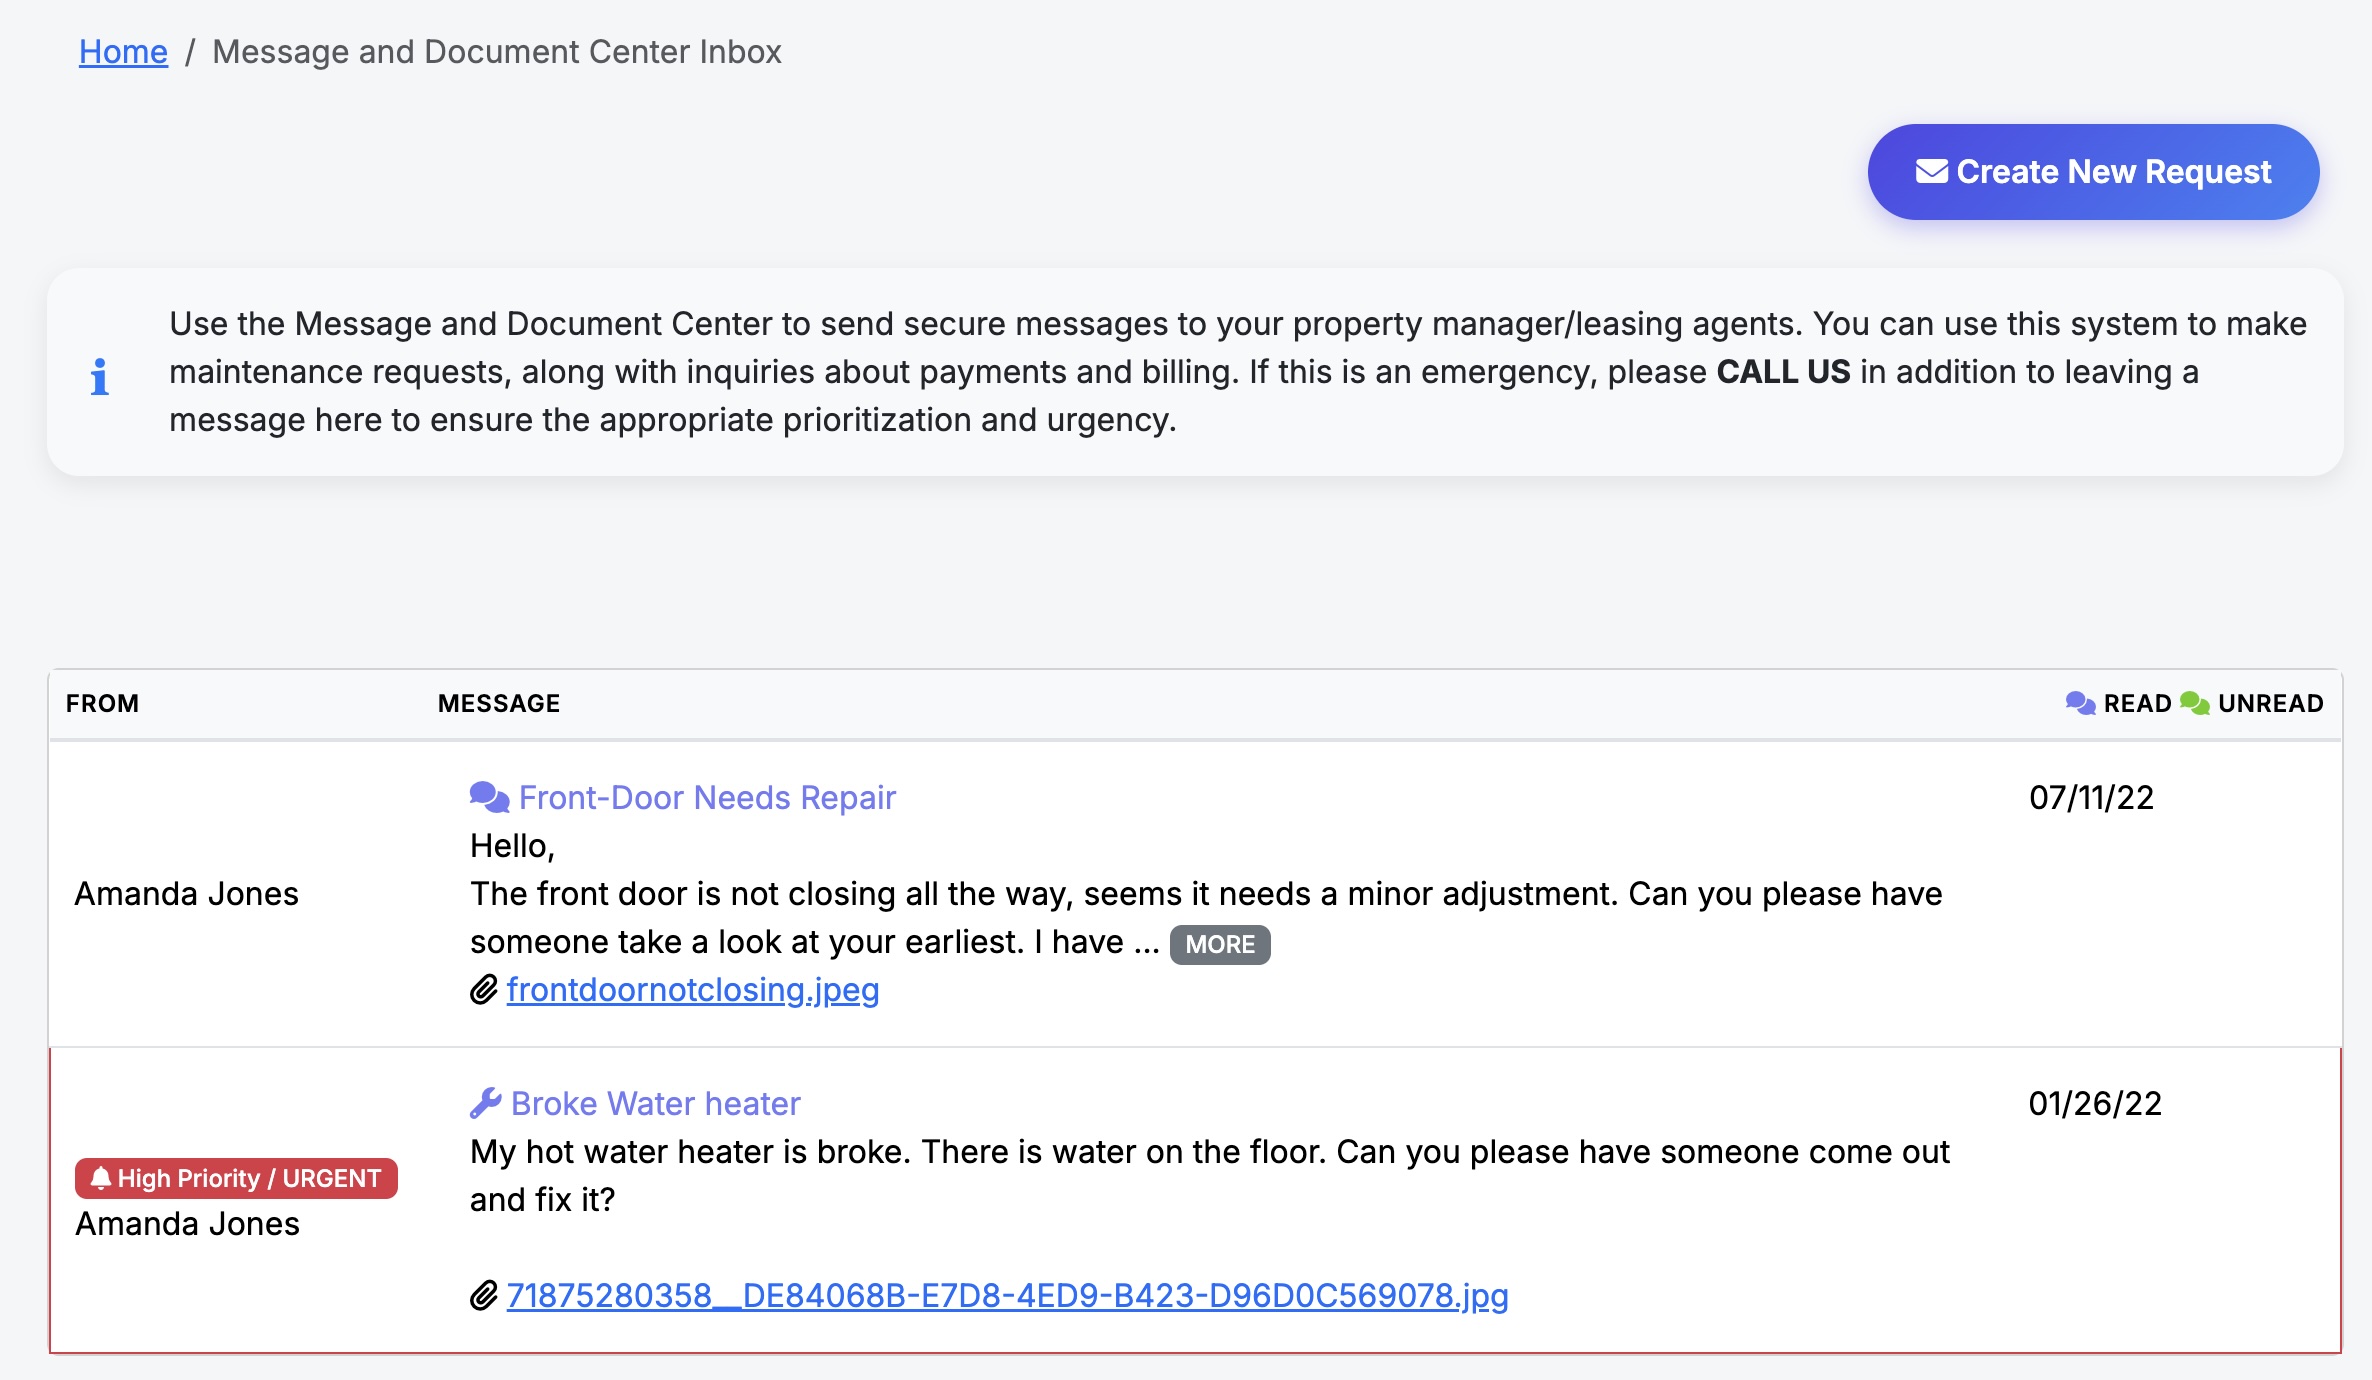
The Message Center is the central hub for all communication between you and your tenants. It is designed to look and feel like a familiar email inbox, keeping all correspondence organized, documented, and easy to reference.
Tenants can send messages to the landlord at any time from their portal. As the landlord, you have additional sending options:
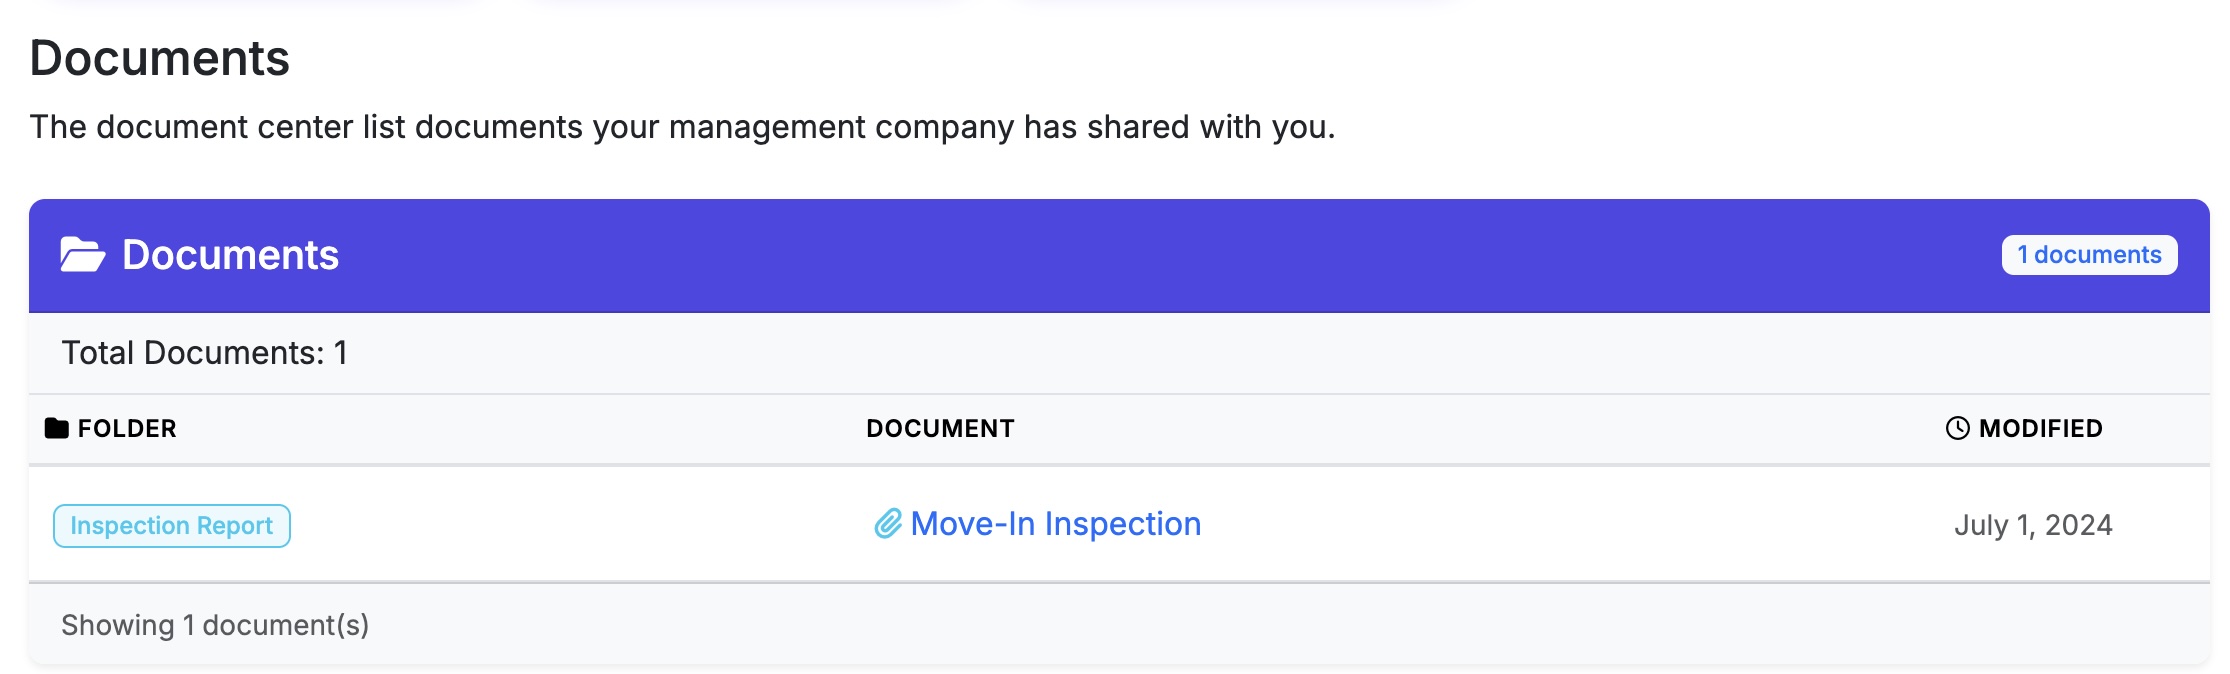
The Document Center gives you a centralized place to store and share important property-level documents with your tenants. Unlike attachments on individual records, the Document Center is designed for documents that apply broadly to a property rather than a specific tenant or lease.
Common use cases include HOA rules, property manuals, move-in instructions, insurance notices, and any general reference material tenants may need during their tenancy.
A document type is required when uploading. Select the category that best fits the content:
Control who can see each document:
| Notification Option | Description |
|---|---|
| None | No alert sent to tenants |
| SMS/Text | Tenant receives a text message alert |
| Tenant receives an email alert | |
| Both | Tenant receives both an SMS and email alert |
Communication is the most important part of property management. Our system ensures your messages are never missed by using a dual-alert approach for all key events.
Events that trigger automatic Email + SMS alerts:
How it works:
Every repair or maintenance request starts with a ticket. This keeps your records organized and your tenants informed without manual follow-up.
Automatic Notifications:
Managing a Ticket:
Tenants can report issues directly from selfservice.properties. Tenants must be logged in to submit a request — they cannot submit without a portal account. This ensures you get photos and clear descriptions without the back-and-forth phone calls.
The Submission Flow:
The Vendor directory lets you store and organize your contractors, service providers, and suppliers in one place. Keeping your vendor records complete and up to date directly improves the accuracy of your financial reports and makes tax preparation significantly easier.
Each vendor record can store the following information:
Complete vendor records unlock more useful financial reporting across the platform:
Managing a tenant move-out professionally protects you legally and ensures your property is documented before and after occupancy. Landlord Cart provides the tools to handle inspections, condition comparisons, and deposit returns all in one place.
From the Properties screen or the Tenants screen, click Inspections to access your inspection tools. You can download a printable inspection template to document the condition of the property room by room. Once completed, the form can be scanned and uploaded back into the system.
Understanding the difference between normal wear and tear and actual damage is critical when deciding what to deduct from a security deposit.
Return any funds owed to the tenant within the timeframe specified in their lease or as required by your state law. To begin the return process in Landlord Cart, go to the Home Screen and locate the Statistics Box. Click Manage Deposits to start the return. You will be given three options:
The full deposit amount is returned to the tenant. The system logs the appropriate entry on the Payments screen and closes out the account.
You retain all or a portion of the deposit as a fee to cover documented damages. The system records the withheld amount accordingly.
The deposit amount is applied to an outstanding balance on the tenant account. The system posts the appropriate entries to the Payments screen and closes out the account.
Once the deposit is processed using any of the three options, the associated lease will automatically update to Completed status.
When a tenant moves out and their lease is marked Completed, their portal account and account history are not automatically removed. All records remain intact and the tenant retains login access unless you choose to restrict it.
Landlord Cart is built for both self-managing landlords and independent property managers who manage properties on behalf of owners. If you run a property management company, here is what you need to know.
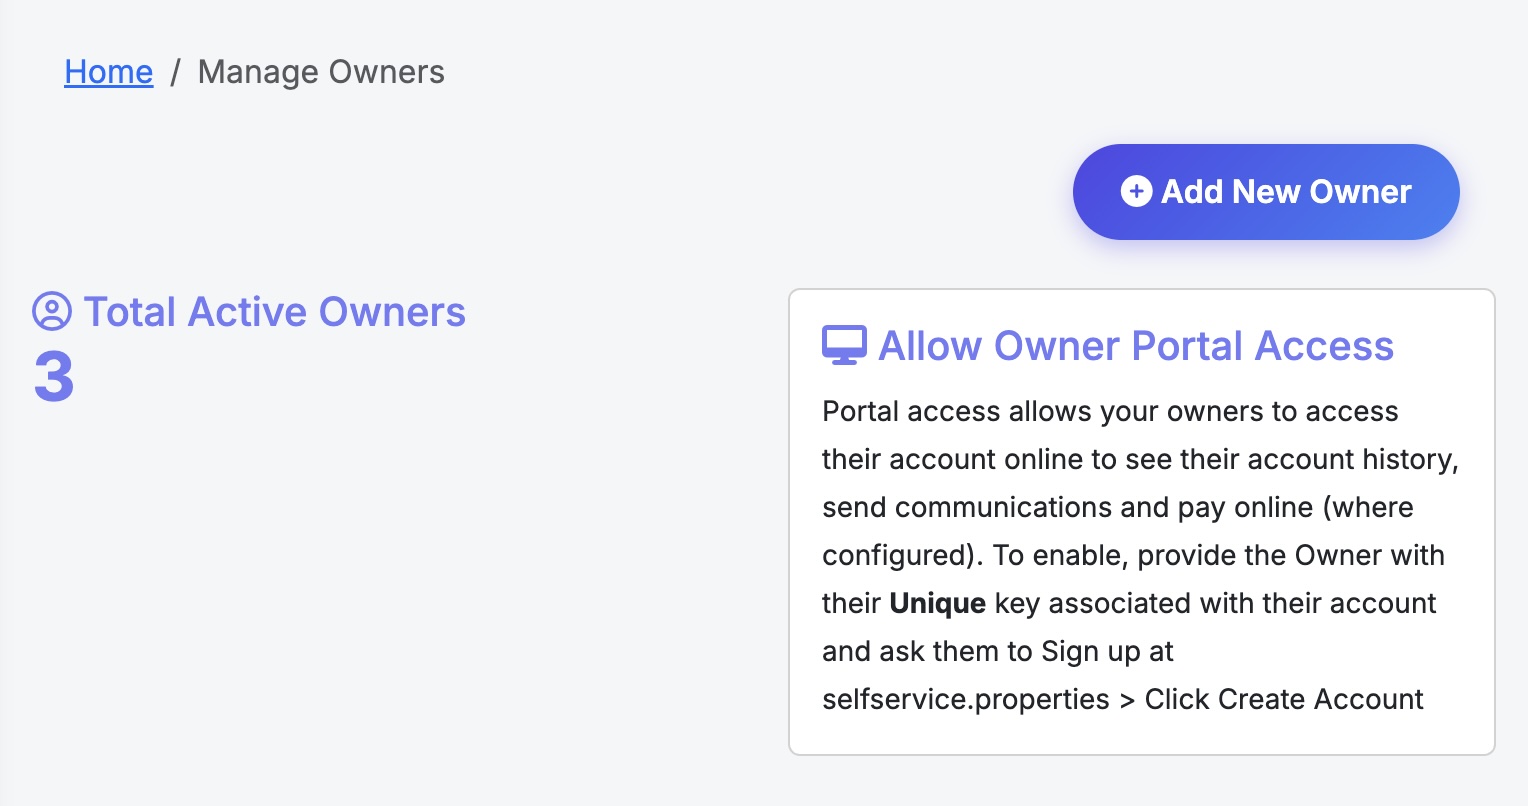
Landlord Cart allows you to add property owners, configure your management fees, and give owners secure read-only access to their financials. All owner management features are available on the Pro plan.
| Method | How to Access | What Happens |
|---|---|---|
| Link Property Owner button | Click the button at the top of the Properties screen | Takes you to the Owners List where you can click Add New Owner to create and link an owner |
| Self-Managed [Link to Owner] | Click the link shown on each individual property record | Takes you directly to the owner form for that property in add mode — the faster path if you are already on the property |
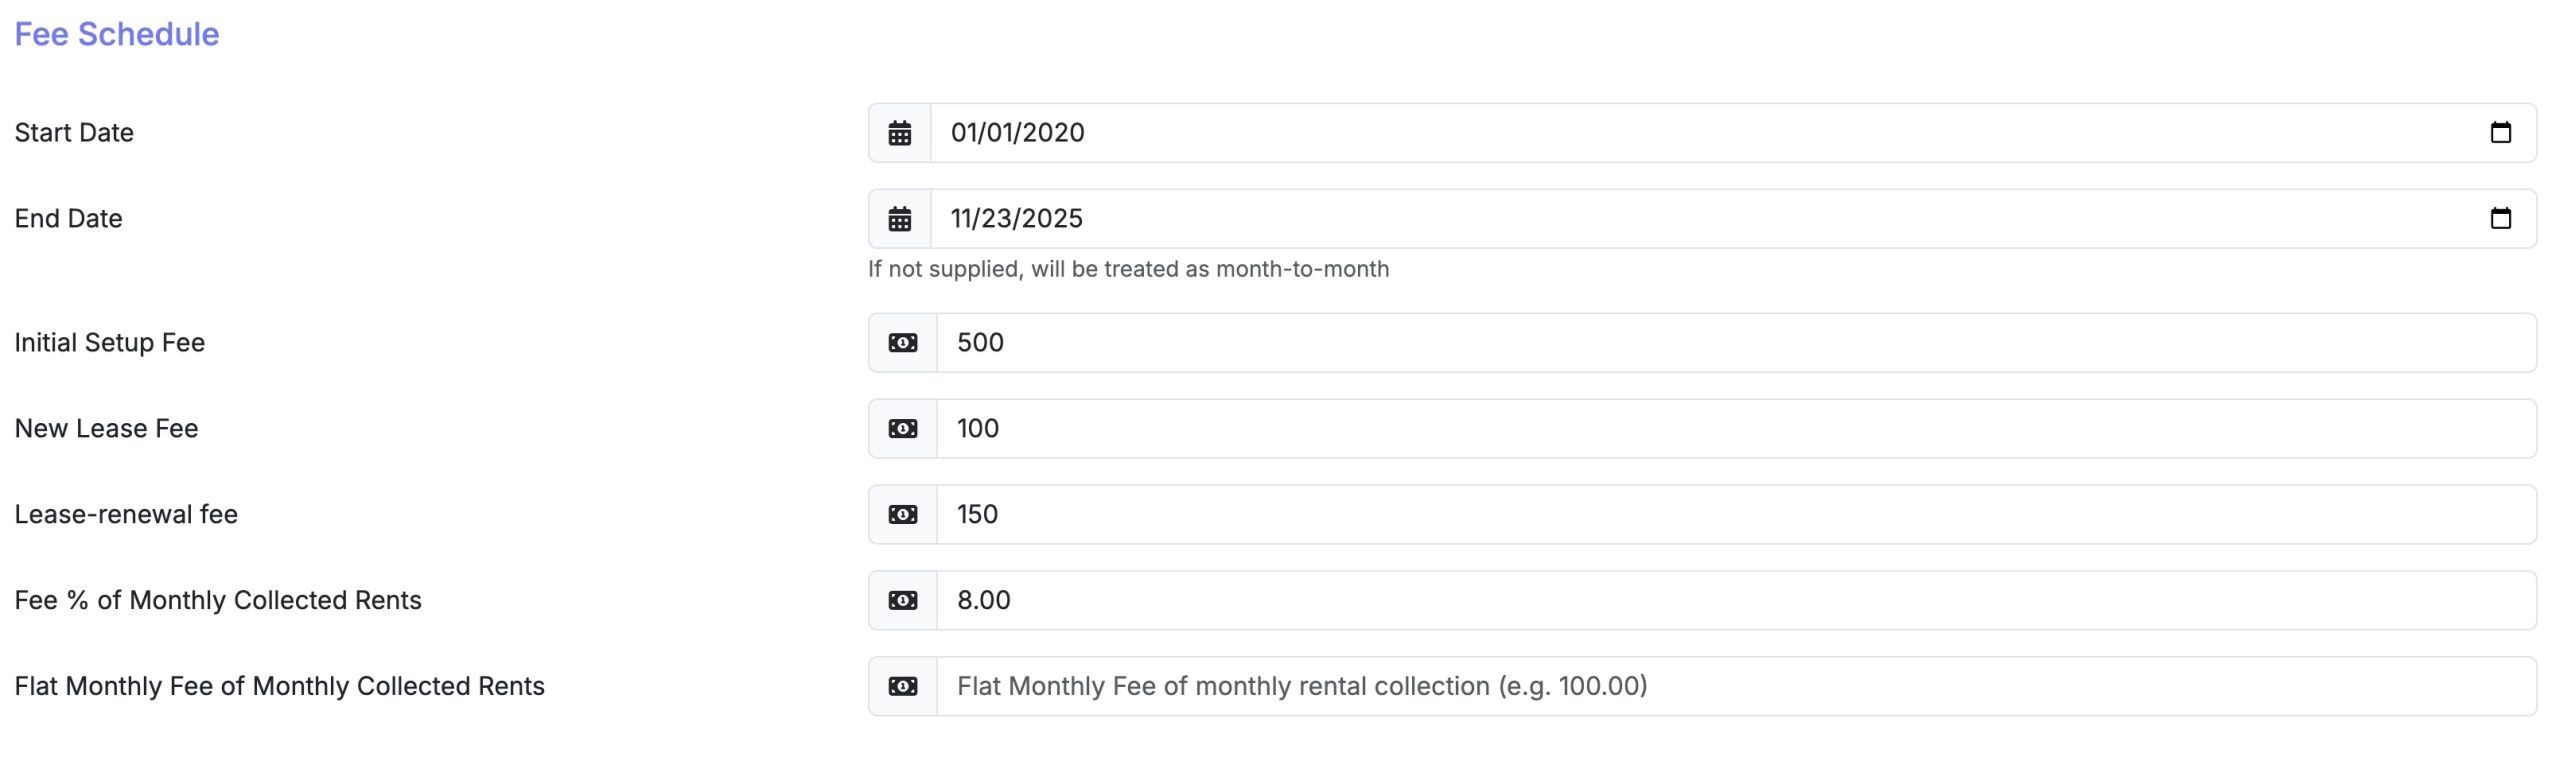
| Fee Type | Description |
|---|---|
| Initial Setup Fee | One-time fee charged when onboarding a new owner |
| New Lease Fee | Fee charged when a new lease is signed |
| Lease Renewal Fee | Fee charged at each lease renewal |
| Fee % of Monthly Collected Rents | Percentage-based management fee on collected rent |
| Flat Monthly Fee | Fixed monthly management fee regardless of rent collected |
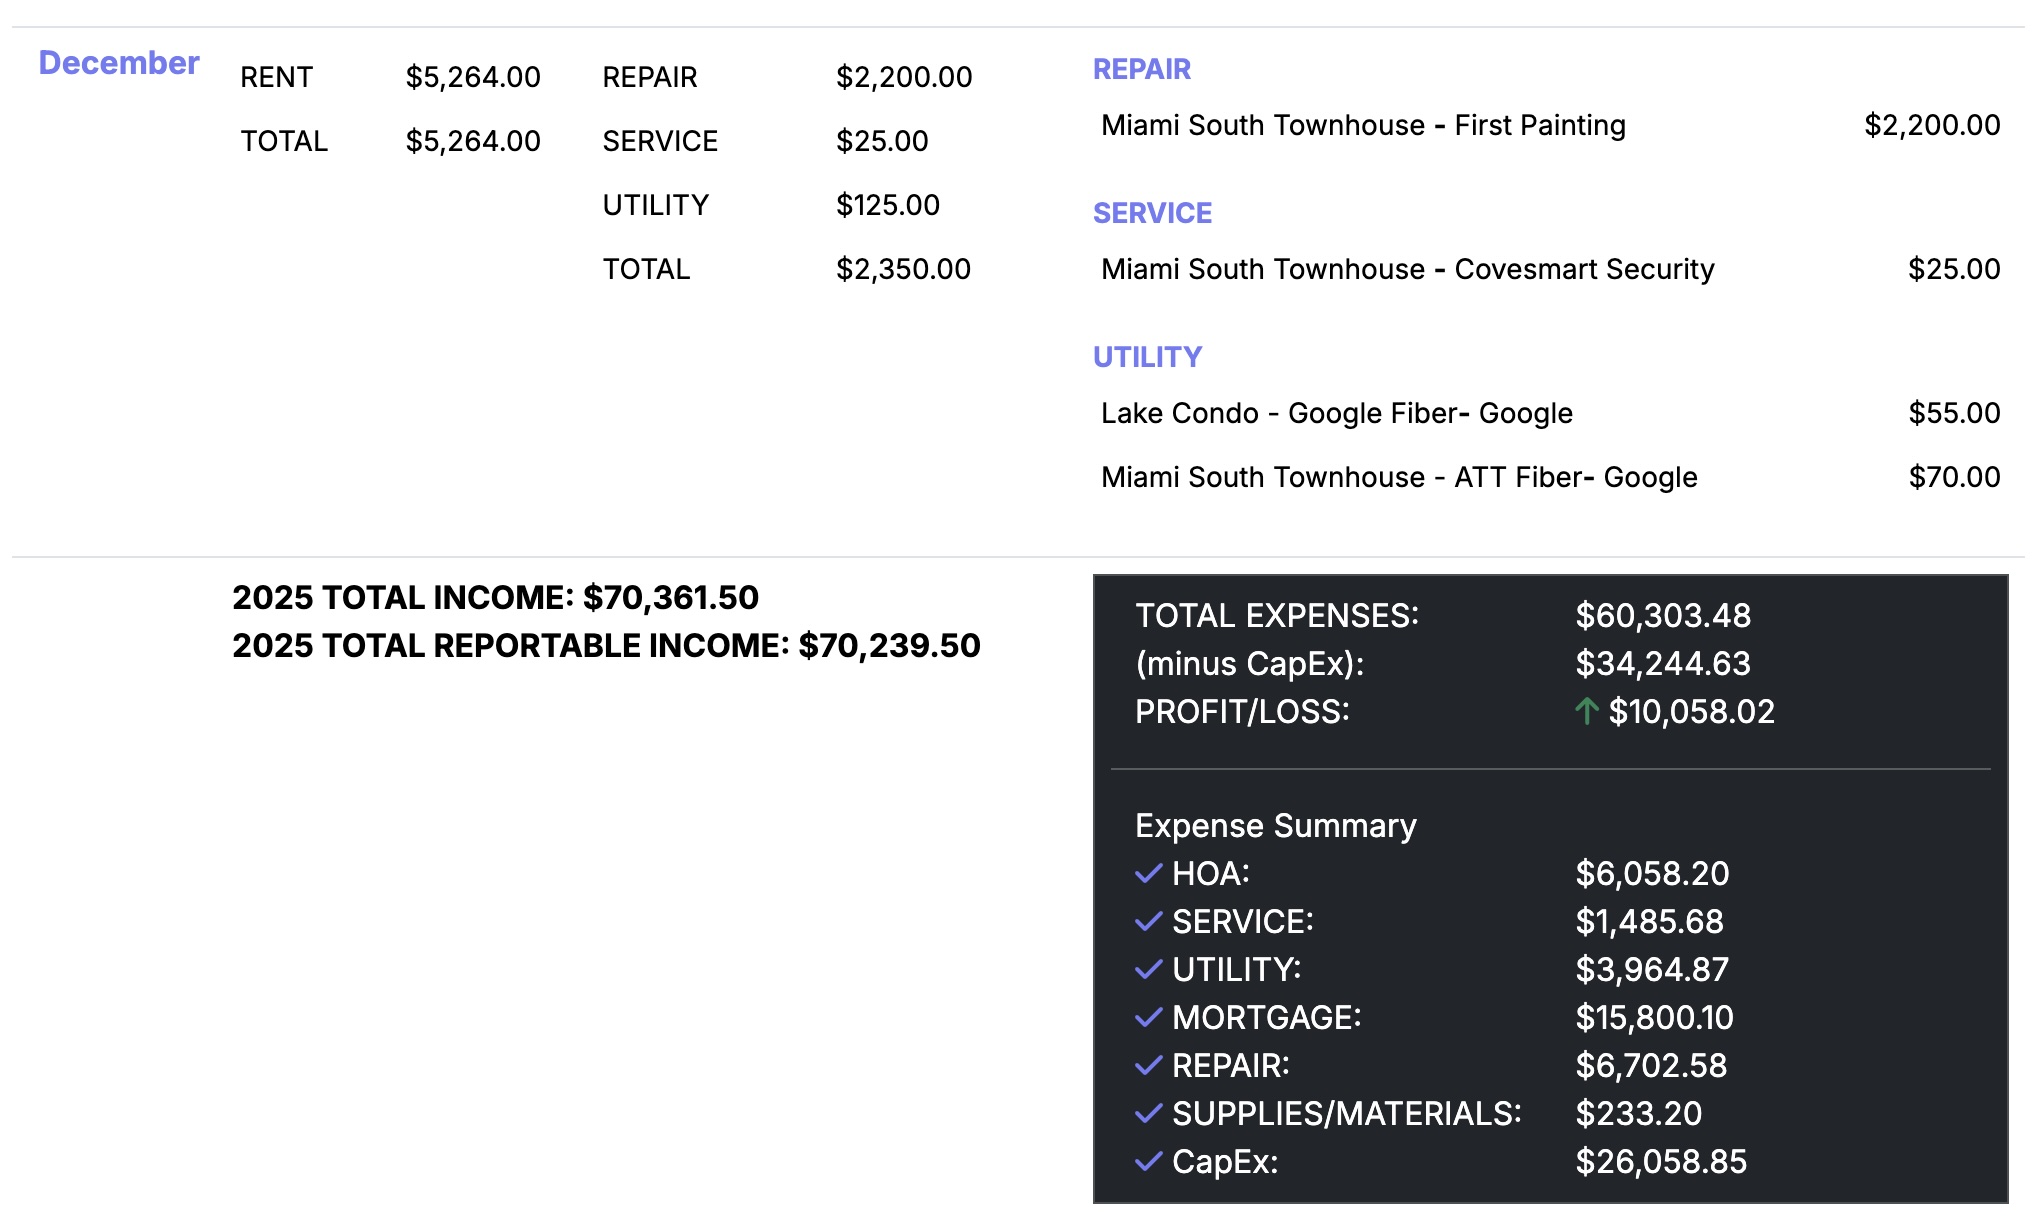
Landlord Cart includes a built-in chart of accounts and Profit and Loss report — there is nothing to configure or set up. Every time you log an expense, you simply assign it to one of the built-in categories below, and Landlord Cart automatically builds your financial picture over time. No accounting degree required — just track your expenses and let the platform do the rest.
| Category | Common Uses |
|---|---|
| Service | Landscaping, cleaning, pest control |
| Repair | Plumbing, appliance repair, general maintenance |
| Utility | Electric, water, gas, trash |
| Mortgage | Principal and interest payments |
| Tax / Insurance | Property taxes, landlord insurance premiums |
| HOA | Homeowners association dues and assessments |
| CapEx / Improvements | Roof replacement, HVAC, major upgrades |
| Supplies | Cleaning products, hardware, small materials |
| Professional Fees | Attorney, accountant, management fees |
| Bank Expenses | Processing fees, returned check fees, wire fees |
Landlord Cart calculates exactly what you owe each property owner after your management fees are deducted, but owner disbursements are processed outside the system. Here is why, and what your options are.
| Method | Best For |
|---|---|
| ACH / Bank Transfer | Most professional option, low cost, works for any amount |
| Zelle | Fast, free, works well for smaller portfolios |
| Check | Simple and documented, preferred by some owners |
| PayPal / Venmo | Convenient but may have fees and transaction limits |
| Property Management Accounting Software | Tools like Buildium or AppFolio include owner disbursement if you need it at scale |
Landlord Cart is built to grow with you. We offer straightforward, no-nonsense pricing with zero hidden fees, zero upsells, and zero binding contracts.
Our Plans:
Free Forever: Perfect for getting started with up to 2 units. Includes tenant portals, maintenance tracking, and manual expense logging.
Starter Plan ($99/year): Ideal for managing up to 10 units. Adds AI-powered late fees, SMS reminders, professional lease templates, and custom branding with your logo.
Professional Plan ($249/year): Full automation for portfolios up to 30 units. Includes a dedicated Owners Portal, white-glove migration, and AI auto-entry for expenses.
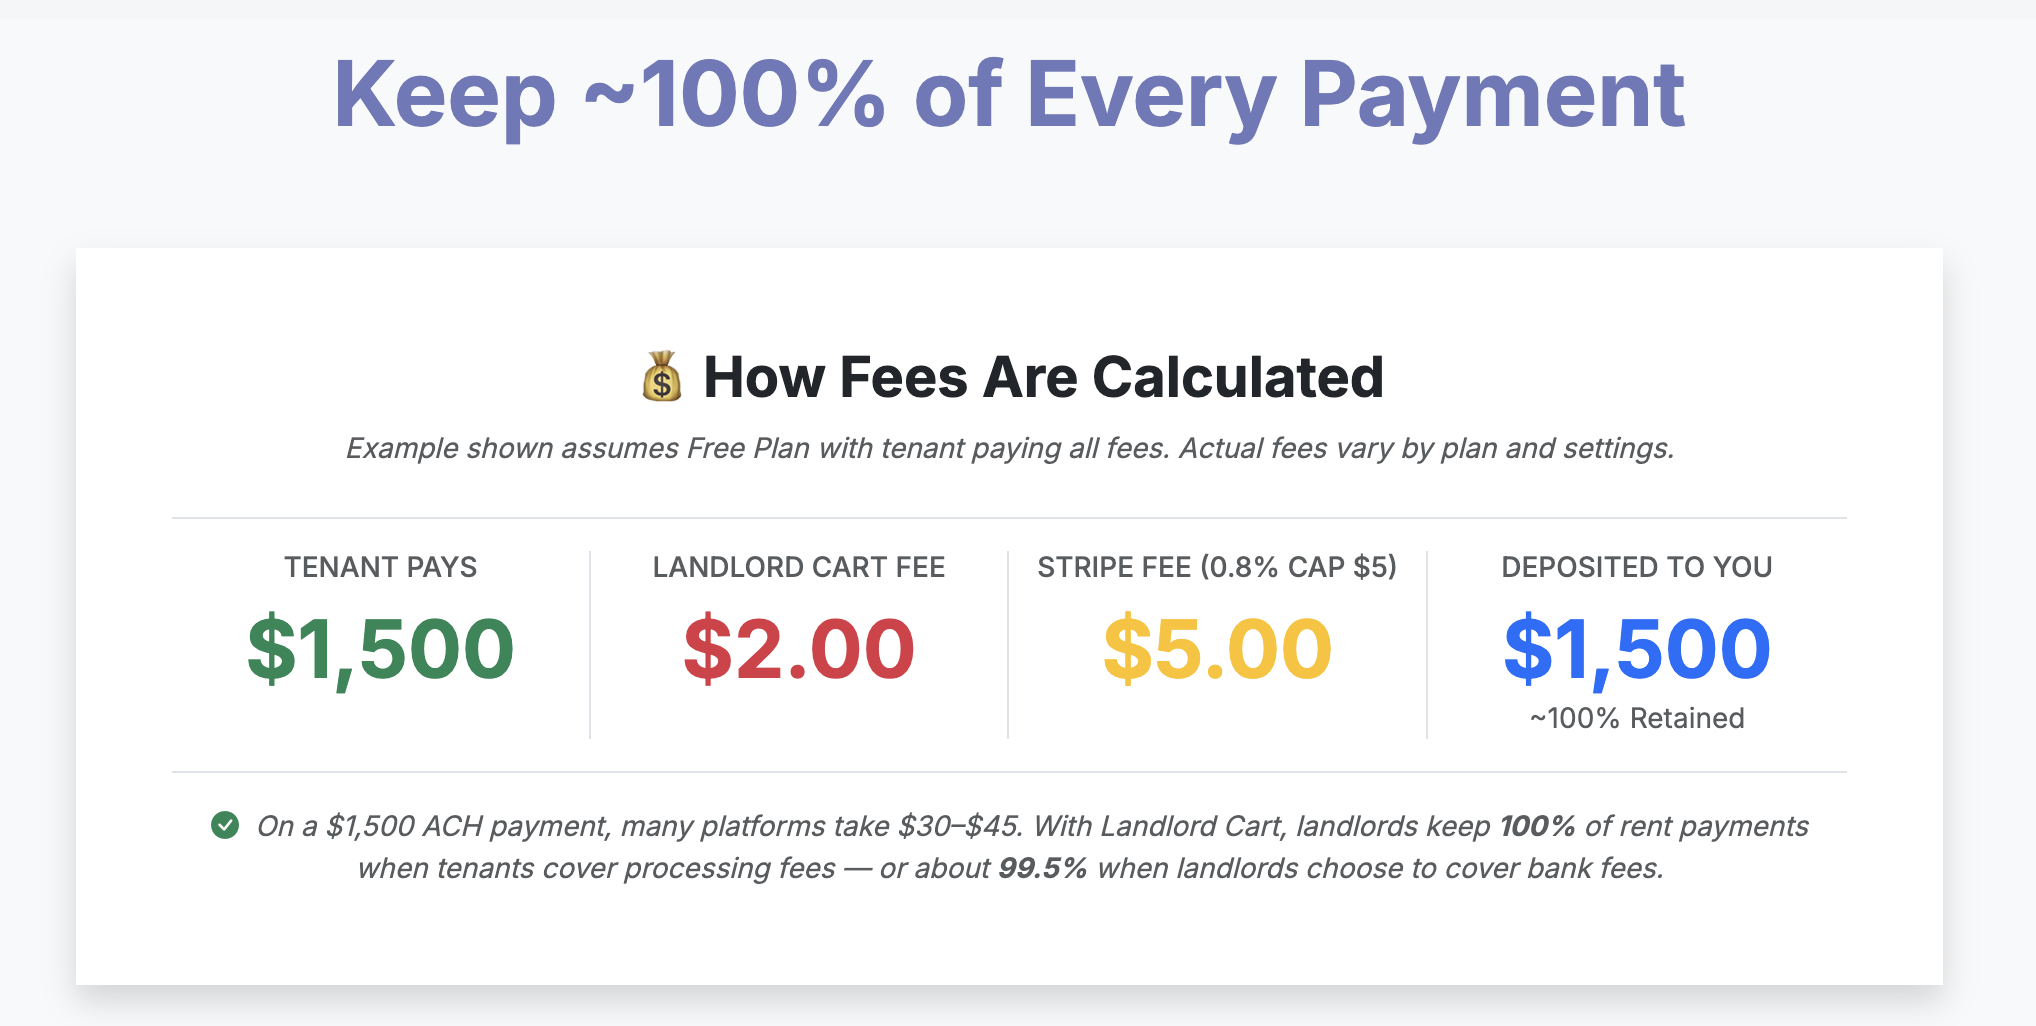
The Landlord Guarantee: In most cases, you keep 100% of your rent. The only exception is if you choose to pay platform or bank fees yourself — in that case, fees are deducted before payout. Unlike other platforms, we do not take a percentage of your cash flow. You can upgrade or downgrade your plan directly from your dashboard.
To cancel your account, contact support so we can ensure your billing is cleared from our secure payment processor.
We are a team of real landlords based in the US. When you need help, you don’t have to navigate a maze of robots — you get real human assistance.
How to Connect:
Moving from another software or a spreadsheet? We make the transition seamless so you don’t have to spend hours on data entry.
Onboarding Resources:
All data you enter into Landlord Cart — including payments, leases, expenses, messages, and attachments — belongs to you. Records and files are stored securely on Amazon AWS and are retained as long as your account is active.
If you need records exported for specific purposes such as a court case, eviction preparation, or legal documentation, our support team can assist directly.